Artillery Autumn – Jumping the traces…

My modelling continues to be dominated by my obsession to finish my Artillery project. I am having to use all of my self control not to be distracted by other more tempting models that I have recently acquired. So far , I’m sticking to the plan…’I’ve started , so I’ll finish’!

I had already decided but was further encouraged by some excellent feedback on TMP to add the traces to the limbers. I thought that this would be fairly straight forward and that it would be easily done once the horses were based. In my mind, I had decided that I needed the horses to be fixed in position to enable me to measure the traces accurately. This of course is true but the mistake that I made was that I should have prepared the horses before I had even started to paint them by drilling out the small holes where the traces would fit.

I also needed to make the traces. I had thought that I could use the wire used to hang pictures as this looks about right for the ropes. There was an issue though. The picture wire that I had was too thick and also would not work with the chain that I had in my spares box. I could go and either search out some narrower wire or a different sized chain but my patience was wearing thin and I wanted to get the job done. I decide to wind the rope myself, using some thin florists wire.

Wire traces in my bench vice

Wire traces in my bench vice

My first attempt at winding the rope was a bit patchy – I was trying to do the job by hand and the result was somewhat non – uniform to say the least. Regardless, I pressed on, and with ‘ropes’ the correct size, I was able to thread them through the chain to make my first trace.

The first trace!

The first trace!

It was then just a question of cutting them to the correct size and gluing them to the horses….it was at this point that I realised I should have drilled the holes first. Even with the smallest of hand drills, I couldn’t get an angle to make a decent hole and I was in danger of damaging the paintwork on the model. If a bad workman blames his tools, then I maybe not that bad after all, as it was my tools that came to the rescue. Using my Zuron flush cutters, I was able to get a perfect flat cut on the ropes and with a combination of Expo thick super glue and spray activator, I managed to get the traces to adhere to the horses.

First traces fixed to the horses

First traces fixed to the horses

It isn’t a perfect solution and if I’ve made it sound easy, trust me it wasn’t! It took about 30minutes to get the first trace in place during which time I had stuck it to myself about six times, ‘lost’ it on the floor, stuck it to the tweezers and developed a whole new combination of swear words, which is quite an achievement for me….Fortunately, to paraphrase an old movie poster, ‘nobody can hear you scream in the garage’.

Two traces done...22 to go! Two traces done…22 to go!

At that point, I gave it a rest for the evening. Overnight, I had a brain wave and remembered how to wind model rope from wire. The solution is simply to put a cup hook into a hand drill, fix three lengths of wire into the mini bench vice and then fix the wires to the cup hook and wind the drill at a steady pace – perfect traces every time!

The hand drill does it! Perfect traces everytime!

The hand drill does it! Perfect traces every time!

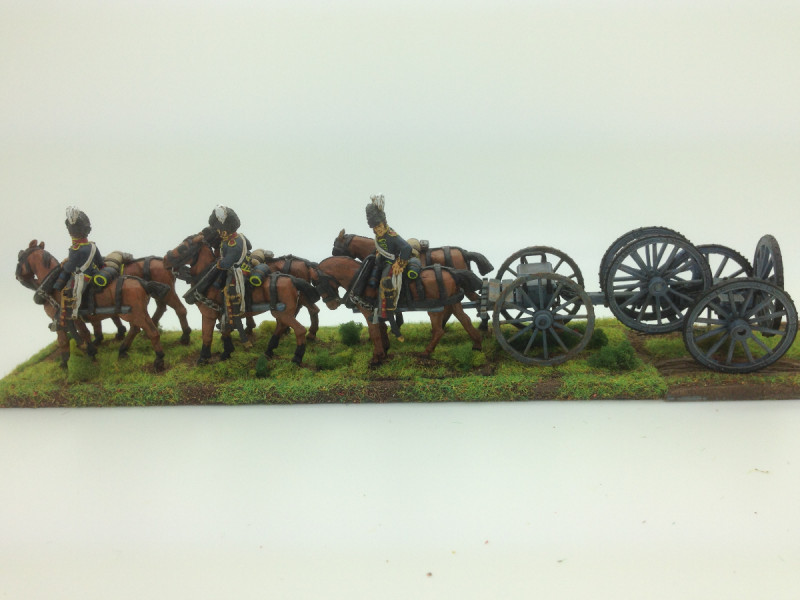
With the traces more uniform, I was able to make faster progress and over the course of the next two evenings, I finished making and attaching the traces. There is just one problem. Whilst the joints on the traces are quite strong when pulled, any lateral movement tends to dislodge them. So even with the reinforced Renedra limber bases the weight of the model will cause the base to flex – no problem – the traces flex and hold. But, pick up the model and accidentally press the traces and as likely as not they will snap off , as I have found to my cost. Despite this, I was able to finish the landscaping on the base and I think that I have a nice model for my cabinet.

Horse artillery Advance!

Horse artillery Advance!

So I now have a slight dilemma, do I add the traces to my other foot artillery limber and make it look nicer for the cabinet or do I leave the traces off and make it a more robust model for gaming? I think that I will add the traces but see if I can work out a way of drilling the horses without damaging them. There’s usually a simple solution to all problems. Hmmm, may be a bit of masking tape will protect the horses and give the drill something to ‘bite’ into…?

Horse Artillery Limber complete.

Horse Artillery Limber complete.

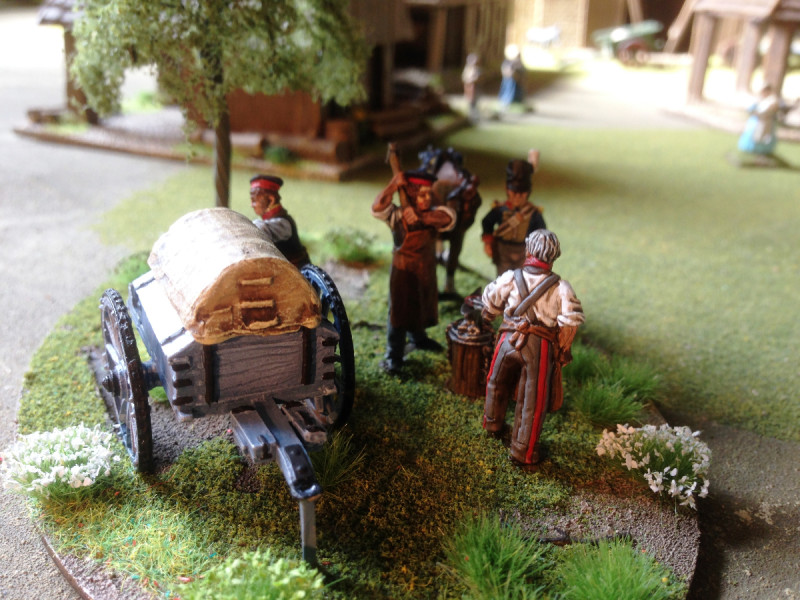
Whilst I summon up the enthusiasm to tackle the traces on the Foot artillery limber, I have decided to crack on with the crews for the guns.

Royal Horse Artillery Gun Crews - W.I.P.

Royal Horse Artillery Gun Crews – W.I.P.

At my current rate of progress it will be the end of September at least before everything is finished. I will have expanded my army collection to include a horse artillery battery of three guns and a limber and my foot artillery will have an extra 2 ( possibly 3) guns and crew as well as a new limber. With nine guns in my collection I think that I can say that I have enough British Artillery for now!

THE COMMERCIAL BIT

I have just decided to feature the three most useful tools that I used in this Project:

THE BENCH VICE

ZURON FLUSH CUTTERS

EXPO THICK SUPER GLUE

We have a huge range of tools, paints and adhesives in our range, to browse, just click into our shop using the link at the top of the page. At the time of writing, we post free to most worldwide locations.

Happy Modelling!

Battling with Black Powder

In what could be the last battle with the ‘old’ Black Powder rules set before the relaunch of the new version on the 6th October, I faced off against my long term gaming buddy Pete Harris in his new gaming room. We are both great fans of the Black powder rules set, having fought many a battle with them and enjoyed the easy going social atmosphere that the rules set bring to our games. We tend to play the ‘Vanilla version’ with very few of the extra rules from the supplements. We find that this makes for a simpler, fairer game, with less need to refer back to the rule book and fewer contentious issues to resolve. Our games are played in the course of an evening, on a smaller 6 x 4 or 8 x 4 foot table and so we use 66% movement and ranging distances. We also use half size units on the smaller tables for these ‘club’ battles. My British Battalions are actually split into 2 x 12’s, two units for the price of one! Pete has organised his French infantry into 16’s for club battles – the French are more likely to form column and 16’s look nicer. Cavalry are 6 per regiment, we simply split the full regiment of 12 for the club games. We still use one gun for our artillery but when we do get the chance to play larger battles, then we find that batteries of two guns look nice! Once on the table, there are enough figures to give the ‘feel’ of a decent sized battle but there is still space for the armies to  manoeuvre.

French Army deploy into line after a rapid advance.

French Army deploy into line after a rapid advance.

The only flavour that we have added to the basic game is to Give the French ‘Pas de Charge’ which effectively means that a level 8 general will pass orders for infantry columns on a 10. The British get first fire for their battalions but must fight in line. We do not give the Brit’s counter charge, or use any other of the rules in Albion Triumphant. These two simple changes are enough to ensure that the French will tend to be quicker to move around on the Battlefield and the British will tend to fight a more defensive battle.

The British Heavy Cavalry Brigade and the First Infantry Brigade.

The British Heavy Cavalry Brigade and the First Infantry Brigade.

Another change is our points system. It is very much simplified with standard Infantry battalions and Light Cavalry worth 2 points, Artillery 1.5 points, Lancers 2.5 points, Heavy Cavalry 2.5 pts. Add one point for D3 Heavy cavalry, Add 0.5 point for light Infantry, add 0.5 point for rifles. We also adjust by a point or so for elites, large units, small units etc. It is by no means a perfect system and how we got to those values is lost in the mists of time. However, it works and allows us to bring approximately equal forces or if required, deliberately unbalance the forces. For our battle tonight, Pete had 30.5 points and I had 31 points. This gave us both 2 Brigades of infantry and one Brigade of cavalry. If that sounds as though the forces were identical, the detail will show that this is not quite the case. For example, Petes’ cavalry brigade consisted of two regiments of Lancers and one regiment of light Chasseurs plus a Horse artillery gun. I had two regiments of Household heavy cavalry. There were other differences in the make up of our Infantry Brigades but I wont detail them here. You can see our original points system in an older blog here:

BLACK POWDER FOR CLUB NIGHTS

There’s one other rule we usually follow for a club night battle – we go off to the pub for a nice meal and a drink before settling down to play – We find this helps to put everyone in the right frame of mind! We don’t like to battle on an empty stomach!

THE BATTLE

The French Infantry occupy the Farm House

The French Infantry occupy the Farm House

The French won the initiative and immediately advanced to capture the Farm house on the British Left. The general push forward saw them advancing on the Central pass between the hill and lake and attempting to capture the large hill that would dominate the battle. The British in reply decided that the French could have the Farm complex and moved their army to the open ground on the right. This would allow them to flank the French with the heavy Cavalry brigade and a strong infantry brigade, leaving the Rifles to defend the left wing and the rest of the brigade to hold the central pass.

British Move to the right

British Move to the right

It was now that the French ran into trouble. The artillery battery trying to gain a dominant position on the hill stalled, failing it’s orders to move thereby hampering the rest of the French brigade from moving. A blunder on the left also meant the the other brigade was not moving. Even though the French Commander was able to intervene, the French were unable to fully implement their plans. The Brigade on the far left was now playing catch up in pursuing the British, whilst the French cavalry were divided and vulnerable on the right.

Brish hold the pass - Rifles hold the flank!

Brish hold the pass – Rifles hold the flank!

The British Cavalry seized the initiative and the full Brigade charged a regiment of French Lancers. The ensuing combat saw the Lancers shaken and withdrawing in disorder. Although the lead British cavalry regiment had taken wounds, it was still able to follow up and charge the French Light Chasseurs. The resulting combat saw them forced from the table and the French Cavalry Brigade were now broken.

On the left, the Rifles had taken a pounding and before too long, they were unable to stand the pressure exerted by the full French Brigade on the left, resulting in them breaking and leaving the table. They had bought just enough time for the British to bring reinforcements to the centre to hold the pass and rout the lead French infantry unit.

The British Left under pressure. Can they hold?

The British Left under pressure. Can they hold?

For 5 turns, the French Artillery unit attempting to ascend to the top of the hill failed it’s orders, stalling the brigade and frustrating the French army in its attempt to dominate the centre of the Battlefield, whilst the British continued to press from the right. The French Commander was heard to shout ‘must I do everything myself?’ in frustration, as order after order was failed by his brigade commanders!

Withe the artillery stalled on the hill, the French infantry march into a trap!

With the artillery stalled on the hill, the French infantry march into a trap!

Eventually, the large French infantry unit ascended the hill only to find that they were in the jaws of a trap and facing two gun battery’s and five battalions of British infantry. They too were routed. With the British Heavy Cavalry now rested, they were now threatening the rear of the French army. Although the French were taking a heavy toll of the British brigade on the left, the game was up for the French. The Second Infantry brigade was broken and the Army decide to pull back, leaving the British in control of the field!

Heavy Cavalry break through! Fench rear under threat.

Heavy Cavalry break through! Fench rear under threat.

POST MATCH ANALYSIS!

Once the French had captured the farmhouse it was pointless to try and challenge on the left. It is difficult to take on infantry in fortified positions, so a move to the right was inevitable for the British. The surprise was how effectively the British were able to execute their orders. Conversely, the French had appalling luck with their orders rolls, leaving the commander to pick up the pieces and do the best he could. This gave the British the opportunity to exploit their numerical superiority on the right flank, whilst holding the majority of the French infantry on the left and in the centre. For once, the British Heavy Cavalry did as ordered and were more than a match for the Lancers. The real bonus was catching the French lights on the edge of the table, they were always going to loose the combat and get pushed back from the field of battle. With the French Cavalry gone, the British were free to move their infantry without threat.

Merde! Le Gun est stuck in ze mud...

Merde! Le Gun est stuck in ze mud…

The French gave the British Brigade on the left a good mauling, breaking them in the final turn but it was too late to save the battle. The French commander was going to have a serious talk with his Brigadiers!

French Infantry advance. These guys did their job!

French Infantry advance. These guys did their job!

It’s nice to win a battle but in fairness to Pete, I should point out that the last time our forces met, he trounced my army in three turns! The dice gods can be very fickle!

THE COMMERCIAL BIT

It’s no secret that I am a great fan of the Black Powder Rules set. I think that it facilitates a great game without losing sight of the fact that the hobby is about having fun with friends whilst playing with toy soldiers.

fc57c2a7-4872-488d-8dd9-61f47aa5e874

The new version of Black Powder is due to be released in Early October, provisionally on the 6th. If you would like a copy post free, with the exclusive miniature then simply click here!

BLACK POWDER VERSION 2


Limbering up…

Well ‘Artillery August’ is coming to an end and I had planned to complete some extra support for my Waterloo based army but I’m afraid that I will fall short. To be fair, my goal of completing two limbers, and five artillery pieces and the crew was very ambitious for the amount of time that I have to paint. To put this in perspective, I had planned to paint two limbers, 12 horses, four riders on the limbers, 6 outriders, 5 cannon and 20 crew in four weeks. Still lets look on the positive side. I have completed the two limbers, four limber riders, six outriders,  6 horses and 6 more are nearly complete. I also have 2 more cannon nearly ready for service, so another month should see this project finished…

British Horse Artillery Limber completed - awaiting basing.

British Horse Artillery Limber completed – awaiting basing.

So, to back track a bit and give some details of how I went about painting these lovely models from Warlord games. I have already discussed my choice of ‘grey’ for the limbers and guns in my previous blog, 50 Shades of Grey here:

50 SHADES OF GREY AND A TOUCH OF BLUE

This article was posted on TMP and as a result of some really good feedback, I’ve gone a bit heavier on the weathering of the wheels. There was quite a discussion regarding whether the wheel rims on the wagon would really be black – they were painted so for the ‘Parade Ground’ but it was felt this paint would soon rub off in service. So I think that I will re visit the weathering on the cannon and limber wheels and make the steel a bit more obvious. This then of course leads to the debate as to how much to weather equipment and uniforms. That topic in itself would be worth a blog article or two but I think that it is a question of personal taste. I am focused on producing units for wargames to the best of my ability, with the time that I have, not diorama standard figures. If you would like to have a look at the TMP thread, click here, there is some superb research in one of the links on the British Artillery.

TMP THREAD

Foot Artillery Cannon and Limber awaiting weathering and horses!

Foot Artillery Cannon and Limber awaiting weathering and horses!

When it comes to painting the horses, I am now happy with my ‘triad’ of colours method. I prefer to start with a black undercoat, and then paint the base coat, with the other two colours wet and dry brushed over the top.

Limber horses - work in progress.

Limber horses – work in progress.

You can see that the right hand horse is a bit messy from dry brushing but once the horse furniture is repainted in black, things look a bit more natural. For the Foot artillery horse I used triad of Chocolate brown, Flat Brown and then Mahogany Brown. I added a touch of Iraqui sand to the Mahogany Brown for the final light dry brush. For the Horse Artillery Limber I used a triad of Flat Brown, Flat Earth and Cork Brown for a lighter finish.

Saddle Horse for the limber

Saddle Horse for the limber

Once the detail is painted – steel chains, brass buckles etc the horses are ready to be based. I’ll also add some white or black ‘socks’ to at least four of the horses for some variation.  I don’t usually quick shade my horses but I did use army painter quick shade to finish the Horse Artillery Horses – it does make them more durable and helps with shading the saddle blankets etc.

Horse artillery limber - Lighter brown horses after Army painter quick shade applied.

Horse artillery limber – Lighter brown horses after Army painter quick shade applied.

As always, after the quick shade has been applied, I use a brushed on Matt varnish and I will usually rehighlight any whites and metallics to get rid of the ‘dirty’ effect.

The full limber on it's Renedra Base.

The full limber on it’s Renedra Base.

I have used the new Renedra specially designed Limber bases for the limber and team. These bases are a bit thicker than normal and are reinforced underneath to help support the weight of the model. I have also used a standard 25 x50mm base to raise the limber up to the same height as the horses, who have their own integral bases moulded on.

Out riders mounted for painting

Out riders mounted for painting

To paint the out riders, I use a blu-tack ‘saddle’ to mount them on Plastic tubes. They are then undercoated with a grey undercoat and block painted. I then paint on Army Painter Dark Tone quick shade and when dry, use a brush on Matt varnish. Once this is dry, I re paint the whites, leaving any shading and re highlight the metallic and lighter colours where I think necessary.

So with one limber more or less complete, the other awaiting it’s horses and both needing the basing completed it’s just a small matter of finishing the crews of the two foot artillery guns:

Foot Artillery crews ready for priming

Foot Artillery crews ready for priming

and of course, getting on with the Horse Artillery – which is what prompted this project….

Horse Artillery still in their packets

Horse Artillery still in their packets

As you can see, I have no hesitation in mixing manufacturers figures. I think that it gives a nice variety  in poses and any minor difference in size is barely noticeable on the table. I will have Victrix, Warlord and Perry Miniatures happily mixed together on the table! So Artillery August looks like turning into Artillery Autumn but once these are finished I will not be adding any more British artillery to my army for a while…..

The Commercial bit

All of the paints, tools, brushes, glues, and finishing products are available post free from my shop here:

ARCANE SCENERY

I would particularly recommend the new Renedra bases if you have a similar project:

HORSE AND LIMBER BASES

The rather superb Warlord Limbers are not held in stock but we can order them in for you and still send post free! Use the shop contact page here:

TO ORDER THE WARLORD LIMBERS

I hope that you enjoy your modelling!

Waterloo Men

The beauty of our hobby is the many facets that can absorb you. I spend a good deal of time modelling and painting (too much according to my Wife!), I game at least once a fortnight and I spend many a happy hour researching, either on the internet or reading. I am currently reading John Hussey’s book on the 100 days Campaign. Actually, it is in two volumes but lets get Volume 1 read first! There’s another facet that I also enjoy, visiting battlefields or historical sites. I have fulfilled one ambition by visiting the Battlefield at Waterloo. You can read about some of my impressions in early Blog articles here:

BATTLEFIELD VISIT – LA HAIE SAINTE

THE HEROIC STAND OF THE INNISKILLING

Cossall Church

Cossall Church

Grand excursions like this are few and far between. However, there is plenty to keep me occupied closer to home in Nottingham. I had come across the story of Corporal John Shaw of the life guards in quite a few accounts of the Battle of Waterloo. I have written a small piece on John Shaw for Wargames Illustrated when putting together a painting guide to the Warlord Games Household Cavalry boxed set.  Shaw was from Cossall, a small village to the north of  Nottingham and I was aware that there was a monument to him in the graveyard at St Catherine’s Church at Cossall but had yet to pay a visit. So this weekend, I combined a trip to Cossall Church with a errand to go out an buy some Wall Paper for the bedroom that we are decorating . Fortunately my Wife was focused on the wall paper, whilst I was day dreaming about Waterloo!

Memorial plate at Cossall Church

Memorial plate at Cossall Church

As it turned out, the monument, erected in 1877, is a memorial to three Waterloo veterans, John Shaw and Richard Waplington both of the Life Guards and Thomas Wheatley of the Light Dragoon Guards. The latter intrigued me. I thought that there were only Light Dragoon Cavalry Regiments not Light Dragoon Guard cavalry regiments. According to the references that I have so far found, Wheatley was in the 23rd Light Dragoons. I’m not sure if it is of significance and will do some further research. Was the memorial stone creator being generous in awarding Wheatley Guard status? Whatever, Wheatley survived the battle and lived the rest of his life in Nottingham once discharged from the Cavalry.

Cossall Memorial

Cossall Memorial

Memorial inscription

Memorial inscription

I was unable to locate his grave in the graveyard although I did find other Wheatleys’ buried there – it seems likely that there is a family connection and although a recent web article speculates that the memorial is built on his grave, I am unable to confirm this.

Detail on Memorial

Detail on Memorial

Unfortunately, the church was closed and so I was unable to find further information but I will go back over at some point to see what else I can discover.

Wheatley family grave

Wheatley family grave

In the course of telling one of my wargaming buddies, Andy,  about my excursion he said ‘of course, you do know that there is a Waterloo man buried in Bingham Churchyard?’ Well despite the fact I have lived in Bingham for some 27 yaers, I had no idea! So I had a wander around the local Church yard and sure enough found the grave of Richard Holt, who served at Waterloo. Initial information indicates that he was with 40th Foot but I have yet to confirm this. If it was so, he not only fought at Waterloo but was across the Atlantic, fighting the Americans in the war of 1812. I had a chat to the Church warden but he was unable to tell me any more about Richard Holt. He did say that he had a relative called Grey, who served in the artillery at Waterloo and who was also buried in the Church Yard but the grave was now lost.

Richard Holt a Waterloo man buried in Bingham

Richard Holt a Waterloo man buried in Bingham

All in all a most rewarding weekend. I’ve commented before that History is often very close to home – it’s just a question of knowing where to look. I find it all fascinating and the stories surrounding the individuals help to bring the past alive. I do love my hobby!

If you would like to read more about the Cossall Memorial to Waterloo, click here:

WATERLOO: THE COSSALL MONUMENT


50 Shades of Grey – and a Touch of Blue?

OK, it’s my attempt at a click bait title for this weeks blog but there is some rational behind it. The title was going to be Artillery August – snappy but not quite so interesting. So what am I rambling on about?

Victrix British Napoleonic foot artillery

Victrix British Napoleonic foot artillery

My first attempt at making and painting British Napoleonic Artillery was with the release of the superb Victrix British Napoleonic Artillery set in plastic. This was in the early days of my conversion to Napoleonic wargaming back in 2010! I built the set making a battery of two 9 pounders, a Howitzer and a couple of limbers, one of which, I added horses to.

Victrix 9 Pounder

Victrix 9 Pounder

Apart from a further three guns that I finished for my Prussian detachment, I haven’t added any artillery to my army in nearly 8 years! A strange thing, given that I am fascinated by the machinery of war as much as I am by the uniforms of the period. However, I have been adding to my Artillery park by building some of the ancillary equipment.

The field Forge takes it's place in Little Bingham!

The field Forge takes it’s place in Little Bingham


Wheel wagon and Limber

Wheel wagon and Limber

two wagons and casks trent6

Supply Wagons

Perry's British Ammunition Wagon

Perry’s British Ammunition Wagon

As well as the items shown above, there is also another limber with an ammunition limber, a water wagon and a spare limber and accessories. Quite a collection, so you would think that the last thing that I needed to paint was more limbers. However, Warlord Games had released a couple of lovely limbers, one horse artillery and one foot artillery and in a moment of madness, I was tempted….It was an excuse to add some Horse Artillery Guns to my army.

I started by cleaning up and assembling the guns and then went on to do the same with the limbers. They were then primed with Army painter Neutral Grey and I was ready to paint them. And now we come to the point of the blog post title – what colour is British Artillery painted? Well the answer is straight forward enough. British Artillery was painted a grey colour. Charles Franklins superb book on British Napoleonic Artillery shows the pieces to be painted a light grey – somewhere in the book ( the exact page eludes me as I write this) he gives the recipe for the paint which is a white base with lampblack mixed in a particular proportion to produce a neutral grey finish.

The problem for me is that in 2010 when I first started painting Napoleonics, the references that I initially found seemed to indicate that British Artillery was a bluish grey. In fact if you look at the art work on the Victrix box, the cannon look as though they are almost a pale blue. So when looking for the correct colours, I was pointed in the direction of the Foundry Triple, British Blue Grey and that is what I used to paint my British Artillery.

Next batch of Cannon

Next batch of Cannon

Now that I am converted to Vallejo paints, I think that I would now use Basalt grey as the under coat and gradually lighten it using Neutral grey through the light grey for dry brushing the details. In fact I started to do so on these new guns but then changed back to the Foundry Blue Grey. I decided that it was better for my collection to match than to have different coloured artillery in the same army – and no I’m not going back to repaint what I have already finished (that is despite my OCD circuit going into overload!).

Warlord Limbers Block Painted - in Bluey Grey!

Warlord Limbers Block Painted – in Bluey Grey!

As with many colours, the lighting can influence what you see, but there is definitely a hint of blue that probably shouldn’t be there! Once the models are inked or painted with quick shade, this effect will tone down and in the normal lighting conditions that seem to be common for wargames, they will look fine, albeit a little darker than perhaps they should. Incidentally, if you doubt that the same colour can look different under different lighting compare that pictures of the supply wagon with the wheel wagon and limber. I promise you that both were painted with the same pot of paint and highlighted and inked in the same way. It is either the lighting or photography that has changed the Supply wagon to blue!

Work in progress - horses for the limbers.

Work in progress – horses for the limbers.

So August is Artillery month for me. The plan is to complete the two limbers along with the 12 horses and 6 outriders and at least three guns and the 12 crew. I hope that I can then consider this part of my collection complete for another eight years…. I will follow up this blog with progress and show off the completed limbers in the next fortnight or so. I’ll also detail the colours and painting process that I have used to get the models finished.

The Commercial Bit

Nearly all of the paints, brushes, finishes and Models and much more are available, post free from my shop here:

ARCANE SCENERY

I haven’t supplied links to every thing this week but if you look in the manufactures categories, you will see exactly what we have in stock ready to ship. If you have problems finding something, please contact us through the shop link.

If you found this article of interest, there are plenty more to browse, either by category or date but if Napoleonics is your passion, particularly British and their Allies, click here:

NAPOLEONIC ARMY

I hope that you find the articles usful. Have fun!

Prince Bernhard of Saxe-Weimar-Eisenach

Prince Bernard was the commander of the second brigade of the Dutch Second Division. It was his brigade that was the first to arrive at Quatre Bras, and joined later by the First Brigade, they held the cross roads there for some 24 hours until reinforced by Wellington late in the afternoon on the 16th. The battle of Quatre Bras is somewhat overshadowed by the much larger affair at Waterloo a couple of days later. If Wellington was ‘humbugged’ by Napoleon in the opening stages of the campaign, it was the Dutch Brigades that initially saved the day at Quatre Bras and handed back some degree of initiative and contol to Wellington.  Some commentators have said that the holding action by these two brigades of the Dutch 2nd Division was one of the most important actions by any of the coalition brigades in the whole of the Waterloo Campaign.

800px-Karel_Bernhard_van_Saksen-Weimar-Eisenach

Following the Battle of Quatre Bras, Prince Bernard commanded the Dutch Forces holding Wellingtons far left wing, including the important farm houses at Papelotte, Frischermont and La Haie. Papelotte was temporarily taken by the French but subsequently recaptured. The Dutch forces here were also responsible for linking up with the Prussians although my understanding was that there was some initial ‘Blue on Blue’ action before the two armies were joined to advance against the French!

Followers of my blog will know that I had painted up a couple of the Nassau Battalions as part of a demonstration game at the Bingham Napoleonic day, where we based the action on the Battle for Pappelotte. You can read about the fictional battle for Papelotte in my blog here:

THE BATTLE FOR PAPELOTTE

If you are interested in how I built the Sarissa vesion of Papelotte, follow this link:

BUILDING PAPELOTTE FARMHOUSE

To read how I went about painting my Nassau Battalion, you can start here:

PAINTING THE NASSAU-USINGEN

However, despite painting 36 of the Nassau-Usingen Regiment second battalion and a further 12 figures to represent the volunteer Jaeger battalion, I had not managed to complete any Staff Officers. The Perry’s produce a lovely pack of figures representing Prince Bernard and his staff and it was this pack that I decided to add to my collection. I would paint one figure as a Brigade Commander and the other two models would be based together as a small vingnette so that I could use them as an Divisional Command stand in the event that I do actually get around to painting the rest of the Division…

Prince Bernard and his staff, block painted.

Prince Bernard and his staff, block painted.

As with the rank and file I decided to take the ‘easy’ route when it came to painting the command group and simply primed the figures with Army painter Greenskin spray. It was then just a question of block painting in the other colours of the uniform. I followed my usual reference from the Mont St Jean web site and the research that I had conducted for the Nassau Infantry. It’s possible that this is incorrect for Prince Bernhard, as he may have been wearing a blue Dutch Uniform but I am not too concerned – I am painting a Commander for my Black Powder army not a specific diorama of the Prince and his staff.

The figures have Dark Tone Quick shade brushed on.

The figures have Dark Tone Quick shade brushed on.

The next step is to brush on Army Painter Dark tone Quick shade. You could use ink but I like the protection the varnish gives, especially when painting metal figures. When it came to the horses, I didn’t use the quick shade method. I’m happy with my three colour dry/wet brush technique that I find quick and easy.

The figures on horseback

The figures on horseback

Once the figures were coated with Matt varnish, I re highlighted the metallic and the lighter colours as well as retouching and obvious mistakes – although looking at the pictures now, I think I have been a bit heavy handed with the horses eyes -something I will go back and fix and perhaps a dab of gloss varnish will help.

Another view of the Staff officers

Another view of the Staff officers

I had decided that the Officer wearing the Shako would make a good Brigade Commander, whilst the Aide mounting and the Prince Bernard figure would form the command group. So the Command group would go onto a 60mm round MDF base and the lone officer would be on a 20mm x 45mm base, the size I usually use for cavalry.

Nassau Commanders based

Nassau Commanders based

I used Vallejo dark earth paste to base the figures. Simply spread the paste over the base and push the figures into it. Then use a sculpting toll or even a cocktail stick to bring the paste over the figure bases and blend them in. I also added some ‘rocks’, from my garden, for a bit of detail.

I then painted the bases with my standard basing colour – Dehli Bazaar emulsion and dry brushed this with an Iraqi Sand mix to get highlights. A bit of scatter was added and of course some tufts and flowers to finish.

The Completed Command for the Nassau

The Completed Command for the Nassau

I now have a command staff for my Nassau Brigade!

As always, all of the paints, tools and basing products are available from my shop, post free at the time of writing:

ARCANE SCENERY SHOP

The models are only available direct from the Perry’s web site here:

PERRY MINIATURES


Napoleonic Zombies!

OK, I know that the purists might find this a bit difficult but I was intrigued by these models that I found in the War Banner office. I just happened to be passing by and caught sight of these conversions and I was immediately curious as to what they were.

Watch out! Zombies!

Watch out! Zombies!

The models are made and painted by Darren Evans, co-designer of the very popular ‘Gangs of Rome’ game and so I immediately wondered if another game was in the pipeline! The short answer is no. The models were just an experiment but having a chat with Darren it was clear that there was a clever idea here for a fun game for the future. It was a great example of how perhaps people could be persuaded to have ago at Napoleonic’s without the need to invest in all the research required to turn out a Battalion of troops!

Napoleonic Zombies!

The simple back story to the idea is that during the hellish retreat from Moscow, following Napoleons disastrous attempt at invading Russia, it wasn’t just the freezing temperatures, marauding wolves and Cossack’s that threatened the French Army. Soldiers that had been driven to desperation by the cold and hunger had turned to cannibalism. Some of these poor souls, suffering a complete descent into madness, beyond all human decency had mutated into the living dead, Zombies. Refusing to leave this mortal earth they now turned on the living, caring neither whether their prey was French or Russian, just so long as it was warm…

More zombies!

And so the stage was set for a very different type of Napoleonic skirmish game. As you can see Daz hasn’t worried too much about the detail on the uniforms. I doubt very much that those involved in the retreat from Moscow were too concerned about Parade ground dress.  Which also begs the question as to why some gamers get so hung up on the ‘right shade’ for a uniform but that’s a question for another blog. As for the Zombies, they really don’t care!

Extra cold steel!

Extra cold steel!

Regarding the conversions, the figures are a mixture of mainly Warlord Games Napoleonic plastics mixed up with some plastic Zombie parts or visa versa, depending on how far the contagion had taken! Daz simply took a scalpel to the figures and hacked away, adding a skeleton arm or leg as appropriate, or a uniformed arm, leg or head to a Zombie torso. There is no need to be too careful, the rough finish just adds to the overall look. When a figure is added to a snowy base, the effect is excellent and immediately evocative of the Russian retreat. It’s only when you look closely at some of the figures that you realise there is a zombie problem!

I wish we had a horse each....

I wish we had a horse each….

The ‘normal’ French that Darren made to fight the Zombie menace were in the main armed only with hand to hand weapons. Muskets were not reliable in the freezing conditions and the idea was to make the conflict all the more desperate. The French were just fighting their way home and trying to escape the latest sinister menace that had appeared.

The muskets aren't as effective as a shovel!

The muskets aren’t as effective as a shovel!

As I have said, there are no rules as such for a game. The models were more an exercise in imagination. That said, I suspect it would be straight forward to incorporate a batch of Zombies into one of the many great Napoleonic skirmish games out there. Sharpe Practice and Over the Hills are two that spring to mind. I’m sure that you wouldn’t want to be playing Napoleonic Zombies every week but now and then, I think that this sort of stretch of the imagination brings the fun into gaming.

Fire!

Fire!

So there you are, Napoleonic Zombies – who would have thought of that? Sometimes it’s great to follow your imagination and who knows what ideas you can come up with. I think that Darren has done a great job with these figures and to see an idea through is impressive to me. Having an idea is one thing, actually making it is quite another! It’s that side of the hobby that I really enjoy and making and converting something a bit different is certainly a break from building my never ending Napoleonic army.

Zombie horde!

Zombie horde!

But in the meantime, back to Waterloo next week and my latest batch of Nassau….

The Commercial bit

If you would like to have a go at converting, we have a vast range of tools, adhesives, paints, Basing Materials and of course figures in our shop. Just follow the link:

ARCANE SCENERY


There’s always time….

With my attendance at Partizan and all the preparation that goes with it (and of course, the tidying up afterwards) my hobby time has been at a premium – but when have I said that before! To be fair, I have made some progress since my last blog. Due to the way that I work on my hobby there is always something on the work bench and I will use any spare time that I have, even 10 minutes to keep things moving along. I am lucky in that I have a permanent place to paint and model, so it is easy to pick up where I last left off and do a bit more to a model.

I was chatting to someone about this at work. Paul, was saying how he was so busy that he didn’t have time to do any painting. The problem was that he was looking for a spare morning or afternoon or even a day when he could really get stuck into his project. I find that such blocks of time are difficult to come by these days and I tend to work in short bursts – sometimes just 2 minutes! Yes, seriously. If the next stage of a model is to slap some texture paste on to the base, then it only takes a couple of minutes to do this. It will take 2 hours for the paste to dry but if I can get this job done just before I leave for work, then I know that it will be dry when I get home and it will take another two minutes to paint the base and so on.

The same goes for the evenings. I may be too weary to spend the evening modelling but just half an hour or an hour gets a lot done, so I just focus on the next step in the modelling process rather than what needs to be done to finish the model, if you see what I mean. So since the last blog, some 14 days ago I have only finished one model/project. As you can see, Kojiro is now completed

Wargames Illustrated Special Edition Models now completed

Wargames Illustrated Special Edition Models now completed

However, I have made progress on a whole lot of other projects. I mentioned that I would be working on another unit of Nassau infantry. Well over the 14 days they have gone from bare castings, primed and the start of the batch paint.

Nassau Volunteer Jaeger on the work bench.

Nassau Volunteer Jaeger on the work bench.

The (poor) photo above shows the figures 7 days ago. The back rank is primed green and the flesh and hats painted. The front rank (out of focus) shows that I have yet to add any black.

Volunteer Nassau - next step

Volunteer Nassau – next step

This photo shows as they are now. ( I promise all 12 are at this stage!). Yes, they are a long way off being finished but I’m happy that progress has been made. I know the next step to be painted – I’ll be painting the gaiters dark grey and then I’ll start the straps with yellow ochre. It wont matter to me whether I do both colours on all figures or just paint the gaiters on just two of them. So long as I am moving forwards, I’m happy. Now I know that 14 days to get to this stage seems like very slow progress but it is progress and I will soon have another unit for my Napoleonic Army.

But that’s not all I’ve done. Taking a break from painting, I’ve assembled the next set that I would like to complete in the Test of Honour Range – Daimyos Retinue.

Daimyos retinue, under construction

Daimyos retinue, under construction

The majority of these were assembled over at Jaz’s house one evening. We took a break from gaming and just had a hobby night. I had never thought of modelling as being a social hobby but I was once again surprised as to how much I managed to get done whilst chatting away with my war gaming pals. So Seven mounted Samurai are nearly ready for priming.

Musket men and Sergeant of archers

Musket men and Sergeant of archers

Building the Samurai cavalry gave me the urge to go back to some spare plastic ashigaru and assemble them as Musket men and I also needed a Sergeant of Archery to complete all the figures that appear on the cards. The musket men will be to go with Nobunaga – as this figure allows you take musket men for just 2 points each, I decided that I wanted at least two bases of them. I also decided to add some extra pouches using green stuff. I’ll never make a sculptor but they look passable enough. Interestingly, I ran out of time and rather than waste the green stuff, I used the excess to make some rocks on the Sergeants base. These models were actually assembled while I was sitting out in the garden with a glass of something cold and chatting to Julie.

British Artillery

British Artillery

Finally, on the work bench are a couple of cannon that I am planning to add to my army. They were kicking around in my lead pile and it wasn’t a long job to get these assembled and ready for priming. I’ll probally prime these at the same time that I prime the Samurai horses, so they will be ready for painting.

So as you can see, I haven’t done much in the last 14 days…

The Commercial bit

You can get most of the modelling supplies that I use from the Arcane Scenery shop. Even better, it’s still post free for most world wide locations!

ARCANE SCENERY

If you would like to stay up to date with latest releases, wargaming gossip and the occasional post as to what I am up to in the garage, follow us on Facebook;

FACEBOOK

Painting the Nassau-Usingen Battalion. Part two, Batch paint

In my last blog I gave some back ground into how and why I was painting Nassau troops for my Napoleonic Army. This week is just a walk through of the basic steps in batch painting the unit. I was on a fairly tight deadline with about three weeks to finish the unit. For me getting 24 troops finished in that time would be a record but I had a plan! Actually, the unit would eventually consist of 36 troops but I quickly realised that this was just not going to happen. I am using the Perry’s metal Nassau troops to build my unit and my painting guide is the plate from the Mont St Jean site – see last weeks blog for more details.

I wont go through the preparation stage other than to say although the Perrys models are beautiful sculpts, some of the castings need a bit of work to get rid of the flash and feeds. There was nothing that couldn’t be sorted with a quick file and scrape with a scalpel. Once cleaned up, I blutack the models to a temporary base and using the Army Painter Green skin primer, sprayed the figures. When batch painting, I usually work on batches of 6 to 8 models to start with. That said, if I am familiar with the colour scheme, I have painted up to 24 in one go.

The first batch of Nassau primed with green skin!

The first batch of Nassau primed with green skin!

Once I had checked that primer had covered the models, the batch paint starts with the faces and hands. I use Vallejo colours from now and I will list the colours used at the bottom of the blog. With the flesh done, my next colour is usually Black, to paint the hats, boots, sword scabbard, cartridge case, collars and cuffs.

2018-02-04 17.26.50 Flesh and Black added.

The next stage is to work through the equipment. I used leather brown for the hair, backpack, bayonet scabbard, and water bottle strap. This is an example of me cutting corners – if you want a more professional look, you would vary the hair colour and use different shade of brown for each item but these are war games figures and I am on a deadline! I used yellow ochre for the straps, off white for the food bag, black grey for the water bottle and sea grey for the blankets.

Nassau, main equipment done.

Nassau, main equipment done.

Each of the centre companies have a different coloured plume on their hats. Company 1 is yellow, Coy 2 is white, Coy 3 is Blue and Coy 4 is black. Orange was used to paint the rosette on the shako. The next stage was to paint the metallic colours, brass for the hat badges and chin straps, detail on musket and sword.  I use steel for the muskets and bayonets. I also painted the piping around the collar and cuffs and tidied up any obvious errors.

Voltigeurs block painted

Voltigeurs block painted

The picture above is a bit of a cheat as this is the Voltigeur company that actually was not ready for the battle! However, it does show the figures at the block painted stage. The figures are now ready to be painted in quick shade – I use the black or dark tone. Note that I don’t dip the figures as suggested by the manufacturer. I find this wasteful and messy. Simply use an old brush to apply the quick shade and you will have a better control over the finish. As a side issue, I decided to give some of the light company off white trousers, just for a bit of variance.

Nassau Grenadiers - quick shade applied

Nassau Grenadiers – quick shade applied

The picture above again is a bit of a cheat in that these were also not ready for the battle but it shows a unit with the quick shade applied and the first coat of matt varnish. I have now resorted to brushing on matt varnish and currently use the artists Galleria varnish. I have had a few recent mishaps with spray varnish and the Galleria seems to give a better finish.

Nassau line Companies ready for basing!

Nassau line Companies ready for basing!

A closer look at the Nassau line

A closer look at the Nassau line

As you can see from the pictures above, the unit of 24 is complete and ready for basing. The figure on the end is from a the casualty pack and I added him in for a bit of variety. To base the figures, I use Renedra plastic bases or I am happy to use the Sarissa MDF bases. In this case, my haste led me to choose Renedra as I had some spare at home (I usually use wood bases for metal figures, plastic for plastic figures). I thought that I was using 60mm by 40mm but in my rush, I picked up 60mm by 45mm by accident. It’s not really an issue for me as depth of bases is often of no particular consequence in rules sets and certainly not in Black powder. I will be more careful in future!

When using the Vallejo paste , there no need to glue the figures to the base, the paste will secure the models. Just draw some of the paste up around the base to hold the figures in place. Once the paste is dry, I give the base a coat of Vallejo Chocolate brown to blend everything together and then add some Iraqi Sand to provide highlights.

Nassau Grenadiers based

Nassau Grenadiers based

The picture above shows the Grenadiers based and I have added some Woodland Scenic scatter to represent grass and to help blend the bases together. The final part of the process is to add some grass tufts and a few flowers – yellow seemed appropriate.

The Nassau line based and ready for action

The Nassau line based and ready for action

The picture above shows the bases completed. There is one step that I have missed out from my narrative. Once the figures have received their coat of matt varnish, I will go back over some of the lighter colours and metallics to tidy them up and make them shine out. So the collars ,cuffs and piping were highlighted with flat yellow, I used gold to highlight the brass and silver for the bayonets. I also retouched the yellow ochre where the quick shade had ‘dirtied’ it down too much.

Nassau - Ussingen 2nd battalion almost complete. Just the Voltigeurs to add.

Nassau – Ussingen 2nd battalion almost complete. Just the Voltigeurs to add.

So the 24 figures in the line Companies were completed ready for the battle and I have nearly finished the Voltigeurs and Grenadier company’s. I now have a large unit of Nassau to add to my Napoleonic army. Next up, the small Jaeger unit and of course Prince Bernard of Saxe-Weimar to complet and my lead mountain will return to it’s starting level in February.

Despite taking casualties, the Nassau hold the gate at Papelotte!

Despite taking casualties, the Nassau hold the gate at Papelotte!

The picture above shows the Nassau ‘in action’. Papelotte was held – whether the battle was won is another matter! Below are just some shots of the finished Battalion taken in front of Papelotte at a later date.

Nassau command - still waiting for a flag!

Nassau command – still waiting for a flag!

Nassau Voltiguers

Nassau Voltiguers

Nassau Grenadiers

Nassau Grenadiers

The final two pictures show that I did manage to get the Voltiguers and Grenadier companies completed – my photography skills don’t allow a full picture of the 36 man unit but hopefully, you will get an idea of how the battalion looks.

The Commercial Bit!

The Vallejo colours used were as follows:

Flesh 70955,  Black 70950, Leather Brown 70871, Yellow Ochre 70913, Black grey 70862, Medium sea grey 70862, Off white 70820, Steel 70864, Brass70801, Flat yellow 70953, Silver 70997, Gold 70996, Orange red 70910, Light Orange 70911.

All paints are available, post free at the time of writing,  from the Arcane Scenery shop here:

VALLEJO MODEL COLOUR

Tufts and basing stuff is here:

BASING MATERIALS

For more updates, blogs and new release information, please remember to like us on facebook

FACEBOOK

Painting the Nassau-Usingen Battalion. Part one, the plan….

Back in March, I was a participant in a small Napoleonic demo game we had put on to support the Bingham Napoleonic day. We, being my two gaming buddies, Pete and Andy. I had already agreed to finish my model of Papelotte in time for the battle and I surprised myself by completing it way ahead of schedule. You can read all about the day and the battle here:

THE BATTLE FOR PAPELOTTE

Papelotte is secure!

Papelotte is secure!

With the main scenery piece completed I turned my attention to the troops involved. Our battles usually tend to be a nod in the direction of historical accuracy and if we haven’t got the exact order of battle we are happy to improvise. However, when I checked my Waterloo companion for the OOB, it was clear that one of  the most significant deployment of allied troops in this area was the 2nd Nassau-Usingen Regiment. Whilst we had plenty of Hanoverians, a contingent of Dutch and Belgium and plenty of British and French troops, none of us had any Nassau. There was even a provision for the Prussians to arrive and we had even talked about using some Portuguese troops as reinforcements! Actually, this turned out to be not so daft as I thought, as Wellington had the same idea, but that’s for another blog!

I thought that I would have a go at painting at least one unit and so ordered some figures from the Perry’s Web site. Of course it wasn’t that straight forward. First I had to do a bit of research and to be truthful, I tied myself in knots trying to figure out what Nassau was which. There were the Orange Nassau Regiment, otherwise know as the 28th Nassau, comprising of 2 battalions and a small Jaeger battalion. The Nassau-Unsingen regiment consisted of 3 battalions of which the first was sent to help defend Hougomont and the second and third battalions, present at Papelotte. The Perry’s web shop list the first and second battalions as separate packs as there does seem to be a difference in their uniforms. The third battalion isn’t mentioned, so presumably it’s identical in uniform to the second, the battalion that I was interested in.

InfanterieNassau02(fusiliers)

A quick check on the wonderful Mont St Jean site seemed to confirm my thoughts so I went with the second battalion. Now usually I am pretty rigid in painting my battalions as units of 24 figures but I noticed that the Nassau battalions were quite large and consisted of around 900 men. This is significantly more than the usual 600 that were present in British Battalions at Waterloo. There are also some significant differences in uniform within the battalion which is divided into 6 Companies. The four ‘centre’ companies or Fusiliers, are identical apart from the different coloured cap plumes but the Grenadier and Voltigeur flank companies are quite different.

The grenadiers!

The grenadiers!

After a great deal of thought, I decided that I would have to go with 36 figures in  a regiment and placed my order for a command pack, 3 centre company packs, a pack of Grenadiers, a pack of  Voltigeurs and while I was at it, the casualty pack and two packs of Volunteer jaegers. Oh! and the very nice models of the commander Prince Bernard and his staff! And that, my friends, is how that lead mountain accumulates!

The Voltigeurs

The Voltigeurs

Then reality set in. How was I going to have these figures finished in the three weeks that I had before the battle was due to take place? As I had said, my research was cursory at best and I hadn’t even thought about what colours I would use. Fortunately, Dave Woodward happened to call into Arcane Scenery for some paints. Dave actually painted the models used on the Perry’s web site so I pinned him into the corner and interrogated him as to what colours he used! ‘I don’t know’ he cried ‘it was ages ago that I painted them’.  Fortunately, Dave is a great guy and he helped me to work out a basic colour scheme that would give me a fighting chance to at least get some of the figures painted for the battle.

The cunning plan that he came up with was to spray the troops with Army painter Greenskin primer. This colour is perhaps a bit bright but I intended to use quick shade which would dull it down. The other significant colour was the cross straps on the uniforms and the yellow stripes and facings. The answer was Vallejo Yellow Ochre 70913. The rest of the colours were pretty straight forward and using the pictures from the Mont St Jean site as my guide, I could press on and batch paint the battalion!

You can see how I did this in the next blog!

The Commercial bit and useful links

You can see the Mont St Jean reference for Nassau here:

NASSAU UNSINGEN REGIMENT

The Sarissa version of Papelotte is here:

PAPELOTTE

Vallejo model colour paints can be found here:

VALLEJO

The Perry’s web site is here:

PERRY MINIATURES


The Battle For Papelotte

One way or another, March has been a beast of a month! What with two bouts of snowy weather causing disruption both at home and work, a radiator bursting ( old age not cold…) flooding the bedroom and dining room, a brace and a half of significant Family Birthdays (Father in Laws 80th, Wifes 60th and Granddaughter’s 5th) all topped off with yours truly going down with a nasty dose of man flu, Hobby time has been at a premium.

Despite all of that, the month started with my attendance at the Bingham Napoleonic weekend on 3rd March. I was there with my two gaming buddies , Pete and Andy to run a demo wargame based on the action around Papelotte, Waterloo 1815. The previous year we had run a similar game based on the action at Quatre Bras with some success, so we thought a continuation into the next day would be fun. Andy, who does the organisation & research had decided that the action around Papelotte is very much under represented in favour of the other ‘big’ moments in the battle. I also had a very nice Sarissa Precision model of Papelotte lying unfinished in my garage so it was an excuse to get on with the model for the day!

You can read how I went about finishing the model for the Demo game here:

PAPELOTTE IN PROGRESS

The other attraction of basing a game around Papelotte was that most of the Allied Soldiers fighting there were actually Allies, not British Redcoats, so a force of Nassau, Dutch-Belgium’s and Hanoverian troops would be taking on the might of France. Of course, we didn’t follow the exact script or order of battle. Andy likes to have a bit of ‘what if’ in his battles – it gives us armchair generals something to pontificate about whilst munching our mid morning bacon cobs….

The rest of the blog is a bit picture heavy but should guide you through the battle as it unfolded.

Dutch Jaeger deployed outside of Papelotte.

Dutch Jaeger deployed outside of Papelotte.

2nd Nassau were deployed inside the farmhouse - hold at all costs!

2nd Nassau were deployed inside the farmhouse – hold at all costs!

French cavalry scout the battlefield

French cavalry scout the battlefield

Once the French Cavalry had scouted the area, the French Columns deployed to take the Farm house and capture the ridge, pushing Wellingtons left flank back and preventing him from reinforcing his centre.

The French Advance!

The French Advance!

Despite reaching the road running across the ridge, the French advance is held by the Hanoverian Landwehr.

Hannoverian Landwehr hold the line!

Hannoverian Landwehr hold the line!

At Papelotte farmhouse, the light Jaegers were quickly overcome and the assult of the farmhouse began.

The skirmishers are overcome

The skirmishers are overcome

Despite taking casualties, the Nassau hold on.

Despite taking casualties, the Nassau hold on.

The road was fiecely contested!

The road was fiercely contested!

The French were very determined!

The French were very determined!

Meanwhile, the Dutch & Belgian troops had managed to redeploy and march to relieve the pressure on Papelotte.

Dutch - Belgians save the day

Dutch – Belgians save the day

Catching the French attackers in the flank, they push them back, and Papelotte is held!

Papelotte is secure!

Papelotte is secure!

If Papelotte is secured and with it, the corridor for Prussian reinforcements to arrive, the battle is still in the balance. The French General decides to ignore the farmhouse in favour of a push on the ridge.

Take the ridge!

Take the ridge!

Advance!

Advance!

French Pressure begins to win

French Pressure begins to win

The determined French attack on the ridge now began to have it’s effect and despite reinforcements, the Hanoverians were pushed back. As yet, there were no signs of the Prussians arriving to help out either. Clearly they had be delayed!  Wellington would be forced to shore up his left wing to hold the French back. Would this have made a difference to the overall battle? Well, it was a good time to stop for cakes & coffee and consider the position!

The battle is ours!

The battle is ours!

And so the battle drew to an end. We had played the game at a very lazy pace although we had few opportunities to talk to visitors – the bad snow fall had meant that visitor numbers to the show were very low. The show had been held on the same day as Hammerhead and despite Hammerhead being cancelled, this seemed to have the effect of dissuading anyone from travelling to Bingham, even though the major roads were open.

It was a shame that the event was so quiet as there were some very interesting speakers and guests on through out the day. Perhaps if you are free next year, you might like to pop along, weather permitting!


Papelotte in progress

I have committed to helping with a Wargames Demonstration at the ‘Bingham Napoleonic Day’ organised by the writer Peter Youds, who lives in Bingham. We ran a similar demo game at last years event – you can read all about it and the event here:

BATTLE FOR THE CROSSROADS

This year the plan was to run a battle loosely based around the action that took place at Papelotte, Waterloo. As I have found, it’s a very under documented part of the battle, probably because it involved mainly the Belgium, Dutch, Nassau, Hanoverian and of course, Prussian contingent from the Allied side and was somewhat overshadowed by events elsewhere on the battlefield. As an aside, if there is anyone out there that can point me in the right direction of a reasonably priced English language account of this part of the battle, I would be very grateful.

British Light Cavalry deploy behind Papelotte

British Light Cavalry deploy behind Papelotte

I had been given a ‘test shot’ model of Papelotte by those very generous people ( Steve and AJ) over at Sarissa precision and it seemed a shame not to get it painted and battlefield ready. The picture above shows the Sarissa show model superbly painted by Gary at March Attack. My first thought was to follow Gary’s colour scheme, Terracotta roof and white washed walls with exposed brick work. Here is my first attempt at painting it.

Papelotte Farm - Under construction!

Papelotte Farm – Under construction!

I have used standard household emulsion to paint the walls and roof – no priming is required, just slap the paint on! I also used the terracotta paint on the ‘exposed’ brickwork and then brushed over with the white. However, I wasn’t happy with the effect. Firstly, it didn’t look as good as Gary’s painting! Secondly, I had seen some versions of the Farm with a Grey slate roof and decided that I would go for this as a finish. So it was off to the bargain arts shop to get some more paint and some big brushes. As a Model shop retailer, it might seem strange not to be pushing ‘proper paints’ but if you are undertaking a project like this, it’s silly to use something like Vallejo to cover large areas. I also find the the ‘coarser nature’ of cheap paints helps with the texture, so that when it comes to weathering or dry drying, the cheap paints are better.

Papelotte,divided into it's components for painting.

Papelotte,divided into it’s components for painting.

So I simply mixed black & white paint to get a nice grey and repainted the roof. As you can see, the Sarissa model easily breaks down into the seperate buildings to make painting more straight forward. It will also help when it comes to storage or transport.

There's something not quite right...

There’s something not quite right…

The picture above shows Papelotte assembled but there was a problem with the Farm house building on the far left. It had been assembled with the walls in the wrong position. Once again, MDF showed it’s versatility, as I was able to carefully split the walls from the building and re assemble it with out too much drama.

Papelotte assembled with damp course and correct facing for the building.

Papelotte assembled with damp course and correct facing for the building.

The building is now assembled correctly, the damp course is painted in black and I have used some artistic licence in painting the stone surrounds on the gates in grey, although modern pictures of Papelotte now show this detail. I’ve also used the same artists paints to dry brush the grey roof and the white to blend the exposed bricks on the walls. At this stage I had left the yard ‘whitewashed’ but then decided that it would be muddied up.

Papelotte with muddied yard.

Papelotte with muddied yard.

To create a more used look to the yard, I simply used Vallejo textured paste dabbed straight onto the MDF yard and then painted and dry brushed with my gaming board colour ‘Dehli Bazzar’ emulsion with a small amount of Vallejo iraqi Sand to lighten it. I have also painted the doors German Camouflage Black, a nice dark brown colour.

Another view of the yard at Papelotte

Another view of the yard at Papelotte

I’ve also added a bit of ‘moss’ – green scatter to parts of the roof and detailed the yard with some Gamers grass tufts and some Javis leaves.

Through the door at Papelotte.

Through the door at Papelotte.

So for now that is as far as I have got. I have done some detailed work in some of the open buildings in the courtyard and added some mud/ straw to the interior using textures past and plant liner that I have cut into small bits but I don’t have photos of this. I’ve also added some Javis climbing weeds to the back of the big barn for a bit more detail and artistic licence. I’ll leave it for now as the next project is to get some Nassau painted ready for the battle but I suspect that I will add a bit more in the way of debris to the yard to make it a bit more battle worn.

I’m a great fan of the Sarissa buildings. They are extremely practical to build, paint and use. If you are looking for a reasonable representation of a building to go onto your wargames table at a great price, I think that you will be pleased with them too.

THE COMMERCIAL BIT

To see the range of Sarissa buildings for Waterloo, including the ‘big three’ Hougomont, La Haye Sainte and Papelotte, click here:

SARISSA OLD EUROPE

VALLEJO PAINTS AND TEXTURES

JAVIS SCENERY & ACCESSORIES


1 2 3 4 5 6 12