One way or another, March has been a beast of a month! What with two bouts of snowy weather causing disruption both at home and work, a radiator bursting ( old age not cold…) flooding the bedroom and dining room, a brace and a half of significant Family Birthdays (Father in Laws 80th, Wifes 60th and Granddaughter’s 5th) all topped off with yours truly going down with a nasty dose of man flu, Hobby time has been at a premium.
Despite all of that, the month started with my attendance at the Bingham Napoleonic weekend on 3rd March. I was there with my two gaming buddies , Pete and Andy to run a demo wargame based on the action around Papelotte, Waterloo 1815. The previous year we had run a similar game based on the action at Quatre Bras with some success, so we thought a continuation into the next day would be fun. Andy, who does the organisation & research had decided that the action around Papelotte is very much under represented in favour of the other ‘big’ moments in the battle. I also had a very nice Sarissa Precision model of Papelotte lying unfinished in my garage so it was an excuse to get on with the model for the day!
You can read how I went about finishing the model for the Demo game here:
The other attraction of basing a game around Papelotte was that most of the Allied Soldiers fighting there were actually Allies, not British Redcoats, so a force of Nassau, Dutch-Belgium’s and Hanoverian troops would be taking on the might of France. Of course, we didn’t follow the exact script or order of battle. Andy likes to have a bit of ‘what if’ in his battles – it gives us armchair generals something to pontificate about whilst munching our mid morning bacon cobs….
The rest of the blog is a bit picture heavy but should guide you through the battle as it unfolded.
Dutch Jaeger deployed outside of Papelotte.
2nd Nassau were deployed inside the farmhouse – hold at all costs!
French cavalry scout the battlefield
Once the French Cavalry had scouted the area, the French Columns deployed to take the Farm house and capture the ridge, pushing Wellingtons left flank back and preventing him from reinforcing his centre.
The French Advance!
Despite reaching the road running across the ridge, the French advance is held by the Hanoverian Landwehr.
Hannoverian Landwehr hold the line!
At Papelotte farmhouse, the light Jaegers were quickly overcome and the assult of the farmhouse began.
The skirmishers are overcome
Despite taking casualties, the Nassau hold on.
The road was fiercely contested!
The French were very determined!
Meanwhile, the Dutch & Belgian troops had managed to redeploy and march to relieve the pressure on Papelotte.
Dutch – Belgians save the day
Catching the French attackers in the flank, they push them back, and Papelotte is held!
Papelotte is secure!
If Papelotte is secured and with it, the corridor for Prussian reinforcements to arrive, the battle is still in the balance. The French General decides to ignore the farmhouse in favour of a push on the ridge.
Take the ridge!
Advance!
French Pressure begins to win
The determined French attack on the ridge now began to have it’s effect and despite reinforcements, the Hanoverians were pushed back. As yet, there were no signs of the Prussians arriving to help out either. Clearly they had be delayed! Wellington would be forced to shore up his left wing to hold the French back. Would this have made a difference to the overall battle? Well, it was a good time to stop for cakes & coffee and consider the position!
The battle is ours!
And so the battle drew to an end. We had played the game at a very lazy pace although we had few opportunities to talk to visitors – the bad snow fall had meant that visitor numbers to the show were very low. The show had been held on the same day as Hammerhead and despite Hammerhead being cancelled, this seemed to have the effect of dissuading anyone from travelling to Bingham, even though the major roads were open.
It was a shame that the event was so quiet as there were some very interesting speakers and guests on through out the day. Perhaps if you are free next year, you might like to pop along, weather permitting!
My Christmas present from my wife this year was a two day course at Barwells in Leicester. The topic, ‘How to use an Airbrush’. After over 50 years of modelling and painting, you would have thought that I was familiar with the technique but apart from one failed attempt with a cheap humbrol airbrush and canned air back in the ’80s, I have never been able to get my head around the idea. I have watched others and picked up a bit of knowledge from reading, you tube, and talking to customers and suppliers but the truth is I never use one. It seemed like I didn’t have time to stop using a paint brush and learn a new technique from scratch. I wasn’t entirely sure that it would be of use, now that I have moved from 40K to historical subjects.
To put things into context, I even had bought a complete set up from Expo but it has sat in my garage under the work bench for over two years and the model air colours that I had bought have been used with a standard brush. As an aside – Vallejo model air are very good for brushing!
The opportunity to go on a course and have someone to show me how to use an airbrush seemed to be a good solution. I had seen the Barwells stand at a couple of war games shows and loitered around watching Steve from Barwells demo-ing the products and I mentioned to My wife that perhaps a course would help. As buying Christmas presents for me is difficult, Julie was more than happy with the idea and I was booked in to the ‘Airbrushing for Beginners’ course on the weekend of 24th/25th February.
The course is run by the appropriately named Steve Puffer of Barwells and it is made clear that on day one you don’t need to bring anything but yourself. Everything is supplied, including unlimited coffee and chocolate biscuits, a buffet lunch and of course the Airbrushes and paint!
The set up at Barwells
After a friendly welcome from Steve, the day began with a short informal talk on how an airbush works and it’s component parts. As there are only 6 people on the course, there’s plenty of time for questions and Steve is well able to get around and check how you are doing when it comes to the practical exercises. Steve has spent his career using an airbrush in the car and bike customisation industry, so his knowledge is not only extremely comprehensive but also very practical and down to earth. He quickly dispels the ‘myths and magic’ that sometimes go with this aspect of the hobby and emphasises that the airbrush is just a tool to do a job, not very different to a paint brush and with the same degree of care will give superb results.
With the basic instructions and techniques demonstrated, ( I wont repeat them all here – you will have to go to the course!), we were unleashed with our airbrushes and the practical work started. For me, this was the great benefit of the course. We started by practicing the various ‘airbrush strokes’ on paper. The beauty being that as well as a great set up, we had plenty of time, materials and Steve’s enthusiastic coaching to keep us focused. If I had been at home, I would have lost patience and picked up my paint brush to do some modelling!
Once we were reasonably competent, the next challenge was to paint a Demo piece shown below. We had a picture to follow as a guide, but we were encouraged to use whatever colours we fancied!
Test in progress!
Throughout the day, Steve was on hand to give encouragement as well as share ideas. At the end of the session, we had all produced something that looked a bit like the original but more importantly, we had gained confidence when it came to using the airbrush.
First days work completed – not bad for the first time with an airbrush!
Onto day two, and we had the choice of either bringing our own models to paint or we could use some of the many sample models in the studio to work on. I elected to bring my own as I wanted to see just what I could achieve with an air brush. The day started with a bit more tuition and a fun exercise where we had to see how many colours we could get onto a model in 15 minutes.
Chaos Biker with chaotic colour scheme!
The exercise was of course another clever way of getting us familiar with our new tool and demonstrated just how quickly we could change colours.
It was now down to the serious business of working on the models that we had brought. My main subject was a 1/48th scale Panther made by Blitzkrieg models. I was using the studio colour range but I had help from one of the other course members, Rodger, who knew his German camouflage colours!
I started out with a bit of pre shading, a technique previously covered in one of the ‘coaching sessions’ with Steve.
Pre shading the Panther
The next task was to build the base colour – I perhaps not only underestimated how little I needed to recoat the model but also misjudged how the colour would dry – more patience and experience will sort this!
Base coat on!
The next step was to airbrush on the brown and green camouflage. As you can see, I was perhaps too heavy handed and I should have taken some reference material rather than work from memory!
Camouflage on!
At this point, I would have been reaching for a paint brush to add some detail but Steve wouldn’t allow anyone near a brush! So I went on to paint the rubber road wheels with an airbrush and using another technique that we had learnt, added mud splashes and then ‘dirtied down’ the top areas to represent wear and tear. As usual, I was a bit heavy handed and over enthusiastic but I got the idea. In future less will be more!
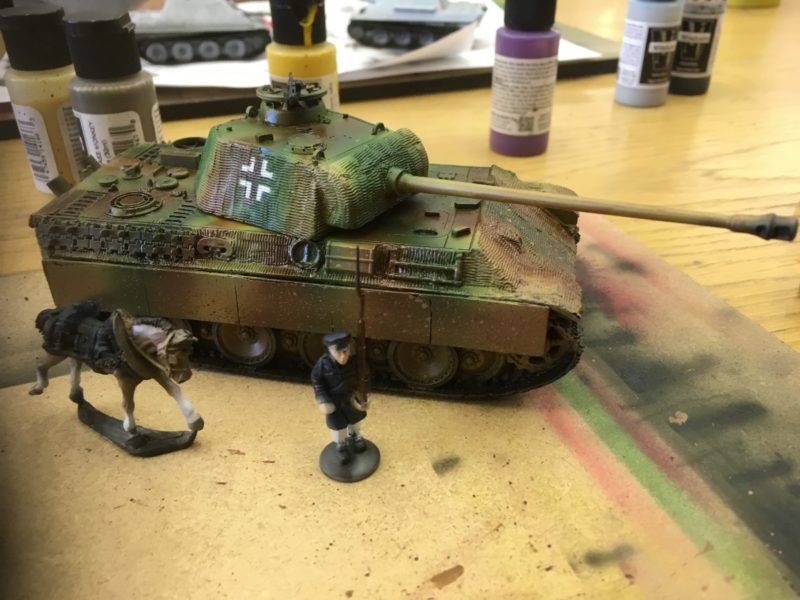
Completed Panther
As you can see from the picture above, I also added some basic markings using a mask Supplied by Barwells. As well as painting the Panther, I also had a go at painting a couple of miniatures to see just what could be achieved with an airbrush. The 28mm Prussian Landwehr model was a limited success, the close ups below showing the over spray. That said, for a first attempt, the results show some promise and whilst it would be beyond my skill to complete a figure, it looks as though most of the block painting of the major colours could be achieved.
Close up of Prussian Landwehr
Rear view of airbrushed figure.
The limber horse was also an experiment and I think that there is definitely potential to paint horses using the airbrush as the shading is quite subtle. Once the straps and harness are tidied up, I think the horse will look acceptable.
Airbrushed Horse
Air brushed horse – it looks better on this side!
Finally, the other piece that I took was a Tamiya V-1 rocket that I had quickly put together on the Friday night before I went to Barwells. In this case, I just managed to prime the model but I must comment that using an Airbrush to prime your models is much superior to blasting them with a spray can! The finish was excellent – the only problem was that some of my heavy handed use of the glue showed up!
V-1 primed and ready to paint!
So a busy weekend came to an end and what a productive one it was too! My next challenge is now to re -jig my painting station in the garage to accommodate my new airbrush and to keep using it. There’s no question that it is an ideal way of priming even the smallest of models and of course, spray varnishing them once they are done. Incidentally, using water based paints through an airbrush is quite suitable for indoors work – there were six of us working in the same room without any ill effects and none of the smell that you would get with using a spray can. No more going outside into the garden to prime or varnish my models!
If you are thinking of trying airbrushing for your self, I can heartily recommend that a course at Barwells is well worth the investment. You wont become an expert in two days but you will gain a tremendous amount of experience, and thanks to Steve Puffers enthusiasm and practical knowledge of the subject, I have no doubt that you will become competent enough to start to get the best out of this method of finishing your models.
If you would like to attend a course, you can find all of the details at Barwells Web page here:
As always, I hope that you enjoy your modelling as much as I do!
This website uses cookies to improve your experience. We'll assume you're ok with this, but you can opt-out if you wish.AcceptRead More
Privacy & Cookies Policy
Privacy Overview
This website uses cookies to improve your experience while you navigate through the website. Out of these cookies, the cookies that are categorized as necessary are stored on your browser as they are as essential for the working of basic functionalities of the website. We also use third-party cookies that help us analyze and understand how you use this website. These cookies will be stored in your browser only with your consent. You also have the option to opt-out of these cookies. But opting out of some of these cookies may have an effect on your browsing experience.
Necessary cookies are absolutely essential for the website to function properly. This category only includes cookies that ensures basic functionalities and security features of the website. These cookies do not store any personal information.