I’ve been bitting and bobbing this week, finishing off one project, my British Artillery, starting the next, Highlanders and being distracted with Greeks!
My Artillery Project Completed – well nearly!
The above picture shows that both my limbers are now completed, with traces added and all five cannon are completed and based. There’s just some tufts to add to the foot artillery limber and two of the guns, although at the time of writing, this has all been done and the figures are now safely in my cabinet ready for battle.
Foot Artillery Officer and Surgeon
I also have a Foot Artillery Officer and a surgeon to finish basing. This will be done over the next evening. I tend to complete my basing in short bursts due to drying time and I’m happy to finish this sort of job when ever I get a spare 5 minutes. Incidentally, the surgeon was a limited edition figure given away free with one of the Painting war magazines. He is a bit on the small side, compared to other figures but he paints up well and it’s not too noticeable. With hindsight, I should have put a bit of plasticard under his feet to give him a lift. Clearly he is more Tom Cruise than Clint Eastwood!
Beware of Greeks but watch out for those skeletons!
I’ve also been working on a ‘test shot’ of Greeks for the up and coming game of Mortal Gods. It’s not actually released until next year but having seen the development that is taking place, I thought that I would put together a small Locos. I’ll give these models a separate blog in the future, perhaps with as much detail about the game as Mr Hobday will let me give away!
Highlanders!
And so to my next Napoleonic project. I will be making the final unit, 79th Battalion, to complete Kempts 8th British Infantry Brigade at Waterloo. As you can see I’ve started assembly, using the Victrix plastic boxed set. I very much like plastics and prefer these to the metals available, despite the need to assemble them and the perceived lack of legacy value that some of my colleagues talk of. Once again, I’ll revisit the background to this project in a future blog.
The thought of painting the tartan is quite daunting, so I’ll take it slowly ( more so than ever!) and show you how I get on. So, A short blog this week as I gather my thoughts to focus on the next stage of my painting projects!
THE COMMERCIAL BIT
Again, very brief! Most of the models, paints, tools bases and basing products are available post free, to most Worldwide locations, here:
A short and mixed blog post this week. Just to record that my Royal Horse Artillery Battery is now complete and ready for action!
Royal Horse Artillery moves into position!
I have been very busy though, but the projects that I have been working on have yet to come to full fruition so I’m not in a position to write them up!
Another shot of my Royal Horse Artillery Battery
I have completed an article for the next issue of Wargames Illustrated, reviewing the new Black Powder rules but I don’t do spoilers so if you would like to read it, you will have to grab a copy of the mag – incidentally, Arcane Scenery send the Magazine out post free, worldwide, so no excuses for being able to get a copy. Mind you, I wont be offended if you decide that my article isn’t a big enough draw…
Black Powder 2ed. has arrived!
Inspired by my current reading, I have put together a small Black Powder Scenario to start to use the new rules with my gaming friends. We are due to play this through tonight and so I am not yet able to bring you the battle report. I am concerned that it is overly ‘asymmetric’ but as I am playing the Prussians, It should be OK…. Here’s the briefing for the players:
Dear General Reille,
You are commanded to lead the advance Corps into Belgium to split the Allied and Prussian Army. Having crossed the Sambre successfully and moved past Charleroi you have encountered a small force of Prussians that are holding the route onto Brussels as well as preventing access to the Brussels – Liege road. You must push on and brush aside these defenders. Time is of the essence.
Your scouts have informed you that the Prussians consist of approximately 2 brigades of Infantry, some artillery and a small brigade of Cavalry. There are other Allied and Prussian units in the area but you are confident that it is unlikely that they will give support.
The Prussian detachment has already deployed and is barring your advance.
You have one brigade of 3 regts of Light Cavalry already in position as well as one brigade of Infantry (including one light infantry battalion). These units do not have artillery. They are deployed as you wish anywhere within 8 inches of your table edge.
As the attacker, you will have the first move.
On your turn two you may deploy an additional brigade of 4 Battalions + One Artillery piece OR a brigade of 3 regiments of Cavalry + One Artillery piece of your choice. They must enter the centre of the table through a 12″ window depending on orders thrown. All French units within 12″ of their own table edge (on or off the table) will benefit from a re roll in the case of a failed order. Blunders excepted! Your command level is 8 – no ‘pa de charge’ but column movement bonuses apply.
On turn three you may repeat the above, and so on until the end of the game.
It is not possible for the French Army to be Broken….French Brigades that are broken will Rally automatically at their table edge and any casualties reduce by one. Routed units will be removed and will not return.
All French INFANTRY units will roll off disorder on a 5+.
Victory will be achieved if you can remove the Prussian barrier before turn 5….
Good Luck – the Emperor is watching….
I will report back if it works.
British Foot Artillery and …..
Back to the painting desk, I have the Foot Artillery crew on the go to complete my Artillery project. Some progress was made before a certain new game started a new itch to scratch! I am lucky enough to be close to the new games in development at Lenton in the heart of the Nottingham lead belt, and rarely comment on anything before it is released. However, The new game from Warbanner, Mortal Gods, A Test of Courage, is currently being play tested and I just happen to have an old box of War Games Factory Greeks on the Kit pile… It wouldn’t hurt to put a few test pieces together now would it?
More to follow!
THE COMMERCIAL BIT
To order your wargaming magazines, post free to most worldwide locations, Click Here:
A somewhat appropriate combination you may think, but merely coincidence that I am reading one and watching the other! I will explain more later. My Artillery Autumn is still rumbling on and to be honest, I have been suffering from painting fatigue. To be fair, painting yellow is always difficult but trying to paint yellow piping and lace has left me somewhat frustrated. I had forgotten how difficult it is and this probably explains why it has taken so long to add to my artillery collection.
Artillery Collection – still plenty to paint!
Nevertheless, I am making slow progress, with three horse artillery crews now painted and awaiting basing. Also on the go and nearing completion are the three cannon to go with them. As usual, I am block painting the figures, then painting over with Army painter quick shade, coating with matt varnish and finishing by re painting the lighter colours and metallics. Oh Joy! This means that I have actually painted most of the piping and lace in yellow twice to try to make it stand out.
Move that Howitzer!
Some of the lace work doesn’t bear close scrutiny but from a distance, the figures are looking OK. Once they are based with the cannon, I think that I will be happy with them.
Battery ready for action! – Well…. nearly!
Painting yellow is always fraught with difficulties. I have tried undercoating with white first, and Orange and sand yellow ( which is almost acceptable on it’s own) and I have tried many different manufacturers to find a yellow that covers in one coat – Vallejo is the best that I have used, albeit with some difficulties.
The cannon are also still in progress. I’ve stuck to my original method and paint scheme despite reservations as to how ‘accurate’ it may be. However, I have taken on board comments made regarding the wheel rims and despite initially painting them black, along with the other iron work, I will heavily dry brush with natural steel. I’ll also apply a light weathering of ‘mud’ to the wheels and spokes.
You will see from the pictures that I have some foot Artillery crew also waiting for their turn on the paint station. Whilst my painting mojo is being severely tested, I have decided to plough on regardless and finish all the artillery that I think that I will need for my army over the next month or so. I am being ‘helped’ by both my current reading and of all things, a drama on TV.
Vanity Fair…really?
I knew that Vanity Fair was set around the Battle of Waterloo but most TV productions have ignored the battle. So I thought that this was a program more likely to appeal to Mrs W than to me. However, to my surprise, I have very much enjoyed it. The costumes and uniforms look fantastic (as do those wearing them), the acting is excellent ( Martin Clunes steals the show for me) and the modern take on the story has worked very well as far as I am concerned – even the soundtrack is excellent. The new ITV production has very much included the battle, with some excellent action. The scene where the infantry form square to fight off the Cuirassiers was excellent. I know some have raised eyebrows at the fact that the dismounted Cuirassiers attempted to press home their attack on foot but I wondered if it did happen. Who knows? What does one do when the blood lust is up, you’ve had your horse shot from beneath you and the bastard that did it is loading his gun ready for the next shot. Running away clearly isn’t going to work….
As if this wasn’t good enough, the next battle scene showed the French Old Guard, in all their glory, marching up what they thought was a deserted hill, only for the English to stand up and pour fire into them. Well, my imagination went into overdrive and I couldn’t wait to get back to painting my army!
John Hussey Waterloo Campaign
On a more serious note, I am currently working my way through John Hussey’s first volume of the Waterloo campaign. There’s very little action in it so far – having reached page 373, we are just at the 15th June 1815 and the first encounters between the French and Prussians. BUT John Hussey has done a superb job with his forensic research and analysis of the campaign. Having read many accounts of the battles of Quatre Bras and Waterloo, so far, this book has been the best that I have read in helping me to understand how and why the battles took place.
This isn’t the place for me to do a full review but one rather simplistic impression stands out. If Wellington was trying to herd Cats to get the allies in place to fight Napoleon, Napoleon at times seemed to be herding snakes! There’s no evidence of a conspiracy in the French camp – they just don’t seem to like each other! Once again, each time I read a chapter, I am inspired to get painting again. I want my army ready to fight the French!
Black Powder 2ed. has arrived!
Finally, my copy of Black Powder 2ed. has arrived. Just in time to provide a tonic for the troops! I’d better get painting!
Horse Artillery colours.
Back to painting – the colours that I have used for the Royal Horse artillery are as follows:
70955 flesh; 70950 black; 70899 dark Prussian blue; 70984 flat brown; 70901 pastel blue; 70871 leather brown; 70992 neutral grey; 70947 red; 70953 yellow; 70801 brass; 70864 steel; 70997 silver. That is also pretty much the sequence in which I have painted as well.
Happy painting!
THE COMMERCIAL BIT
All of the paints used are available post free from my shop here:
Use the search function if you are just looking for a specific colour
At the time of writing, you can still pre order Black Powder second edition through my shop and get the free figure and of course it will be sent out post free on 6th October, the official launch date. Hurry up though, I am running out of the preorder stock with the figures!
Well ‘Artillery August’ is coming to an end and I had planned to complete some extra support for my Waterloo based army but I’m afraid that I will fall short. To be fair, my goal of completing two limbers, and five artillery pieces and the crew was very ambitious for the amount of time that I have to paint. To put this in perspective, I had planned to paint two limbers, 12 horses, four riders on the limbers, 6 outriders, 5 cannon and 20 crew in four weeks. Still lets look on the positive side. I have completed the two limbers, four limber riders, six outriders, 6 horses and 6 more are nearly complete. I also have 2 more cannon nearly ready for service, so another month should see this project finished…
British Horse Artillery Limber completed – awaiting basing.
So, to back track a bit and give some details of how I went about painting these lovely models from Warlord games. I have already discussed my choice of ‘grey’ for the limbers and guns in my previous blog, 50 Shades of Grey here:
This article was posted on TMP and as a result of some really good feedback, I’ve gone a bit heavier on the weathering of the wheels. There was quite a discussion regarding whether the wheel rims on the wagon would really be black – they were painted so for the ‘Parade Ground’ but it was felt this paint would soon rub off in service. So I think that I will re visit the weathering on the cannon and limber wheels and make the steel a bit more obvious. This then of course leads to the debate as to how much to weather equipment and uniforms. That topic in itself would be worth a blog article or two but I think that it is a question of personal taste. I am focused on producing units for wargames to the best of my ability, with the time that I have, not diorama standard figures. If you would like to have a look at the TMP thread, click here, there is some superb research in one of the links on the British Artillery.
Foot Artillery Cannon and Limber awaiting weathering and horses!
When it comes to painting the horses, I am now happy with my ‘triad’ of colours method. I prefer to start with a black undercoat, and then paint the base coat, with the other two colours wet and dry brushed over the top.
Limber horses – work in progress.
You can see that the right hand horse is a bit messy from dry brushing but once the horse furniture is repainted in black, things look a bit more natural. For the Foot artillery horse I used triad of Chocolate brown, Flat Brown and then Mahogany Brown. I added a touch of Iraqui sand to the Mahogany Brown for the final light dry brush. For the Horse Artillery Limber I used a triad of Flat Brown, Flat Earth and Cork Brown for a lighter finish.
Saddle Horse for the limber
Once the detail is painted – steel chains, brass buckles etc the horses are ready to be based. I’ll also add some white or black ‘socks’ to at least four of the horses for some variation. I don’t usually quick shade my horses but I did use army painter quick shade to finish the Horse Artillery Horses – it does make them more durable and helps with shading the saddle blankets etc.
Horse artillery limber – Lighter brown horses after Army painter quick shade applied.
As always, after the quick shade has been applied, I use a brushed on Matt varnish and I will usually rehighlight any whites and metallics to get rid of the ‘dirty’ effect.
The full limber on it’s Renedra Base.
I have used the new Renedra specially designed Limber bases for the limber and team. These bases are a bit thicker than normal and are reinforced underneath to help support the weight of the model. I have also used a standard 25 x50mm base to raise the limber up to the same height as the horses, who have their own integral bases moulded on.
Out riders mounted for painting
To paint the out riders, I use a blu-tack ‘saddle’ to mount them on Plastic tubes. They are then undercoated with a grey undercoat and block painted. I then paint on Army Painter Dark Tone quick shade and when dry, use a brush on Matt varnish. Once this is dry, I re paint the whites, leaving any shading and re highlight the metallic and lighter colours where I think necessary.
So with one limber more or less complete, the other awaiting it’s horses and both needing the basing completed it’s just a small matter of finishing the crews of the two foot artillery guns:
Foot Artillery crews ready for priming
and of course, getting on with the Horse Artillery – which is what prompted this project….
Horse Artillery still in their packets
As you can see, I have no hesitation in mixing manufacturers figures. I think that it gives a nice variety in poses and any minor difference in size is barely noticeable on the table. I will have Victrix, Warlord and Perry Miniatures happily mixed together on the table! So Artillery August looks like turning into Artillery Autumn but once these are finished I will not be adding any more British artillery to my army for a while…..
The Commercial bit
All of the paints, tools, brushes, glues, and finishing products are available post free from my shop here:
Well, it’s the day after England were knocked out of the World Cup by Croatia and I am somewhat melancholy as I sit to write my blog. To be fair, I haven’t much to write about. The World Cup gradually became all consuming for me and for once, my priority wasn’t the models on my work bench. Football combined with the hot weather meant that I have been spending less and less time on my modelling projects. Indeed, the last blog that I wrote showing my own work was dated 14th June, a month ago.
The last of Daimyo’s Retinue on the work bench
In that time, I have managed to finish painting the last of Daimyos retinue. One mounted Samurai completed in a month is hardly something to crow about but I suppose it is progress. As I have been nipping out to paint and base in ever shorter bursts, I haven’t recorded my progress but six of the retinue are now complete.
Daimyos retinue
Retinue showing detail of Arrow catcher.
As you can see, the last mounted Samurai that I completed has the Arrow catcher or Horo in place. I painted a very simple design on it to add some interest and based him in my usual style.
My Work bench is somewhat neglected…
Another indication of my neglect of my hobby is the state of my work bench. If you look closely you can see another mounted Samurai – this is the spare Samurai that you get in the set mounted on a Warhammer horse. I’ve actually gone backwards here as although I have added some green stuff to make the horse look more ‘Samurai’ I have managed to break the model.
Green Stuff added but the model is a bit fragile…
In trying to make the pose dynamic, I have created a somewhat fragile model that I doubt will stand the rigours of gaming – if you look closely, you can see that the one standing leg is threatening to snap as well – the white line above the hoof showing where the plastic is weakening.
So, the football is over for England (the play off for third place doesn’t really inspire me) and it’s time to get back to enjoying my modelling, hot weather or not. I will probably watch the Final but will find it hard to cheer for either side. More likely, I think I will tidy up my work bench and listen to it on the radio. As well as getting on with the final mounted Samurai, I can reorganise my lead mountain and decide on the next project.
Samurai Cavalry charge!
In the meantime, just to cheer myself up, I got all of the samurai cavalry out of the cabinet for a photo shoot! I’m actually quite pleased with how they look. The football may be over but there’s plenty to keep me busy!
If you would like to read how I went about painting my Samurai, please look in the Samurai category of my Blog here:
If you need anything to help you to complete your models, we probably have it in our shop and supply post free to most worldwide locations. Click here:
Sometimes things don’t work out the way you would like them to, and for me, that seems to be the way it is with Daimyo’s retinue. Of course, it could just be a case of familiarity causing the dissatisfaction – this is the second batch of plastic cavalry that I have painted. For some reason, I am not feeling the love for this project! I now have two of the Retinue more or less complete and painted in a similar style to my other samurai cavalry. However, they just don’t look as good as I want them to!
The first of Daimyo’s retinue
Now to be fair, they are not yet finished. I need to complete the basing and I know that once the base has been painted and some nice grass tufts added the models will look substantially better. I also will be adding a Decal to the flags and tidying these up a bit, all of which will help.
In the meantime, I carried on with the retinue and painted the Daimyo himself. I had a clear idea in my mind as to how I wanted him to look and the colour scheme that I would use.
Daimyo ready for basing
However, I am disappointed with the result! The colour scheme just hasn’t worked – he looks like he is sponsored by JCB! Once again, I have made the mistake of adding green trim to his cloak. It didn’t work when I painted my Geisha spy so why I made the same error is a mystery! I also think that yellow is a difficult colour to get right and in trying to use such a bold finish with a primary colour, I have made it difficult to achieve the look that I was after.
Daimyo repainted!
The picture above shows a few changes that I have made to try and improve the figure. The trim on the cloak is now Turquoise, to match his trousers. I’ve added some white socks to the horse and given the horse a white mark on it’s head and I’ve added some highlights to the Daimyo’s trousers. The base has the textured paste applied and will of course benefit from being painted.
Daimyo Charge!
So I think that he looks a bit better but the feeling lingers that it is not quite the finish that I had in mind.
It is easy to be over critical and often the answer is to put the models to one side and come back to them a couple of days later. For now, though, apart from the basing, these are done. I console myself with the thought that these are table top pieces not entries for the Golden Demon Painting competition. They don’t look too bad with my other cavalry.
Samurai Cavalry charge!
Daimyos Retinue grows!
So I have another four more Samurai cavalry to paint before the set is complete. With the World Cup about to start, it will be a while before I can show you the finished result. Perhaps watching the football will give me the break that I need from painting….
The Commercial Bit
Practically all of the models, paints, bases, textures and finishes are available post free to most world wide locations in my shop here:
With my attendance at Partizan and all the preparation that goes with it (and of course, the tidying up afterwards) my hobby time has been at a premium – but when have I said that before! To be fair, I have made some progress since my last blog. Due to the way that I work on my hobby there is always something on the work bench and I will use any spare time that I have, even 10 minutes to keep things moving along. I am lucky in that I have a permanent place to paint and model, so it is easy to pick up where I last left off and do a bit more to a model.
I was chatting to someone about this at work. Paul, was saying how he was so busy that he didn’t have time to do any painting. The problem was that he was looking for a spare morning or afternoon or even a day when he could really get stuck into his project. I find that such blocks of time are difficult to come by these days and I tend to work in short bursts – sometimes just 2 minutes! Yes, seriously. If the next stage of a model is to slap some texture paste on to the base, then it only takes a couple of minutes to do this. It will take 2 hours for the paste to dry but if I can get this job done just before I leave for work, then I know that it will be dry when I get home and it will take another two minutes to paint the base and so on.
The same goes for the evenings. I may be too weary to spend the evening modelling but just half an hour or an hour gets a lot done, so I just focus on the next step in the modelling process rather than what needs to be done to finish the model, if you see what I mean. So since the last blog, some 14 days ago I have only finished one model/project. As you can see, Kojiro is now completed
Wargames Illustrated Special Edition Models now completed
However, I have made progress on a whole lot of other projects. I mentioned that I would be working on another unit of Nassau infantry. Well over the 14 days they have gone from bare castings, primed and the start of the batch paint.
Nassau Volunteer Jaeger on the work bench.
The (poor) photo above shows the figures 7 days ago. The back rank is primed green and the flesh and hats painted. The front rank (out of focus) shows that I have yet to add any black.
Volunteer Nassau – next step
This photo shows as they are now. ( I promise all 12 are at this stage!). Yes, they are a long way off being finished but I’m happy that progress has been made. I know the next step to be painted – I’ll be painting the gaiters dark grey and then I’ll start the straps with yellow ochre. It wont matter to me whether I do both colours on all figures or just paint the gaiters on just two of them. So long as I am moving forwards, I’m happy. Now I know that 14 days to get to this stage seems like very slow progress but it is progress and I will soon have another unit for my Napoleonic Army.
But that’s not all I’ve done. Taking a break from painting, I’ve assembled the next set that I would like to complete in the Test of Honour Range – Daimyos Retinue.
Daimyos retinue, under construction
The majority of these were assembled over at Jaz’s house one evening. We took a break from gaming and just had a hobby night. I had never thought of modelling as being a social hobby but I was once again surprised as to how much I managed to get done whilst chatting away with my war gaming pals. So Seven mounted Samurai are nearly ready for priming.
Musket men and Sergeant of archers
Building the Samurai cavalry gave me the urge to go back to some spare plastic ashigaru and assemble them as Musket men and I also needed a Sergeant of Archery to complete all the figures that appear on the cards. The musket men will be to go with Nobunaga – as this figure allows you take musket men for just 2 points each, I decided that I wanted at least two bases of them. I also decided to add some extra pouches using green stuff. I’ll never make a sculptor but they look passable enough. Interestingly, I ran out of time and rather than waste the green stuff, I used the excess to make some rocks on the Sergeants base. These models were actually assembled while I was sitting out in the garden with a glass of something cold and chatting to Julie.
British Artillery
Finally, on the work bench are a couple of cannon that I am planning to add to my army. They were kicking around in my lead pile and it wasn’t a long job to get these assembled and ready for priming. I’ll probally prime these at the same time that I prime the Samurai horses, so they will be ready for painting.
So as you can see, I haven’t done much in the last 14 days…
The Commercial bit
You can get most of the modelling supplies that I use from the Arcane Scenery shop. Even better, it’s still post free for most world wide locations!
If you would like to stay up to date with latest releases, wargaming gossip and the occasional post as to what I am up to in the garage, follow us on Facebook;
Having just finished my latest Napoleonic Battalion, I fancied a change. A recent post on the superb Test of Honour Facebook group had inspired me to send for some plastic Bonsai trees from China. The Bonzai trees make excellent full sized trees for a Test of Honour game. As a bit of a digression, I am usually not too fussed about the scale of my trees in war games, particularly when playing the larger battles. The trees on a wargames table are there to represent an area of wood, not to be a scale model.
However, Test of Honour is a skirmish game and a tree that is more in keeping with the scale of the figures and buildings seemed attractive. Even if the leaves are a bit on the large size, the overall impression would be of a specimum tree, as seen in Japanese gardens.
Plastic Bonsai tree
As you can see, the tree comes in a nice plastic pot so it was a simple task to cut it out and using a glue gun, stick it to an old DVD. I used ‘Seven Steps to a Better Life’ a free DVD from a newspaper and clearly nonsense, as none of the steps included ‘spend more time wargaming’. You can, of course, use any suitable DVD or CD…In fact, I think that would be an interesting survey…’Which DVD/CD is more suitable for scenery bases than watching/listening to! I digress once again, but at least I am recycling my rubbish!
Tree attached to DVD
The next job was to slap some filler (Polyfilla or other decorators filler is ideal) over the base and when dry, I covered this with Vallejo Dark Earth Textured paste. Incidentally, the temple dog in the picture is from the Ainsty Castings range. They do a set of two of these and also make a very nice Sampan – if you haven’t discovered Ainstey Castings the link is below and they have some very useful stuff! Once the paste was dry, I gave the whole thing a good coat of paint – I use emulsion for scenery, it’s cheaper. The base is now ready for detailing.
Bonsai tree based and ready for detailing
The next stage is to dry brush a highlight onto the textured earth and to add some scatter and of course, some grass tufts and flowers. While I was highlighting the base, I also used the same mix to dry brush the tree trunk to bring out the detail. You could really spend a bit of time improving the tree with a quick spray or dry brush but time was at a premium and I’m happy with the overall look for a piece of wargames scenery that I hope will see plenty of use.
The completed bonzai tree based and ready for the table.
Each of the stages above only take a few minutes but the drying time is the issue. So I tend to have another project on the go when I am making a piece like this. As you can see from the picture above, I am working on a set of ‘Giants in Miniature’ figures from Wargames Illustrated. The figures represent the famous duel between Miyamoto Musashi and Sasaki Kojiro and are a limited edition of 500 sets. If you would like one the link to Wargames Illustrated site is below.
Miyamoto Musashi on the work bench
The figure is straight forward to paint as he is all in black, so while waiting for my scenery piece to dry, I got on with him. Sasaki is in the background. ready for his coat of paint! You can see the finished Musashi in the picture above based and ready to fight his rival Sasaki. The final picture is a very poor shot of the two of them fighting in front of the Sarissa shrine, with the Geisha spy looking on. Sasaki is yet to be finished, requiring a coat of matt varnish, some extra highlighting and of course, basing.
Musashi and Kojiro clash!
As I have said, modelling time has been at a premium these last couple of weeks but I should have Sasaki Kojiro finished for the weekend and he will complete my triology of limited edition figures from Wargames illustrated. I’ve also got a couple more of the Bonzai trees to base, but now that I know what I’m doing , these will be a quick little project. It’s back to Nassau Infantry after that!
You can visit the Arcane Scenery shop for all Vallejo paints, textures and basing products – we send post free! We have a great Samurai section and carry all of the Sarissa Japanese range.
As regards the Bonzai tree, you will have to search ebay! However, we are looking to import a batch from China – they will be a little more expensive but we are looking to see if we can bundle them with some buildings. If you follow us on Facebook, you will be the first to know!
My Christmas present from my wife this year was a two day course at Barwells in Leicester. The topic, ‘How to use an Airbrush’. After over 50 years of modelling and painting, you would have thought that I was familiar with the technique but apart from one failed attempt with a cheap humbrol airbrush and canned air back in the ’80s, I have never been able to get my head around the idea. I have watched others and picked up a bit of knowledge from reading, you tube, and talking to customers and suppliers but the truth is I never use one. It seemed like I didn’t have time to stop using a paint brush and learn a new technique from scratch. I wasn’t entirely sure that it would be of use, now that I have moved from 40K to historical subjects.
To put things into context, I even had bought a complete set up from Expo but it has sat in my garage under the work bench for over two years and the model air colours that I had bought have been used with a standard brush. As an aside – Vallejo model air are very good for brushing!
The opportunity to go on a course and have someone to show me how to use an airbrush seemed to be a good solution. I had seen the Barwells stand at a couple of war games shows and loitered around watching Steve from Barwells demo-ing the products and I mentioned to My wife that perhaps a course would help. As buying Christmas presents for me is difficult, Julie was more than happy with the idea and I was booked in to the ‘Airbrushing for Beginners’ course on the weekend of 24th/25th February.
The course is run by the appropriately named Steve Puffer of Barwells and it is made clear that on day one you don’t need to bring anything but yourself. Everything is supplied, including unlimited coffee and chocolate biscuits, a buffet lunch and of course the Airbrushes and paint!
The set up at Barwells
After a friendly welcome from Steve, the day began with a short informal talk on how an airbush works and it’s component parts. As there are only 6 people on the course, there’s plenty of time for questions and Steve is well able to get around and check how you are doing when it comes to the practical exercises. Steve has spent his career using an airbrush in the car and bike customisation industry, so his knowledge is not only extremely comprehensive but also very practical and down to earth. He quickly dispels the ‘myths and magic’ that sometimes go with this aspect of the hobby and emphasises that the airbrush is just a tool to do a job, not very different to a paint brush and with the same degree of care will give superb results.
With the basic instructions and techniques demonstrated, ( I wont repeat them all here – you will have to go to the course!), we were unleashed with our airbrushes and the practical work started. For me, this was the great benefit of the course. We started by practicing the various ‘airbrush strokes’ on paper. The beauty being that as well as a great set up, we had plenty of time, materials and Steve’s enthusiastic coaching to keep us focused. If I had been at home, I would have lost patience and picked up my paint brush to do some modelling!
Once we were reasonably competent, the next challenge was to paint a Demo piece shown below. We had a picture to follow as a guide, but we were encouraged to use whatever colours we fancied!
Test in progress!
Throughout the day, Steve was on hand to give encouragement as well as share ideas. At the end of the session, we had all produced something that looked a bit like the original but more importantly, we had gained confidence when it came to using the airbrush.
First days work completed – not bad for the first time with an airbrush!
Onto day two, and we had the choice of either bringing our own models to paint or we could use some of the many sample models in the studio to work on. I elected to bring my own as I wanted to see just what I could achieve with an air brush. The day started with a bit more tuition and a fun exercise where we had to see how many colours we could get onto a model in 15 minutes.
Chaos Biker with chaotic colour scheme!
The exercise was of course another clever way of getting us familiar with our new tool and demonstrated just how quickly we could change colours.
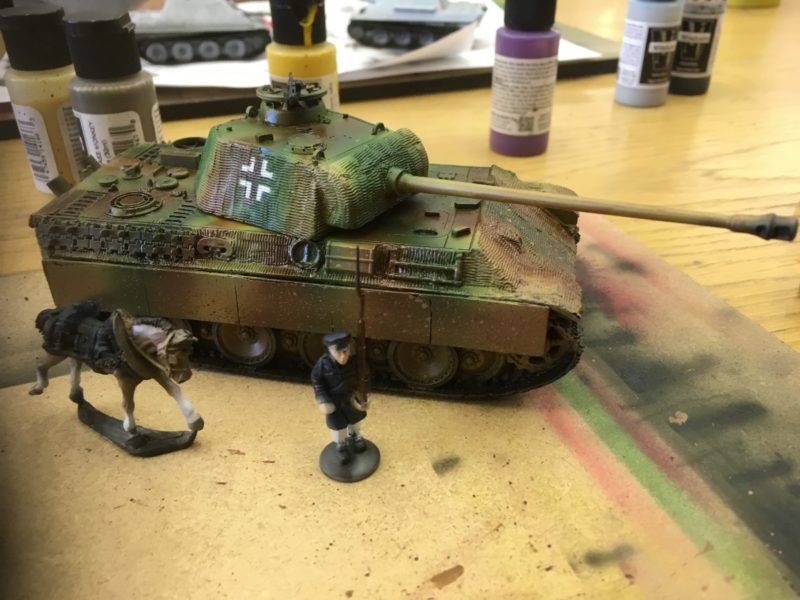
It was now down to the serious business of working on the models that we had brought. My main subject was a 1/48th scale Panther made by Blitzkrieg models. I was using the studio colour range but I had help from one of the other course members, Rodger, who knew his German camouflage colours!
I started out with a bit of pre shading, a technique previously covered in one of the ‘coaching sessions’ with Steve.
Pre shading the Panther
The next task was to build the base colour – I perhaps not only underestimated how little I needed to recoat the model but also misjudged how the colour would dry – more patience and experience will sort this!
Base coat on!
The next step was to airbrush on the brown and green camouflage. As you can see, I was perhaps too heavy handed and I should have taken some reference material rather than work from memory!
Camouflage on!
At this point, I would have been reaching for a paint brush to add some detail but Steve wouldn’t allow anyone near a brush! So I went on to paint the rubber road wheels with an airbrush and using another technique that we had learnt, added mud splashes and then ‘dirtied down’ the top areas to represent wear and tear. As usual, I was a bit heavy handed and over enthusiastic but I got the idea. In future less will be more!
Completed Panther
As you can see from the picture above, I also added some basic markings using a mask Supplied by Barwells. As well as painting the Panther, I also had a go at painting a couple of miniatures to see just what could be achieved with an airbrush. The 28mm Prussian Landwehr model was a limited success, the close ups below showing the over spray. That said, for a first attempt, the results show some promise and whilst it would be beyond my skill to complete a figure, it looks as though most of the block painting of the major colours could be achieved.
Close up of Prussian Landwehr
Rear view of airbrushed figure.
The limber horse was also an experiment and I think that there is definitely potential to paint horses using the airbrush as the shading is quite subtle. Once the straps and harness are tidied up, I think the horse will look acceptable.
Airbrushed Horse
Air brushed horse – it looks better on this side!
Finally, the other piece that I took was a Tamiya V-1 rocket that I had quickly put together on the Friday night before I went to Barwells. In this case, I just managed to prime the model but I must comment that using an Airbrush to prime your models is much superior to blasting them with a spray can! The finish was excellent – the only problem was that some of my heavy handed use of the glue showed up!
V-1 primed and ready to paint!
So a busy weekend came to an end and what a productive one it was too! My next challenge is now to re -jig my painting station in the garage to accommodate my new airbrush and to keep using it. There’s no question that it is an ideal way of priming even the smallest of models and of course, spray varnishing them once they are done. Incidentally, using water based paints through an airbrush is quite suitable for indoors work – there were six of us working in the same room without any ill effects and none of the smell that you would get with using a spray can. No more going outside into the garden to prime or varnish my models!
If you are thinking of trying airbrushing for your self, I can heartily recommend that a course at Barwells is well worth the investment. You wont become an expert in two days but you will gain a tremendous amount of experience, and thanks to Steve Puffers enthusiasm and practical knowledge of the subject, I have no doubt that you will become competent enough to start to get the best out of this method of finishing your models.
If you would like to attend a course, you can find all of the details at Barwells Web page here:
I have committed to helping with a Wargames Demonstration at the ‘Bingham Napoleonic Day’ organised by the writer Peter Youds, who lives in Bingham. We ran a similar demo game at last years event – you can read all about it and the event here:
This year the plan was to run a battle loosely based around the action that took place at Papelotte, Waterloo. As I have found, it’s a very under documented part of the battle, probably because it involved mainly the Belgium, Dutch, Nassau, Hanoverian and of course, Prussian contingent from the Allied side and was somewhat overshadowed by events elsewhere on the battlefield. As an aside, if there is anyone out there that can point me in the right direction of a reasonably priced English language account of this part of the battle, I would be very grateful.
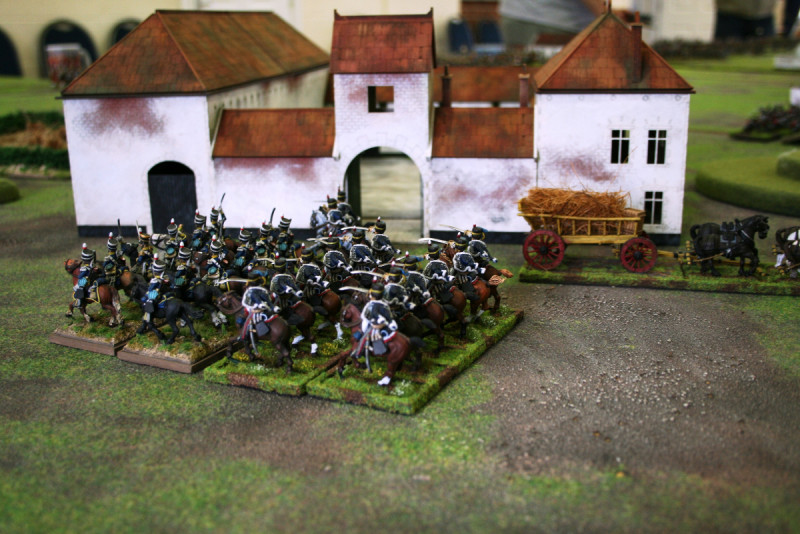
British Light Cavalry deploy behind Papelotte
I had been given a ‘test shot’ model of Papelotte by those very generous people ( Steve and AJ) over at Sarissa precision and it seemed a shame not to get it painted and battlefield ready. The picture above shows the Sarissa show model superbly painted by Gary at March Attack. My first thought was to follow Gary’s colour scheme, Terracotta roof and white washed walls with exposed brick work. Here is my first attempt at painting it.
Papelotte Farm – Under construction!
I have used standard household emulsion to paint the walls and roof – no priming is required, just slap the paint on! I also used the terracotta paint on the ‘exposed’ brickwork and then brushed over with the white. However, I wasn’t happy with the effect. Firstly, it didn’t look as good as Gary’s painting! Secondly, I had seen some versions of the Farm with a Grey slate roof and decided that I would go for this as a finish. So it was off to the bargain arts shop to get some more paint and some big brushes. As a Model shop retailer, it might seem strange not to be pushing ‘proper paints’ but if you are undertaking a project like this, it’s silly to use something like Vallejo to cover large areas. I also find the the ‘coarser nature’ of cheap paints helps with the texture, so that when it comes to weathering or dry drying, the cheap paints are better.
Papelotte,divided into it’s components for painting.
So I simply mixed black & white paint to get a nice grey and repainted the roof. As you can see, the Sarissa model easily breaks down into the seperate buildings to make painting more straight forward. It will also help when it comes to storage or transport.
There’s something not quite right…
The picture above shows Papelotte assembled but there was a problem with the Farm house building on the far left. It had been assembled with the walls in the wrong position. Once again, MDF showed it’s versatility, as I was able to carefully split the walls from the building and re assemble it with out too much drama.
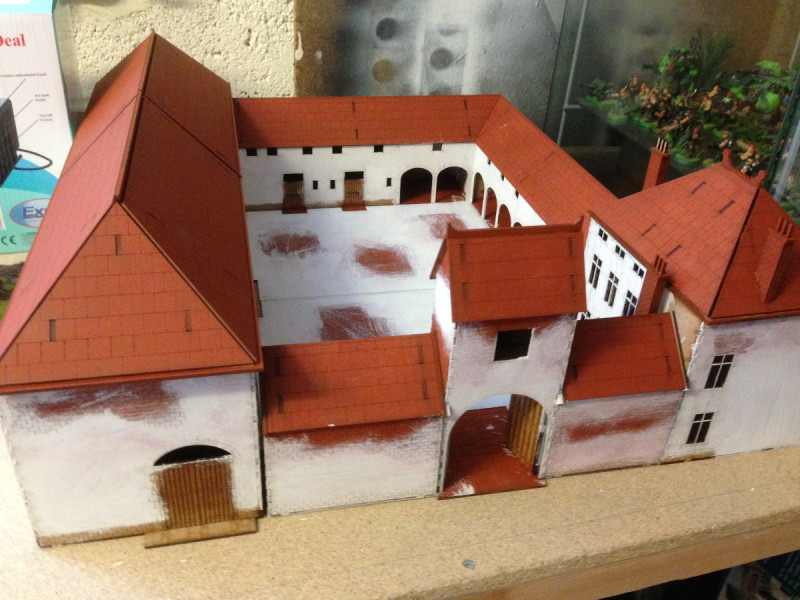
Papelotte assembled with damp course and correct facing for the building.
The building is now assembled correctly, the damp course is painted in black and I have used some artistic licence in painting the stone surrounds on the gates in grey, although modern pictures of Papelotte now show this detail. I’ve also used the same artists paints to dry brush the grey roof and the white to blend the exposed bricks on the walls. At this stage I had left the yard ‘whitewashed’ but then decided that it would be muddied up.
Papelotte with muddied yard.
To create a more used look to the yard, I simply used Vallejo textured paste dabbed straight onto the MDF yard and then painted and dry brushed with my gaming board colour ‘Dehli Bazzar’ emulsion with a small amount of Vallejo iraqi Sand to lighten it. I have also painted the doors German Camouflage Black, a nice dark brown colour.
Another view of the yard at Papelotte
I’ve also added a bit of ‘moss’ – green scatter to parts of the roof and detailed the yard with some Gamers grass tufts and some Javis leaves.
Through the door at Papelotte.
So for now that is as far as I have got. I have done some detailed work in some of the open buildings in the courtyard and added some mud/ straw to the interior using textures past and plant liner that I have cut into small bits but I don’t have photos of this. I’ve also added some Javis climbing weeds to the back of the big barn for a bit more detail and artistic licence. I’ll leave it for now as the next project is to get some Nassau painted ready for the battle but I suspect that I will add a bit more in the way of debris to the yard to make it a bit more battle worn.
I’m a great fan of the Sarissa buildings. They are extremely practical to build, paint and use. If you are looking for a reasonable representation of a building to go onto your wargames table at a great price, I think that you will be pleased with them too.
THE COMMERCIAL BIT
To see the range of Sarissa buildings for Waterloo, including the ‘big three’ Hougomont, La Haye Sainte and Papelotte, click here:
Having finished assembling the Pauper archers (see last weeks blog) the next job was to paint them. I had an idea of the colour scheme that I would use and decided to ‘batch paint’ all nine in one go. The deadline was to have them completed by this weekend as I have a big Napoleonic project that I has to be completed by the end of February – more on that in future blogs!
So the first task was to prime them with Army painter matt black spray.
Pauper Archers primed and ready for painting
Senzo was put to one side for now – he will get his own special paint job! Next, using a large brush, I dry brushed them with Vallejo Sea Grey to bring out the detail. With hind sight, I should have given them a heavier dry brush, a lesson for the next batch as it not only highlights the black armour but brings out the detail making it easier to paint the models. It also helps to show any imperfections that I had missed before they were sprayed.
Dry brushed models ready for the next stage
The next stage was to paint the face and hands with Dark Flesh and the straw hats were painted with Flat Earth.
Faces and Hats done
Rather than give all the archers the same uniform, I wanted them all to be slightly different. They are supposed to be a ‘rag tag’ band not a cohesive unit. That said, I still wanted them to look similar so when it came to painting the tunics and trousers, I used five different ‘earthy tones’ and using a trick learnt from painting my Dark Age War Bands, applied these colours randomly across the nine figures.
Tunics and Trousers painted
The next picture shows the bows painted using New Wood, The socks, arrow flights and trim on the bows are off white, and the arrow shafts are painted using Old wood. I’ll list all the colours with their numbers at the end of the blog.
Bows, arrows & socks done
The next picture shows a bit more progress. I’ve dry brushed the hats with buff to lighten them & bring out the texture. The straps on the sandals, Katana hilts and detail on the quivers have been painted using German Camouflage Black Brown, the arrow heads and Katana hilts have been painted in natural steel, The katana scabbards have been painted in burnt red. The idea has been to stay away from using any more black than is necessary (the armour and gloves) and to keep to the earthy colours.
Main colours now blocked in
I also gave the figures a thin coat of Army Painter Strong tone and added texture to the bases. The figure are nearly done but I’m not quite happy with the finish yet.
Reinforcements arrive at Papelotte!
I’ve added a simple pattern to the archers tunic, tidied up the arrow flights and painted the base chocolate brown ready for highlighting. The tuft is just to see how it looks before I finish the basing. I was also having problems with the figures being top heavy. Because they all have metal heads there is a tendency for them to be top heavy and to fall over easily. I fixed this by gluing a penny into the base of each model – this also had the effect of increasing the value of my collection!
Weighting the base makes the figures more stable
You can also see from the picture that I have dry brushed the bases and added some green scatter. I’ve also added the bowstrings using the stretch sprue technique outlined in a previous blog here. One further tip. I attach the bow strings using super glue, applied with a cocktail stick. Don’t put the wrong end of the stick into your mouth when manoeuvring the model. Super gluing a cocktail stick to your lips is not a good move and it hurts when you take it off!
I finished off the base using some of the new Gamers Grass spikey bushes. I think that they look great!
bases complete with spikey grass!
And so another unit is finished. If I’m honest, I’m not as pleased with these as some that I have done. The faces are not good – perhaps an ink wash will hide some of the problems and help to blend some clumsy highlights. In truth, I have rushed them over a week, rather than take my time. That all said they make a nice band and once the bases are tidied up and they are in the triple bases supplied, they will look fine on the table.
Nine Pauper Soldiers ready for action!
I now need to paint the leader,Lord Senzo ‘The Thorn’. However, he might just have to wait as I have Papelotte to finish and about 60 Nassau infantry to paint, ready for the end of the month!
The Commercial Bit
Nearly all of the materials that I use are available from the Arcane scenery shop and at the time of writing are supplied post free to most worldwide locations.
The paints used were as follows. Face & hands; Dark flesh 70927: Hats; Flat Earth 70983, dry brushed in Buff 70976: Trousers and Tunics; 70923 Japanese uniform, 70877 gold brown, 70977 desert yellow, 70821 german cam. beige, 70914 green ochre: Bows, 311 New wood: Quivers, saddle brown 70940: Socks, bow trims, arrow flights, Off white 70820: Arrow shafts, Old Wood 310: Sandals, sword hilts, quiver ties, Germans Cam. Black Brown 70822: Arrow heads natural steel 70864 ( silver highlight), Dry brush on armour, Sea grey 70870: Sword Scabards & patterns 70870 burnt red. I have used army painter inks & Strong tone as described above.
Well, actually there is – you are reading it, but…..It’s been a fraught week, one way and another. No doubt all the minor tribulations that have distracted me from my modelling have been magnified by the approach of Christmas. The so called ‘Season of good will to all men’ seems to running a bit short of the ‘good’ part at the moment. The week started well. Saturday found me down in London at the Wembley Stadium watching the mighty Spurs giving Stoke City a 5 -1 pasting. On Sunday I ventured into Nottingham, despite the snow, and finished off my Christmas shopping. It was quite a pleasant experience as the weather appeared have dissuaded some folks from shopping so the queues were quite bearable. With no Mrs Arcane in tow, I could sneak off for a crafty Greggs sausage roll and spend a couple of hours in Waterstones’ bookshop without any guilty feelings. So far so good.
Christmas Shopping in Nottingham – Coffee break
It was on Sunday evening that things began to unravel. Whilst checking through my paperwork and planning the forthcoming week I found that the MOT on my car was about to run out on Monday. Bugger! Fortunately, although the Arcane Rolls Royce (which is cunningly disguised as a 12 year old Vauxhall Astra) was now unavailable, Mrs Arcanes Ferrari, (again, we disguise it as a aged Vauxhall Corsa) would allow me to get to work. As if this wasn’t enough, a crisis was looming in the Arcane household. After 27 years of loyal service, we had disposed of our trusty dinning room table and two months ago, ordered a brand new one all ready for the big Christmas family gathering. I’d even redecorated the dinning room in preparation. Except the table wasn’t ready… Mrs Arcane was not happy and I must admit that I wasn’t looking forward to eating my Christmas dinner from a tray. So as well as sorting the car, I needed to sort a table supplier out. All of this was distracting me from my modelling!
First two figures from the Bandits and Brigands set
I have been working on the Test of Honour Bandits and Brigands set and had completed the first two models using inks, to shade and highlighting in the usual method. The plan was to complete the other five models over the last two weeks but the afore mentioned distractions were making any sort of protracted painting session difficult. I had also intended to document the models as I painted them so that I could complete a painting guide and review on the blog. Alas, something had to give and in this case, as I was grabbing odd bits of painting time when I could, it was the documentation and pictures for the blog that fell by the wayside.
A third bandit joins the gang.
So, all I can say is that I had decided to follow the colour scheme used on the Warlord website and when it came to model number three, shown above I defaulted to using Army Painter quick shade rather than ink to speed things up. To be fair, I did do some highlighting before the quickshade was painted on and once varnished I also used my tried and trusted method of adding in some extra highlights or repainting some of the lighter colours. However, as these are Bandits, I decided that the ‘dirty’ look wasn’t such a bad idea. I was onto my last figure and had decided to do a step by step guide to him when to add to the troubles at home, the web site went down following a routine upgrade to the security certificate! This photo is as far as I got in terms of step by step.
Top Bandit under way.
So by Wednesday, with no car, no Table for Christmas and no website, I was feeling a bit sorry for myself. The irony being that in order to take a break from the stress, I took myself off to the garage, despite the cold, and just got on with my hobby! Result being that the Bandits are now complete!
My Bandit Gang for Test of Honour
The good news is that week has finished well. The car is MOT’d and back on the road. We have a loan table for Christmas, so no more worries about where we put the family or the Christmas dinner and the web site upgrade has now been sorted, so we are back in business. I have also had a reminder as to why my hobby is so important to me. When the minor speed bumps of life are threatening, the best remedy is to lose myself in some painting and it will all get sorted out, one way or another. So no Blog as such but I have finished my Bandits!
Bandits and Brigands Boxed set done!
If you would like a set of Test of Honour Bandits and Brigands. they are available from our shop, post free at the time of writing, here:
This website uses cookies to improve your experience. We'll assume you're ok with this, but you can opt-out if you wish.AcceptRead More
Privacy & Cookies Policy
Privacy Overview
This website uses cookies to improve your experience while you navigate through the website. Out of these cookies, the cookies that are categorized as necessary are stored on your browser as they are as essential for the working of basic functionalities of the website. We also use third-party cookies that help us analyze and understand how you use this website. These cookies will be stored in your browser only with your consent. You also have the option to opt-out of these cookies. But opting out of some of these cookies may have an effect on your browsing experience.
Necessary cookies are absolutely essential for the website to function properly. This category only includes cookies that ensures basic functionalities and security features of the website. These cookies do not store any personal information.