I’m never sure of the best way of painting cavalry. Should you attach the rider to the horse and paint the model as a complete item? Or is it better to paint the horse and rider separately? I’ve tried both methods and I think that when it comes to painting a unit of cavalry, I find that a batch paint for the horses and riders separately works best for me. I tend to paint the horses in two’s or three’s, varying the colour for each batch and then adding different markings to give some variety. The same goes for the riders, unless of course, they are in uniform.
It’s then a question of how to paint the rider. By this I mean how do you hold the rider when there is no base to grip?
my previous method of mounting riders for painting
I’ve tried several methods. My preferred method used to be to sit the rider on a ‘saddle’ of blue tack attached to a stick. I then upgraded this to the method above. A wire stuck in bluetack through a plastic tube. It was OK but a bit over engineered!
My latest solution is just to drill the base of the rider and use super glue to attach a cocktail stick. The cocktail stick is more than big enough to hold whilst you are painting the figure and gives you access to all areas! Once the model is painted, I simply clipped off the stick with my trusty Xuron sprue clippers and the rider was ready to attach to his horse. Cheap, easy and effective.
Samurai cavalry primed, dry brushed and ready to paint.
As you can see from above, I ‘plonk’ the stick into a blob of blutack in between coats to protect the paint from any damage or if a wash is drying.
The horses were painted separately as a ‘mini batch’Ready to paint the ridersThe nearly finished Cavalry – just the basing to complete!two out of six complete – just four more on the bench.
So, I have a new simple method of painting cavalry riders that seems to be both cheap and effective. Unfortunately, whilst it makes painting easier, it doesn’t make it faster. It’s taken me two weeks to get six horses and two riders completed. Just four more to go!
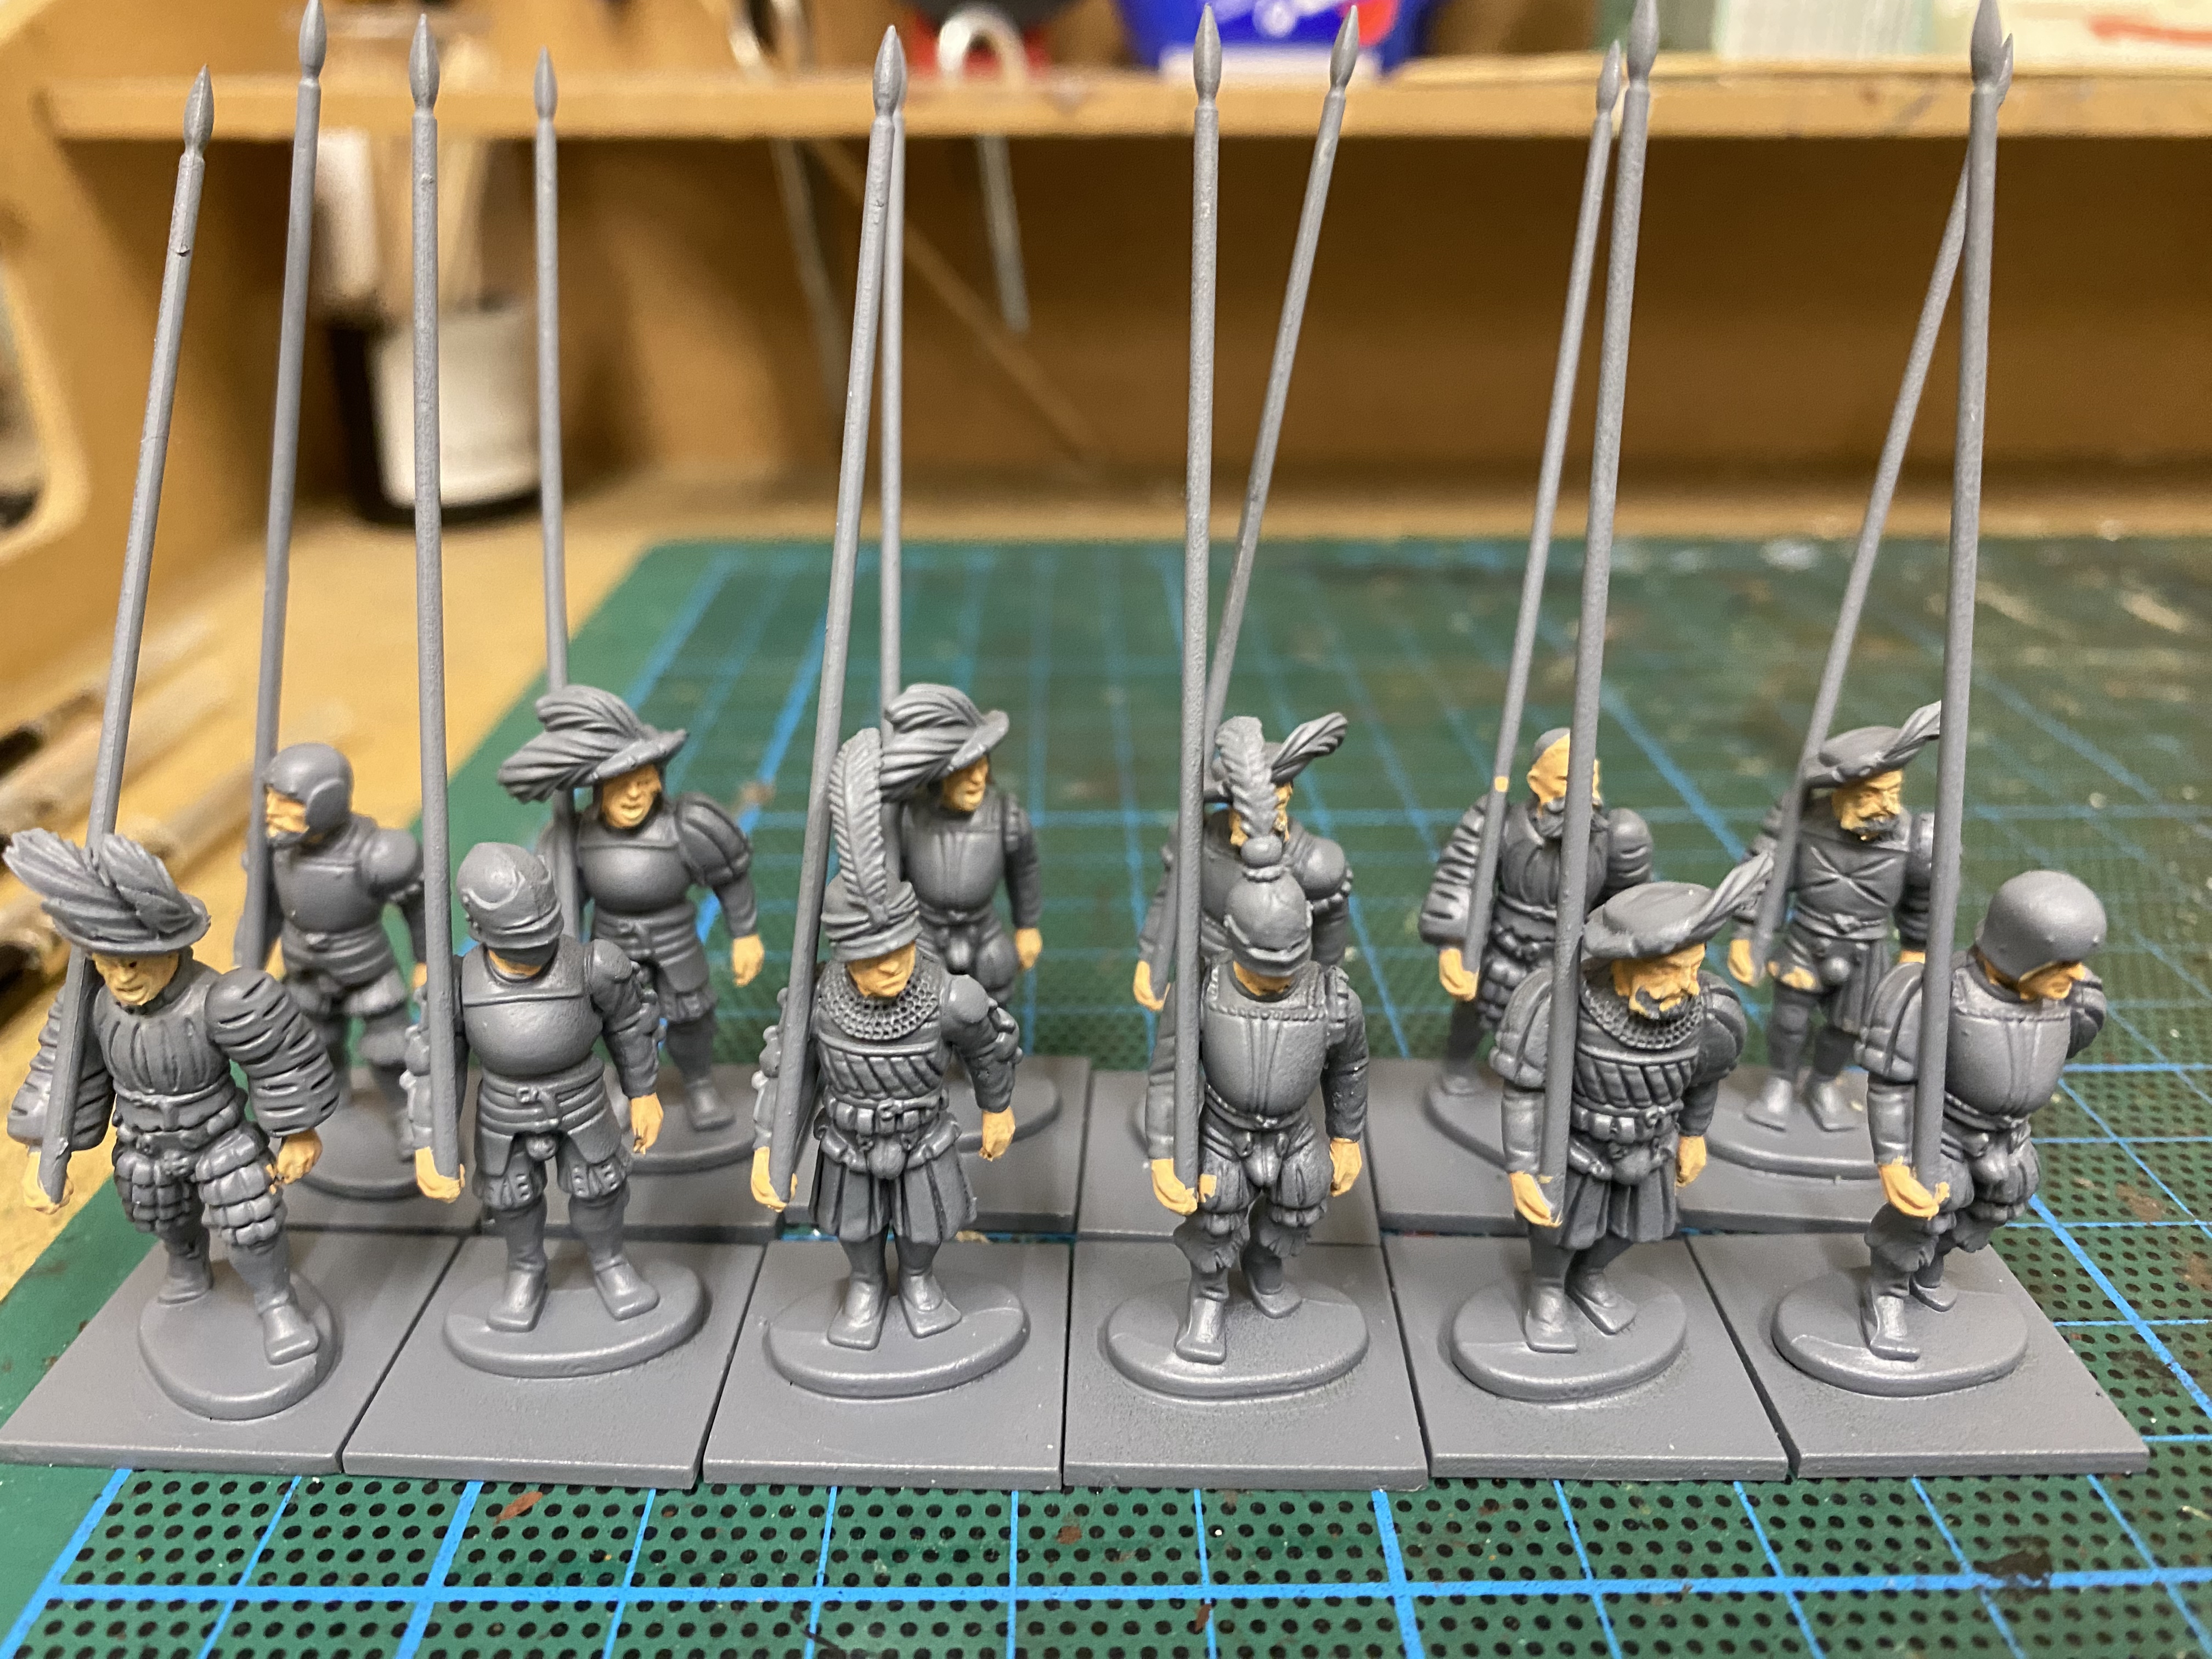
Following on from my last blog post. Here is a rough guide to how I batch painted my Landsknechts. I am using Warlord Games plastic Landsknechts. I assembled them in batches of 12 models and once assembled and cleaned up, I primed them in Army Painter Uniform grey. I had thought about using a white primer, which would have given the colours a brighter base to paint over but decide to stick with grey as I find it more forgiving if you miss a bit of painting on a figure!
Once primed, I painted the flesh with Vallejo flesh 70955.
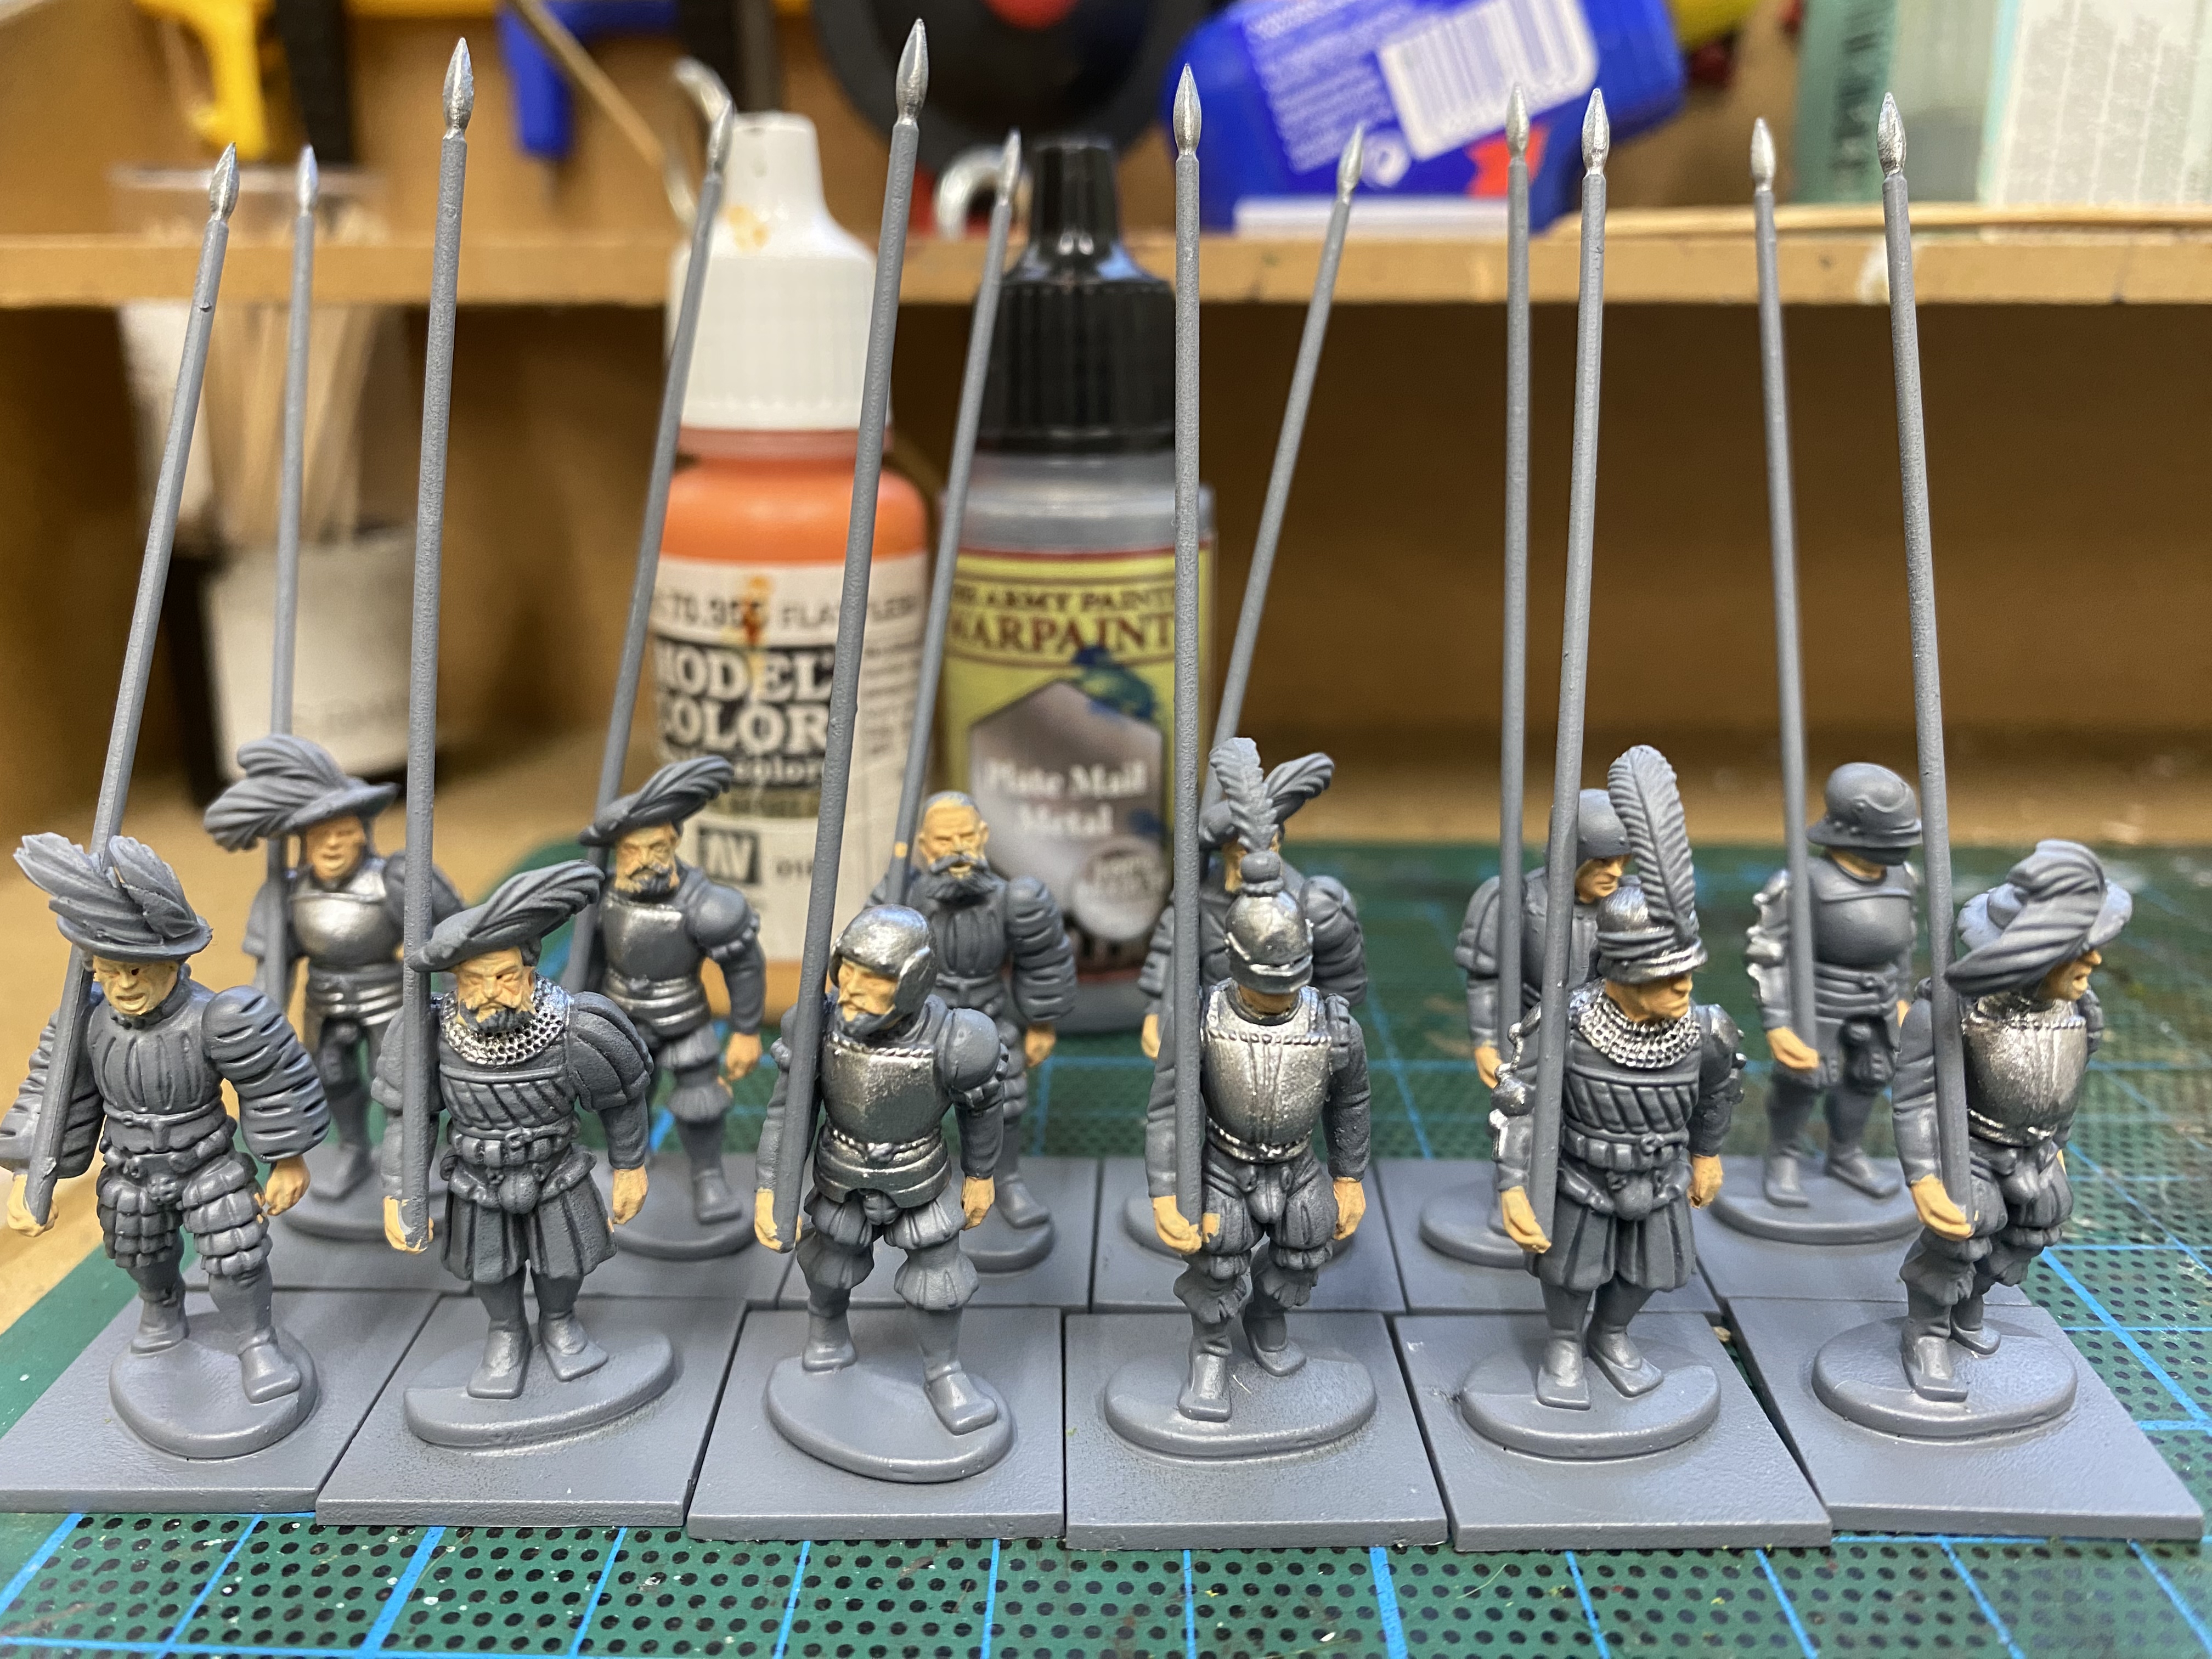
I then picked out the armour plates, chain mail and spear tips in Army Painter plate mail. There was one exception, The figures on the far right of the back rank was left as I intended to give him painted armour. I’ve no idea whether this is historically accurate but I had seen some pictures of helmets painted in this way.
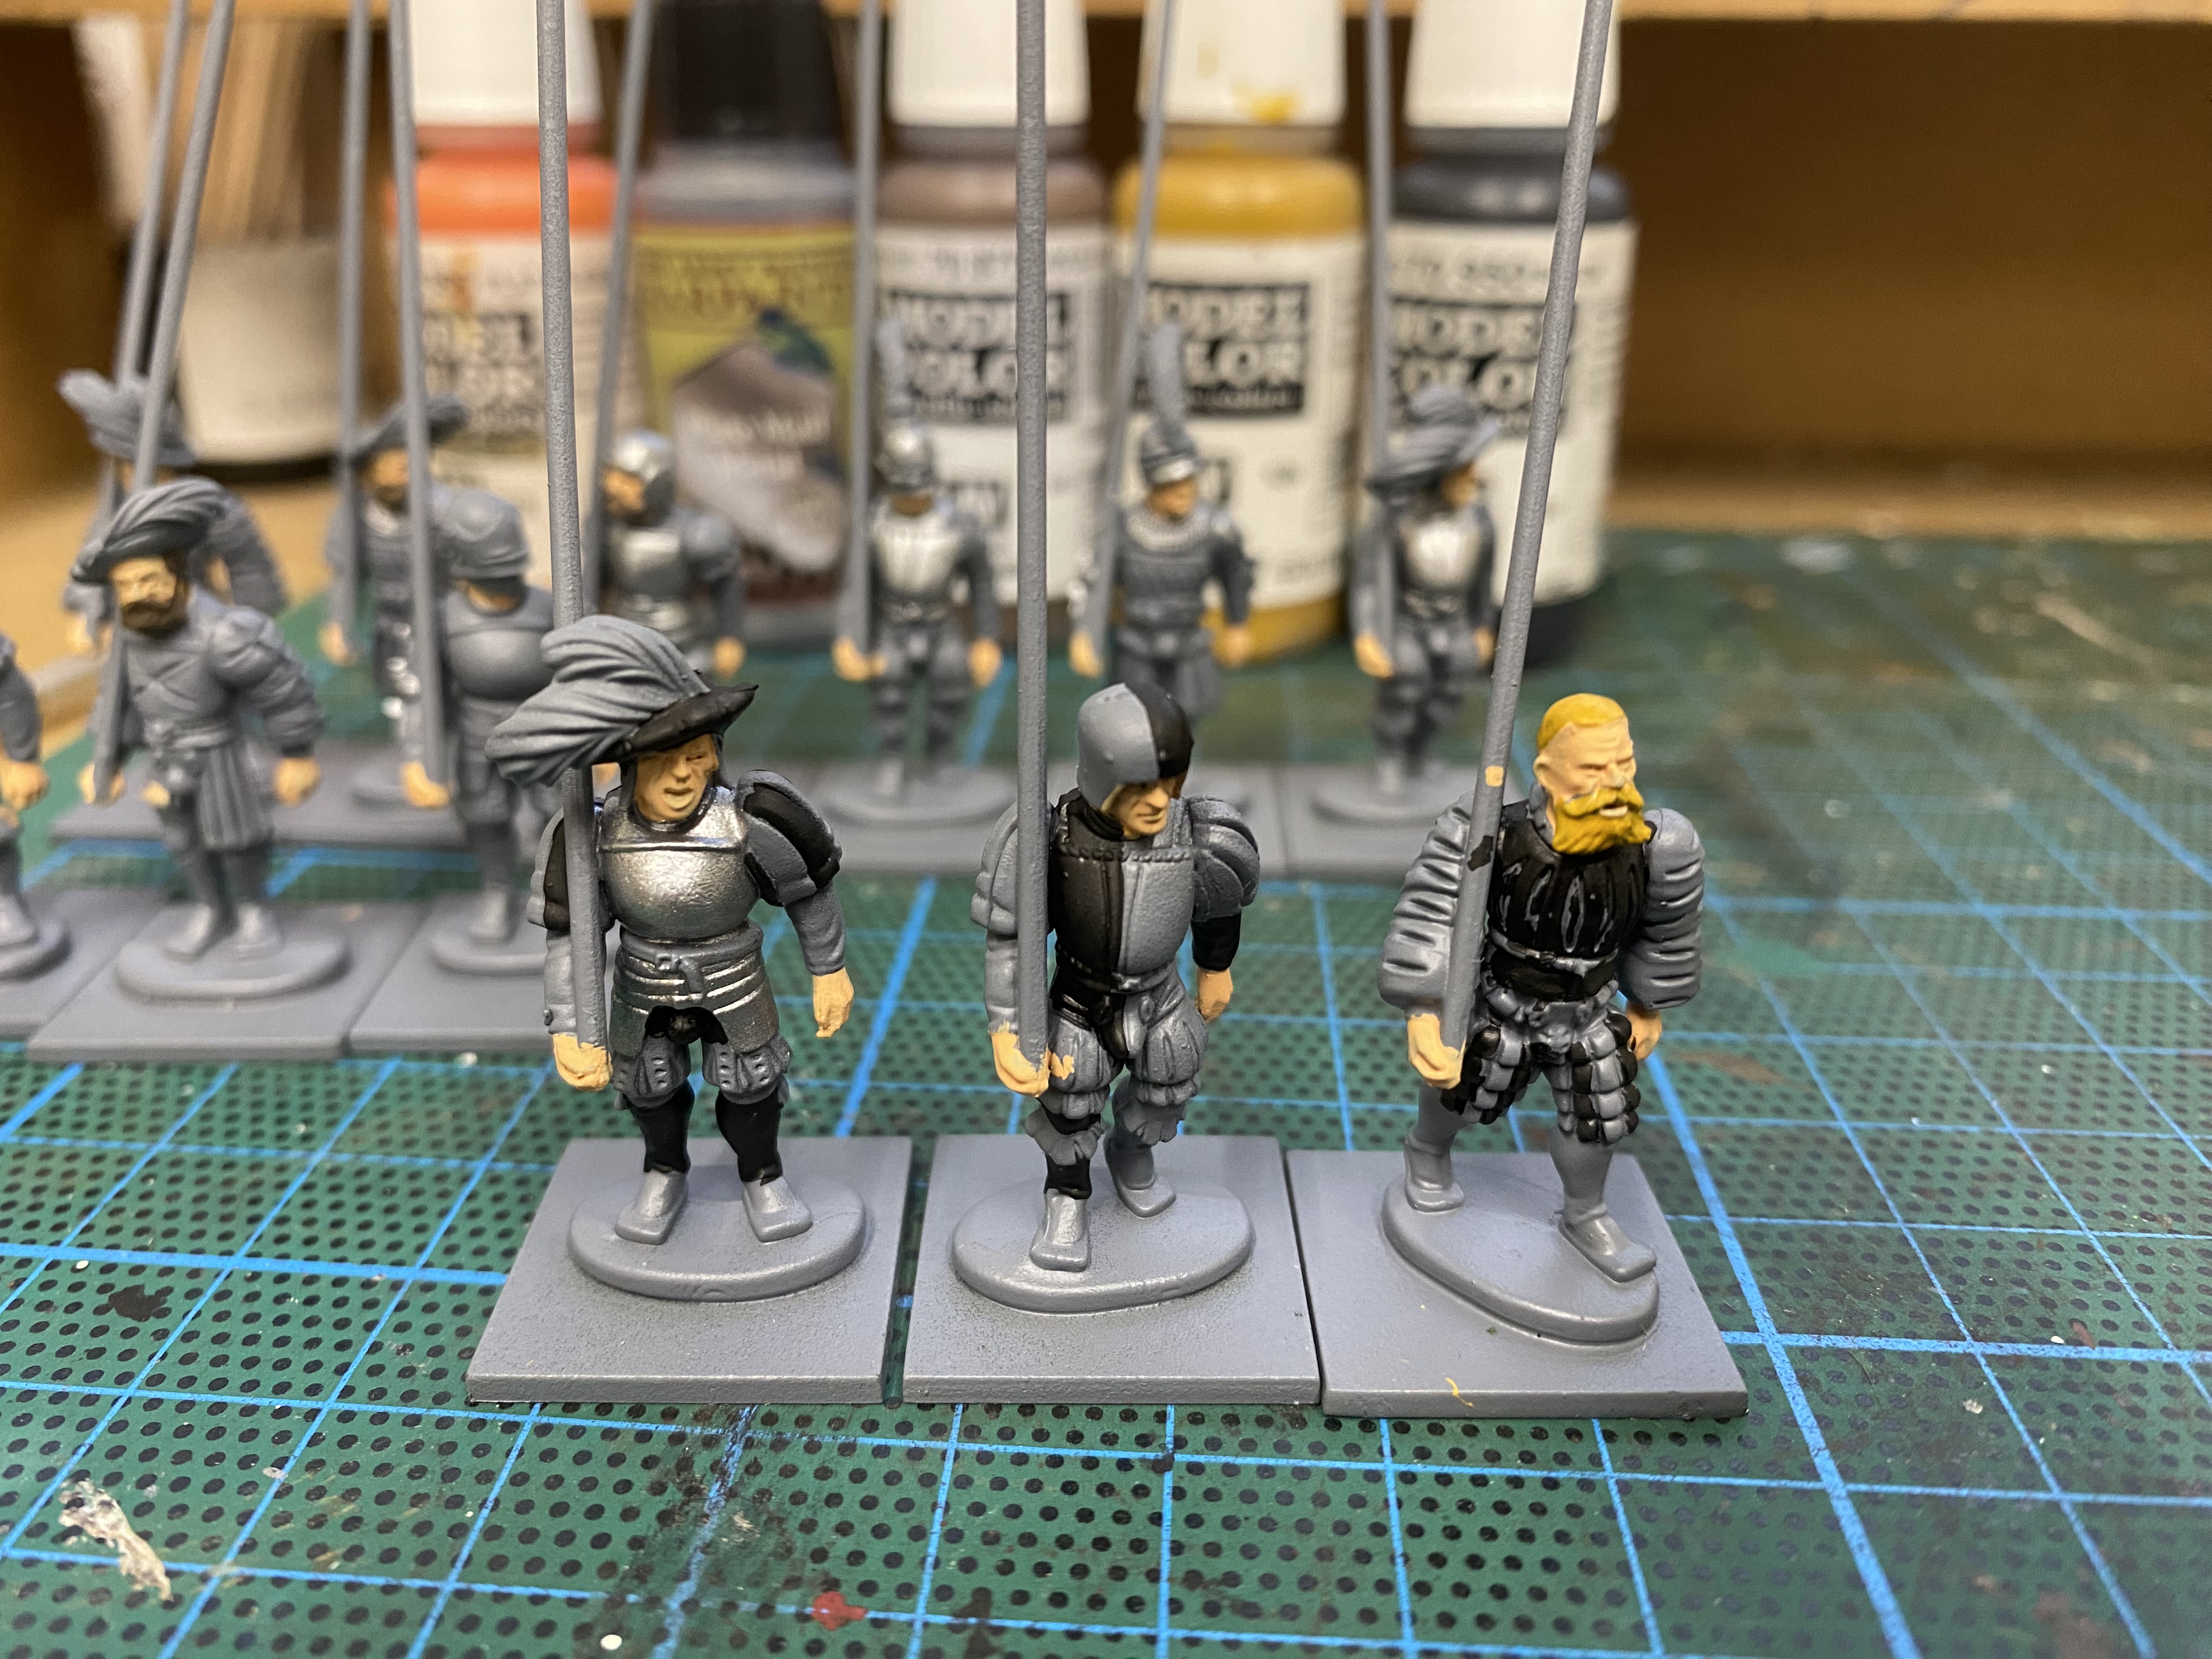
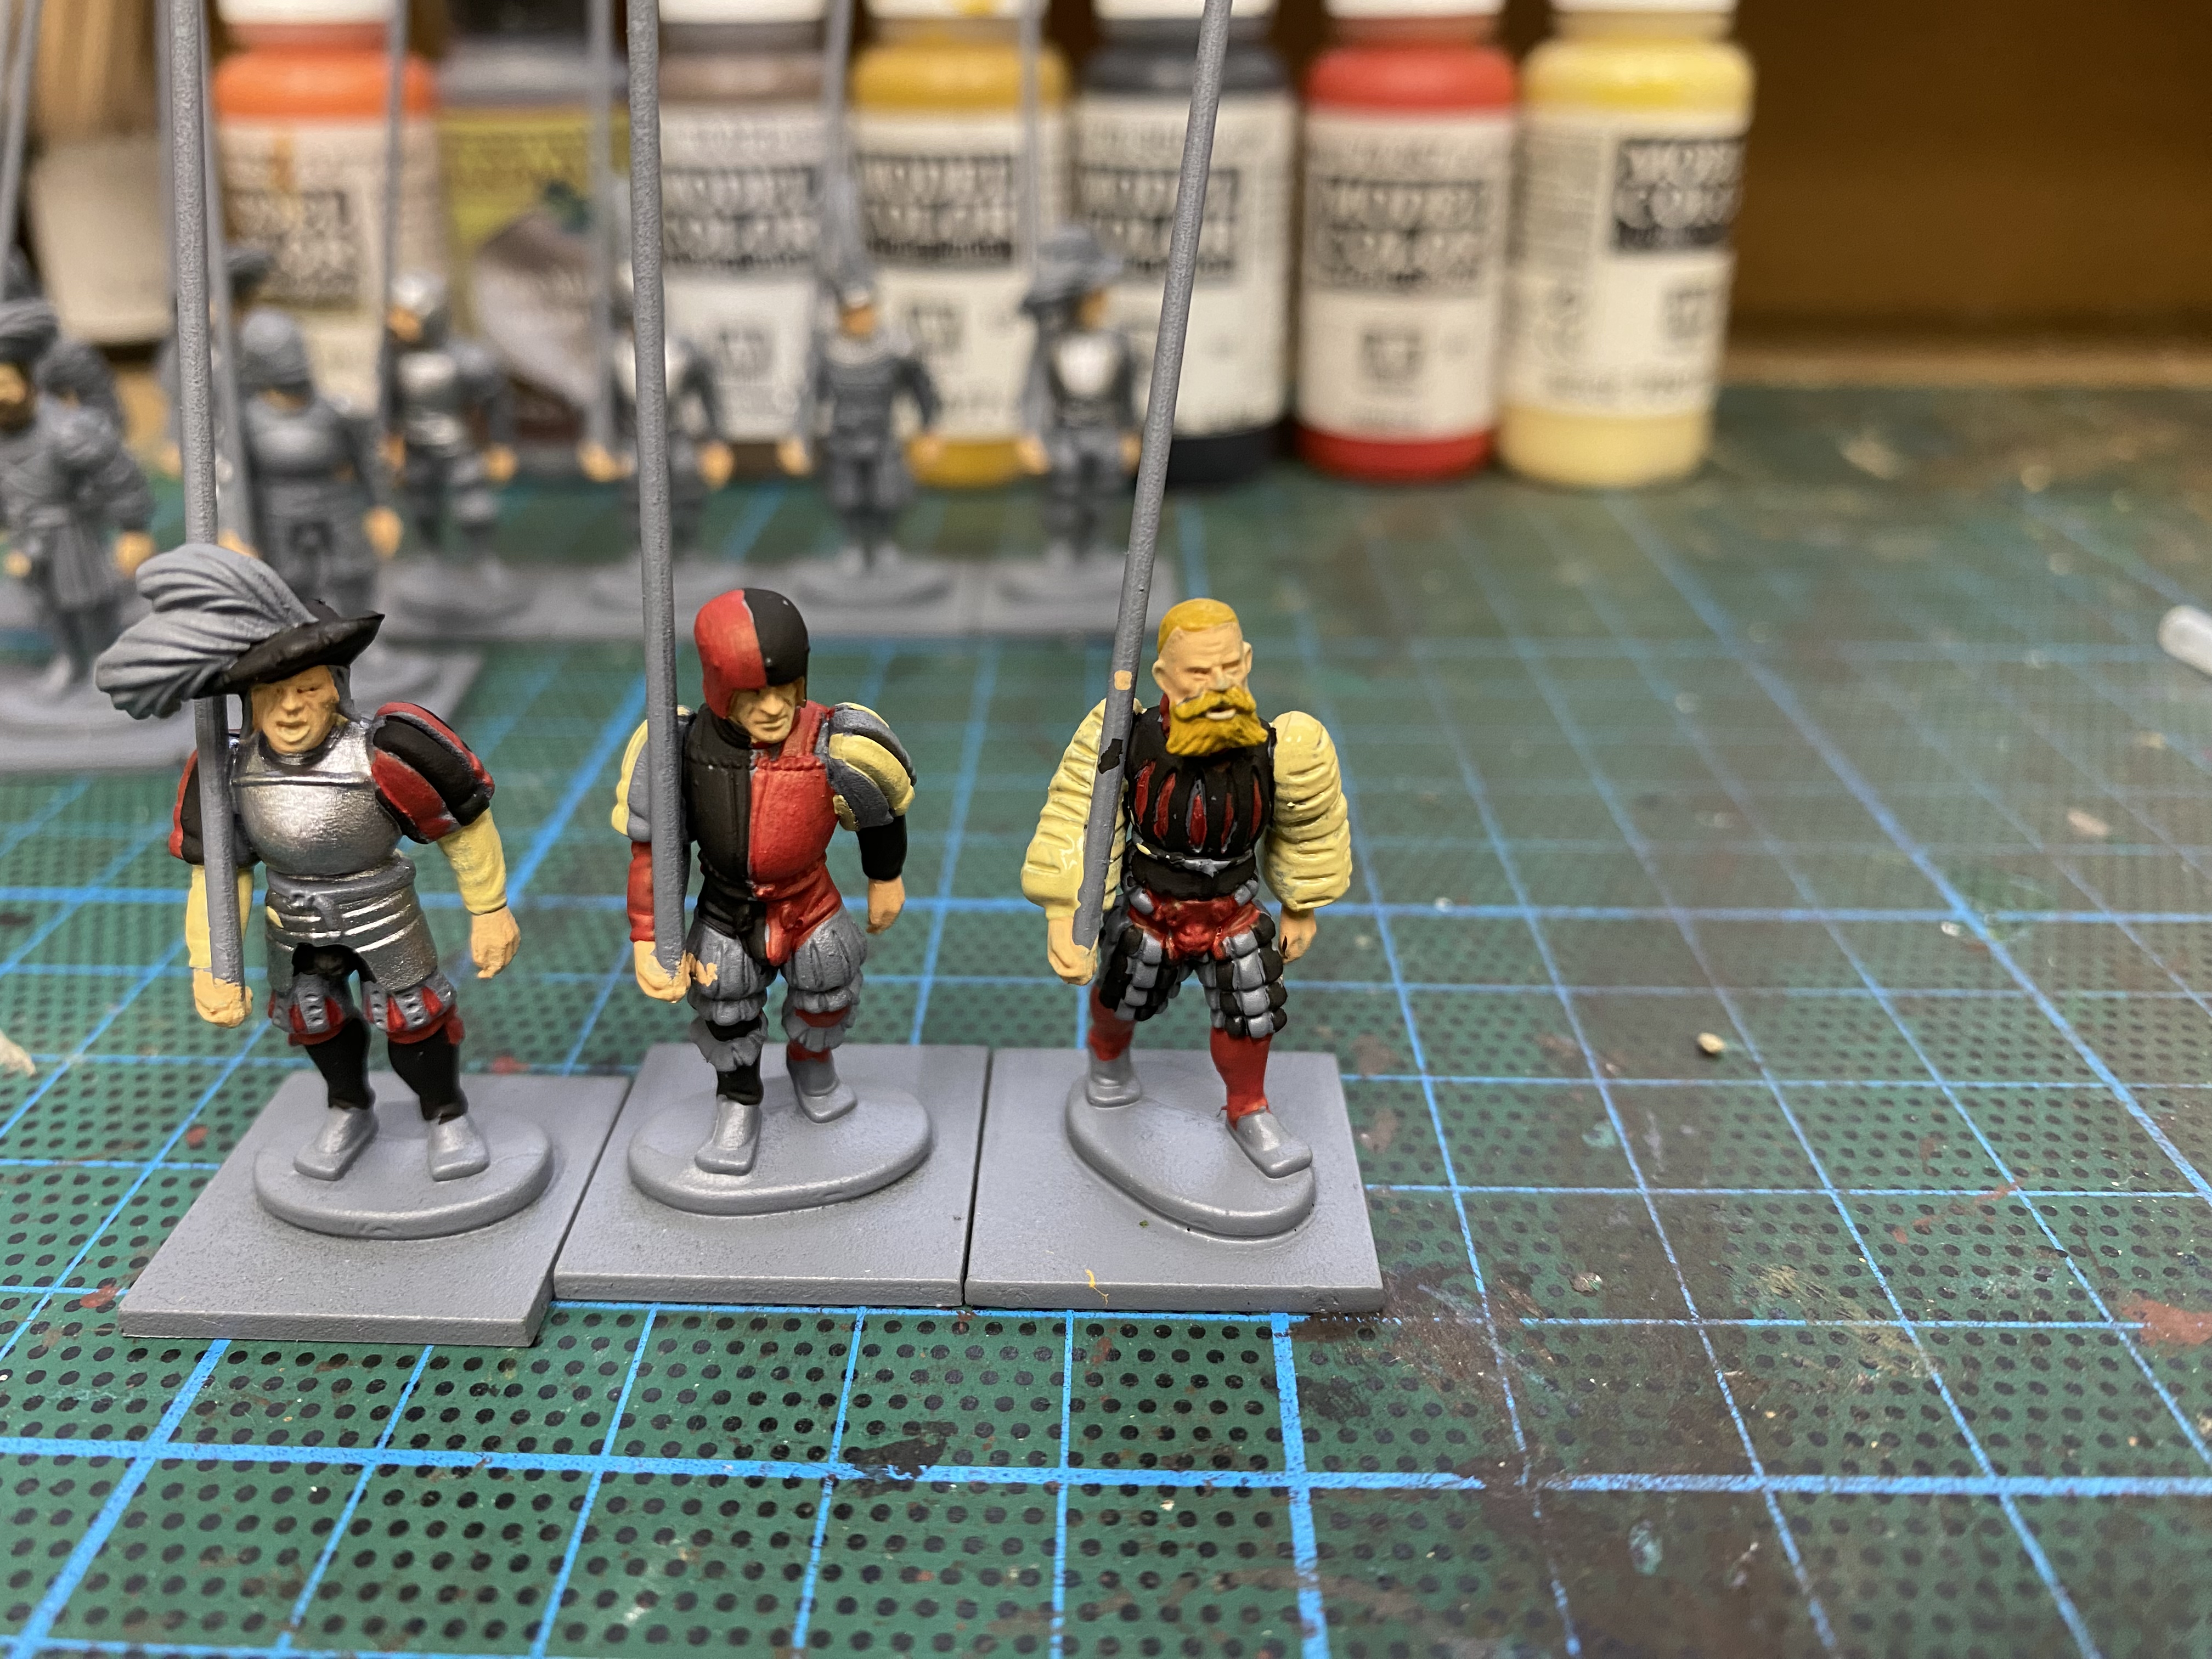
At this point, I decided that a batch of twelve wasn’t going to work for me, so I took three figures, painted the hair and then started to block paint the first colour – in this example 70950 Black.
Next, I added the red, 70957. It looks a bit messy at this stage but I tend to tidy up as I go. There’s no plan that I’m following – I just paint the block colours in as the mood takes me!
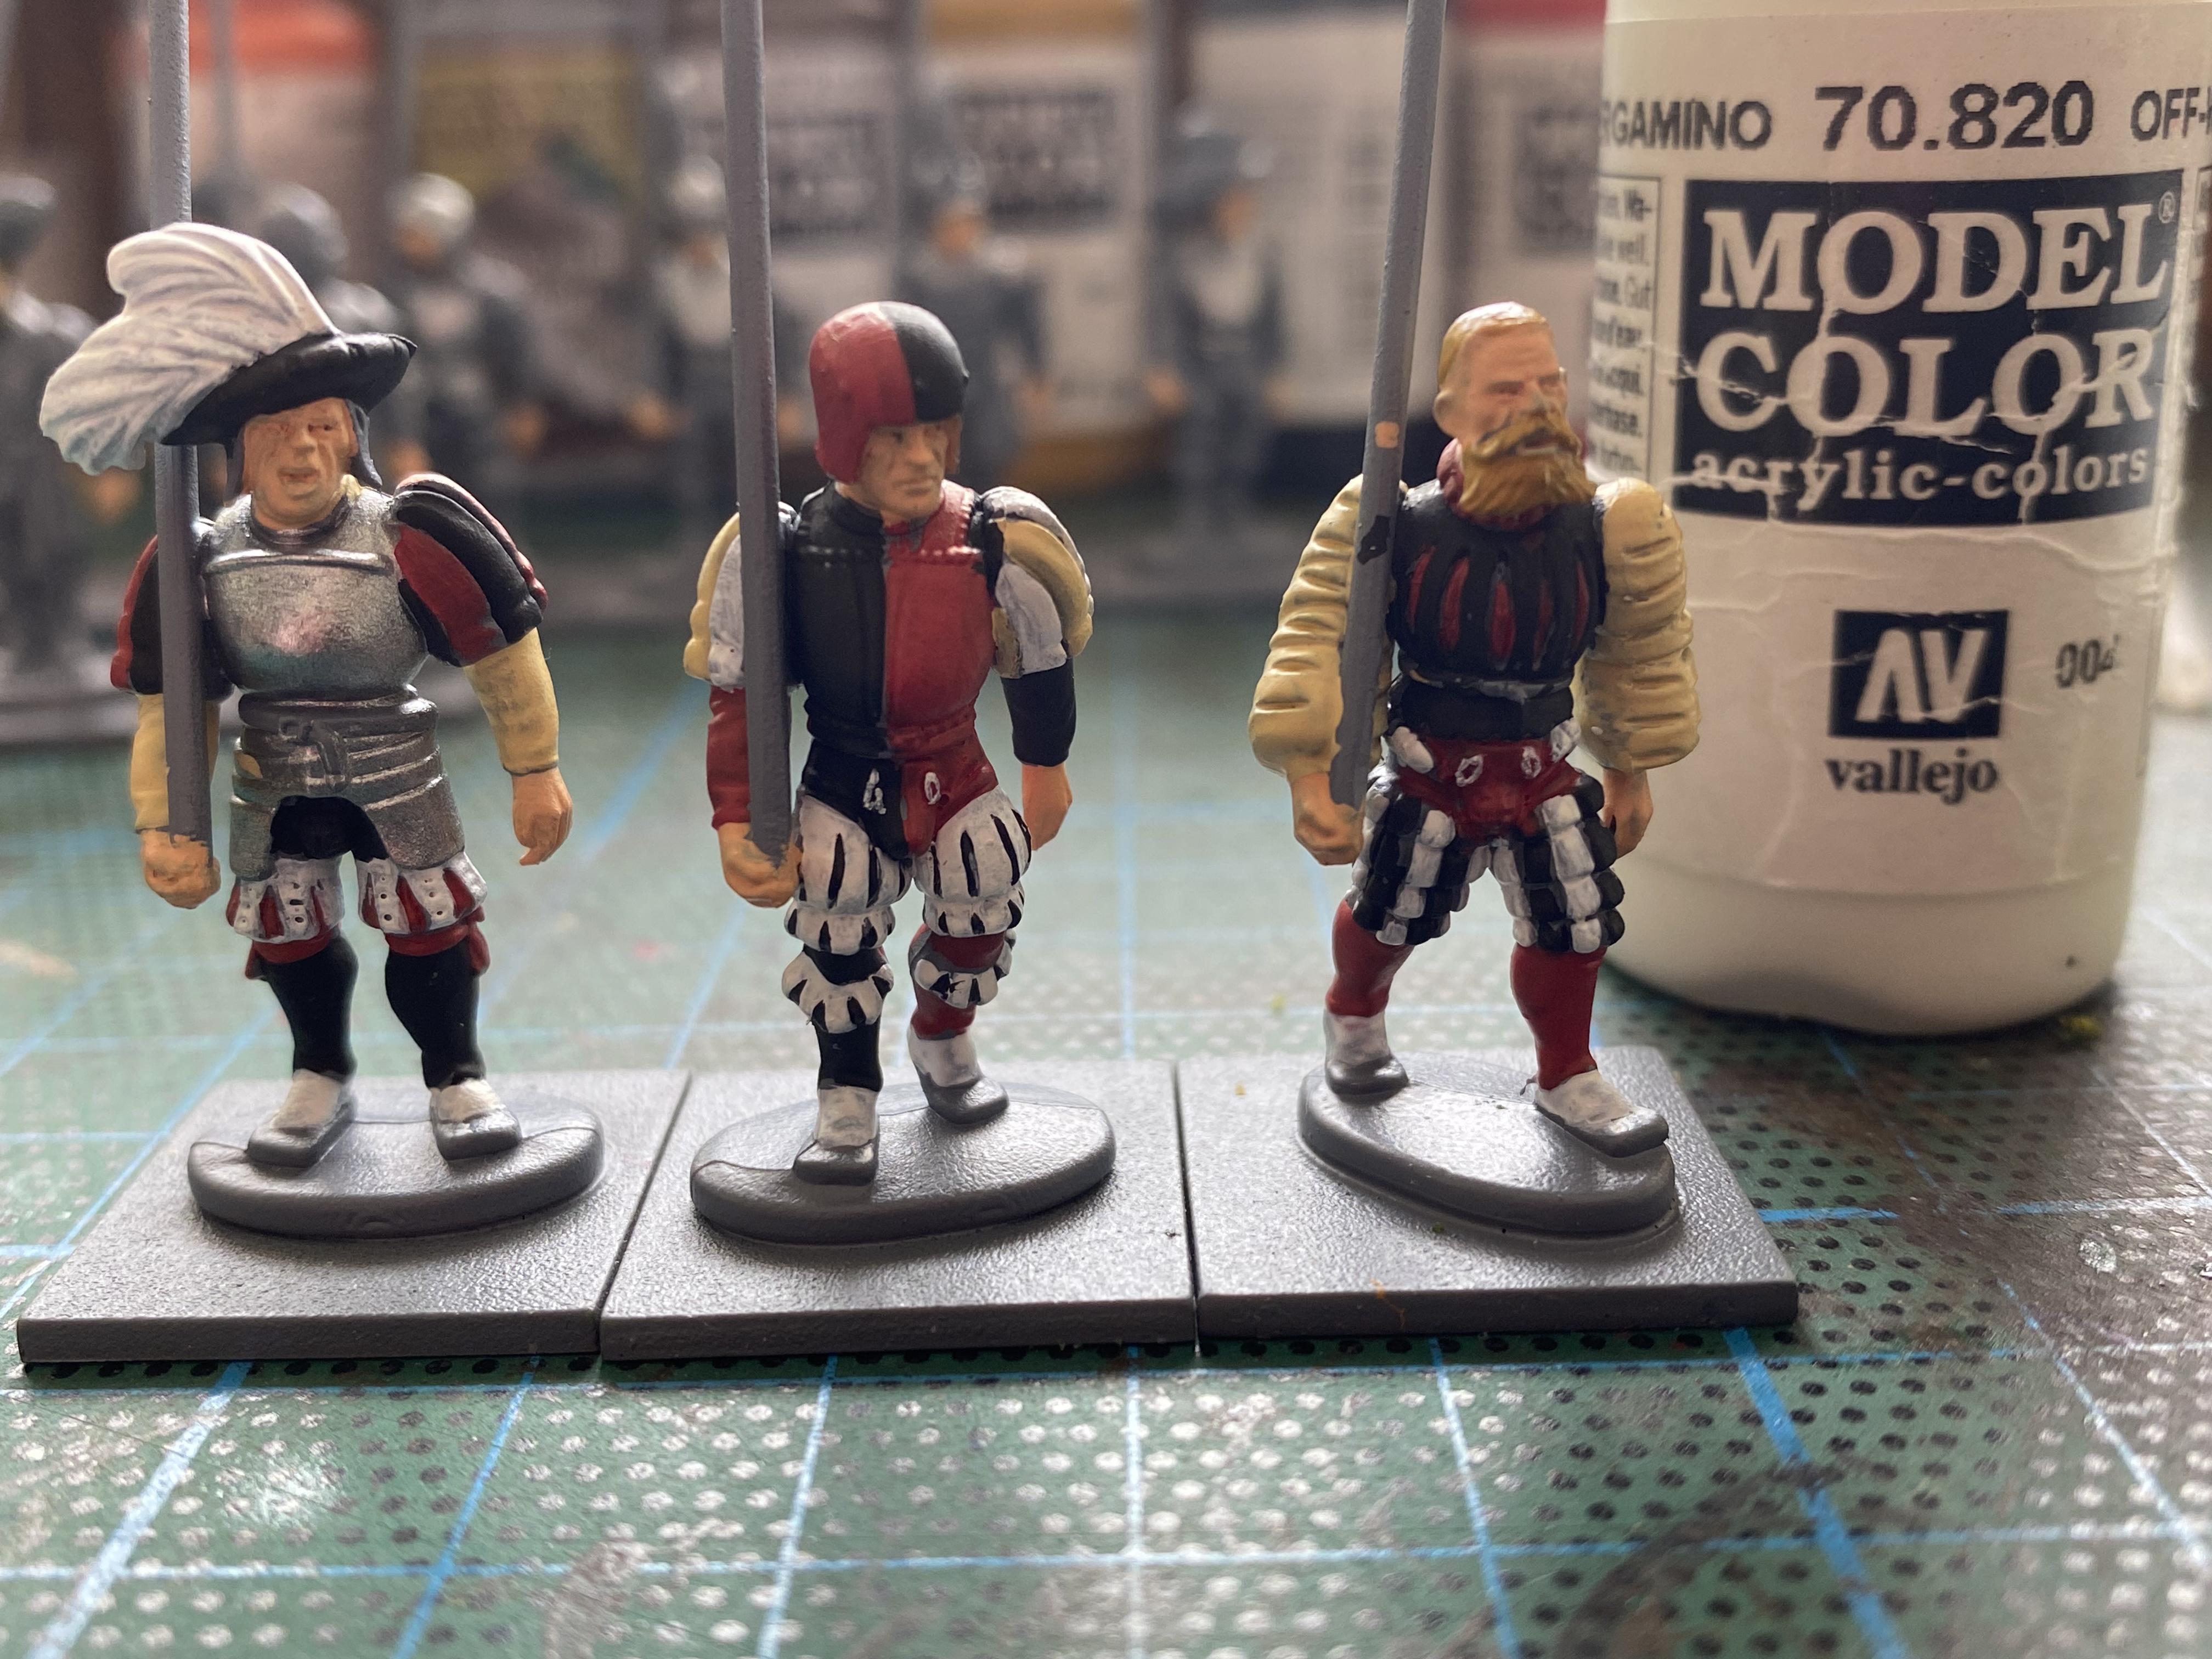
I’ve now added a third colour to the figures – 70917 beige.
The fourth colour is off white 70820 – we are nearly done with the block paint!
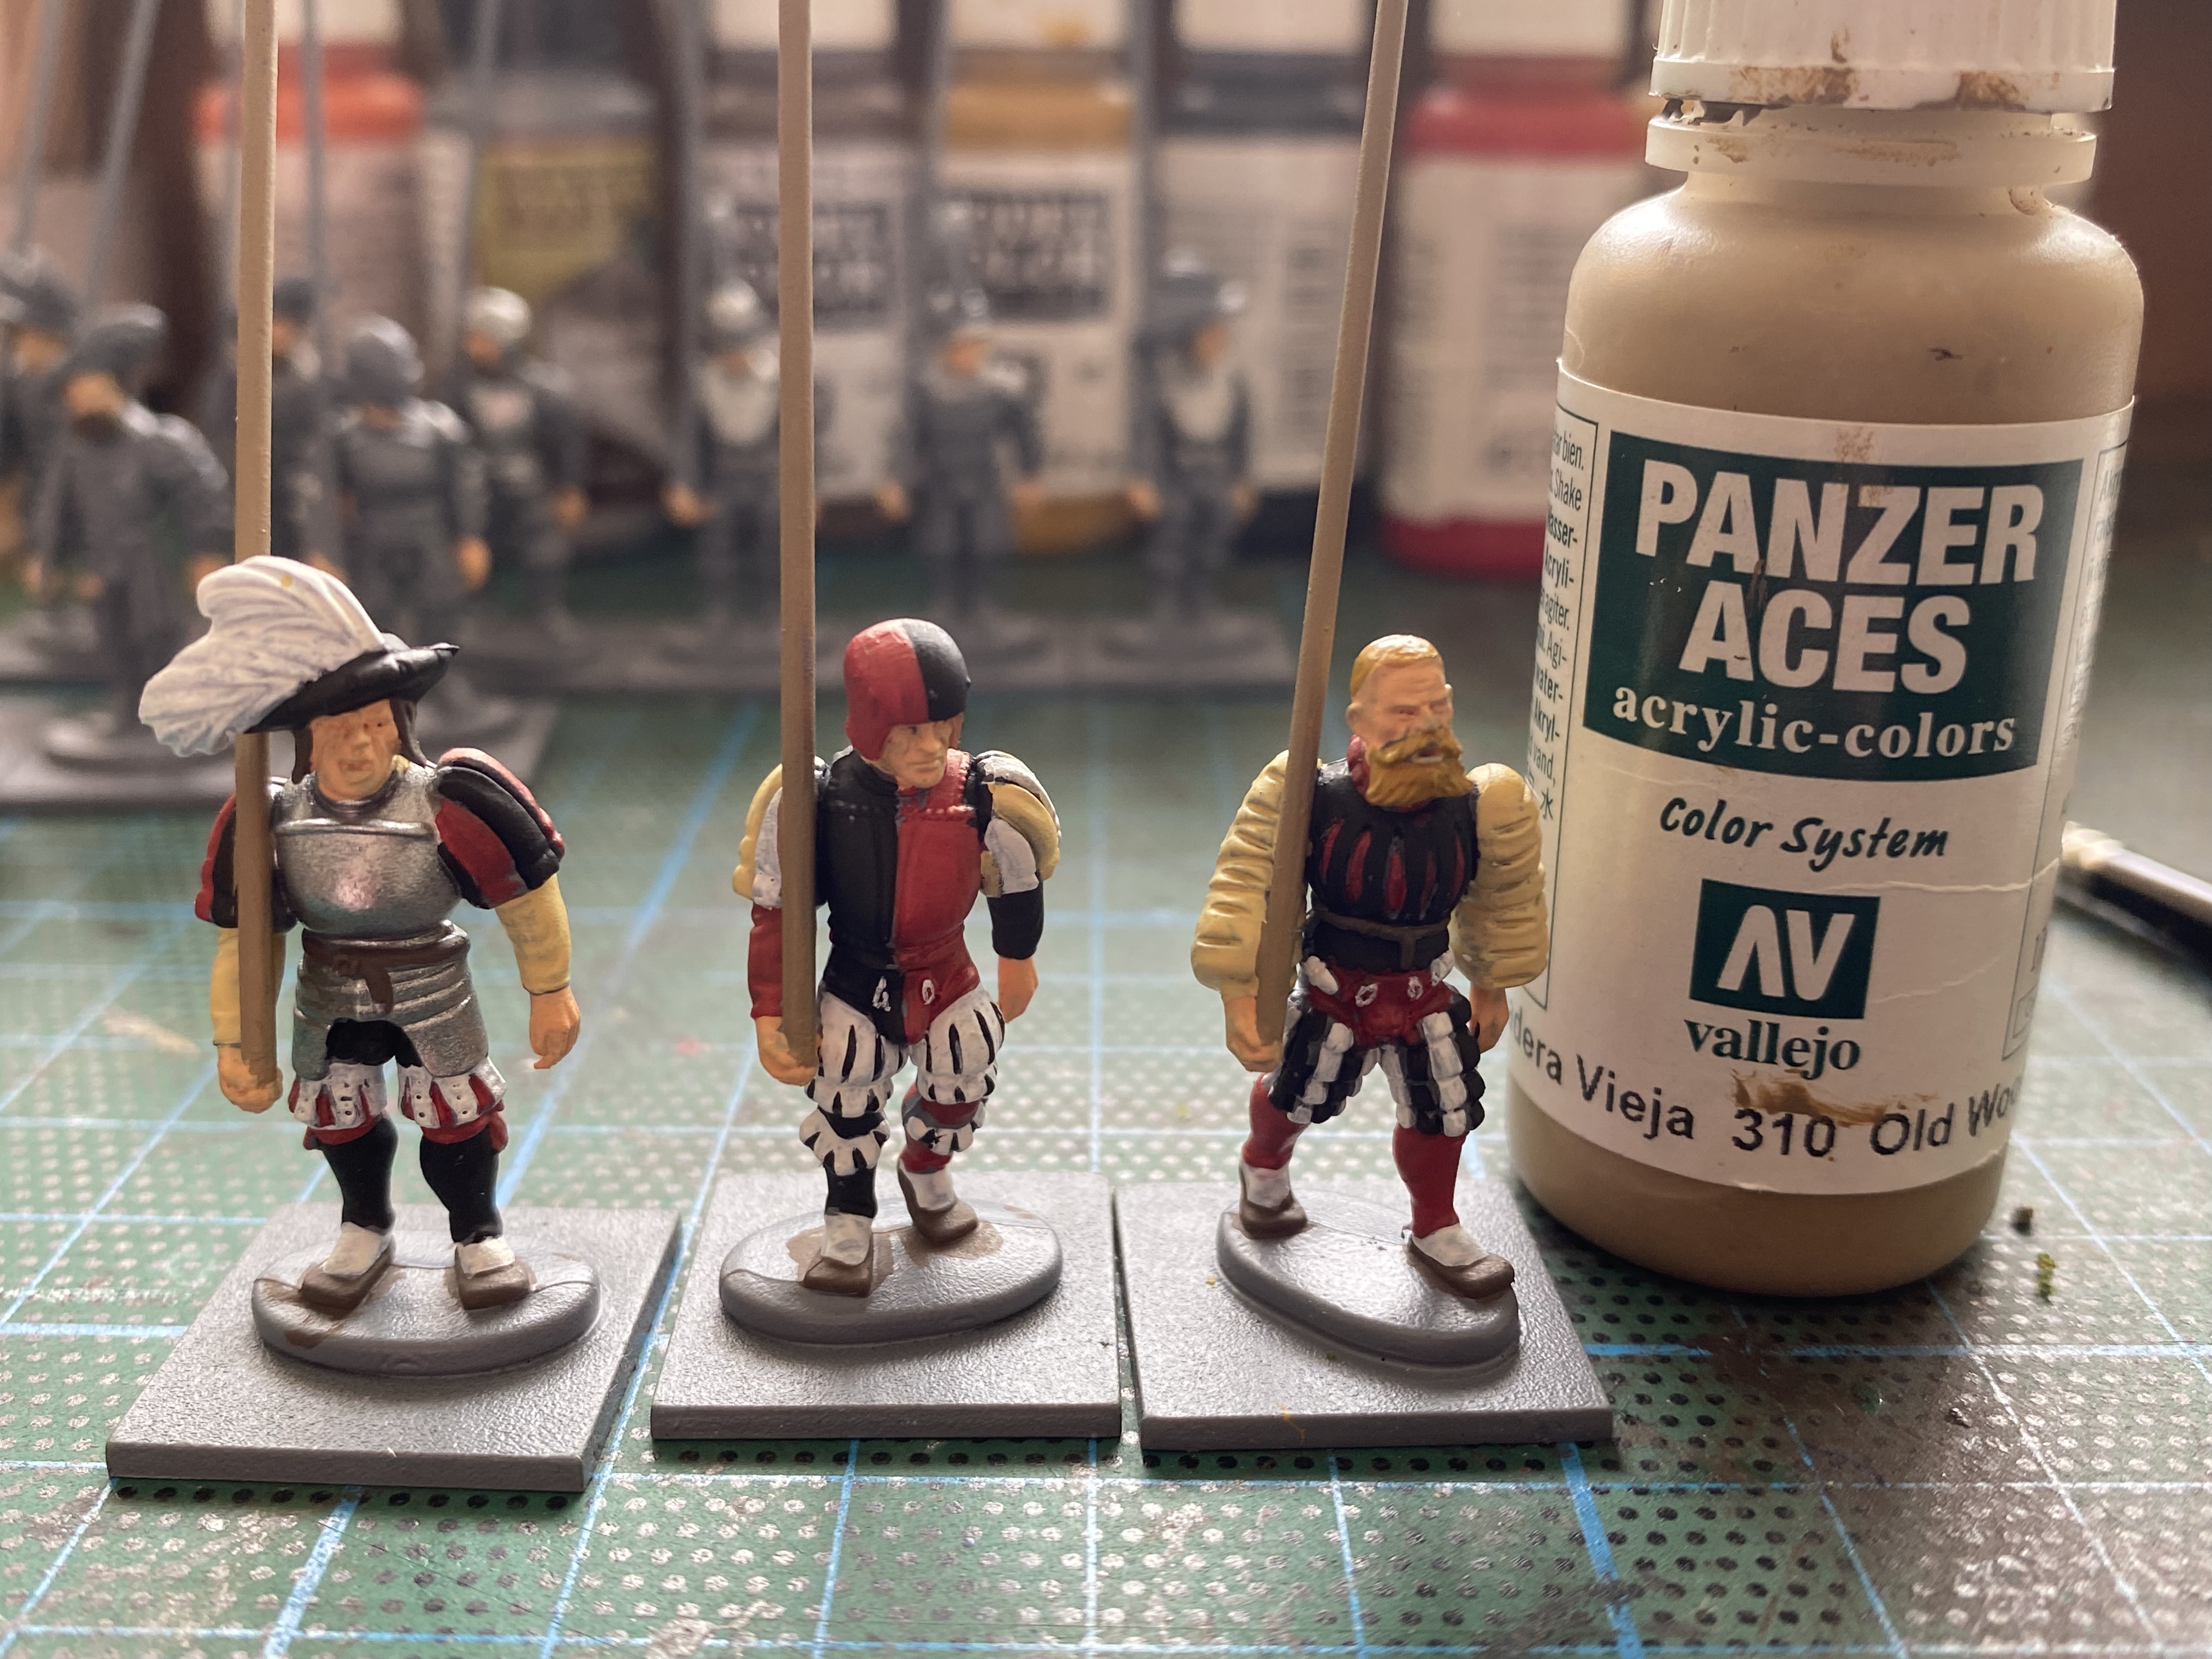
The belts ( front and back) and the shoes are painted 70871 leather. I used this on all of my figures regardless of the colour scheme chosen.
The pikes are painted with Panzer Aces Old Wood 310.
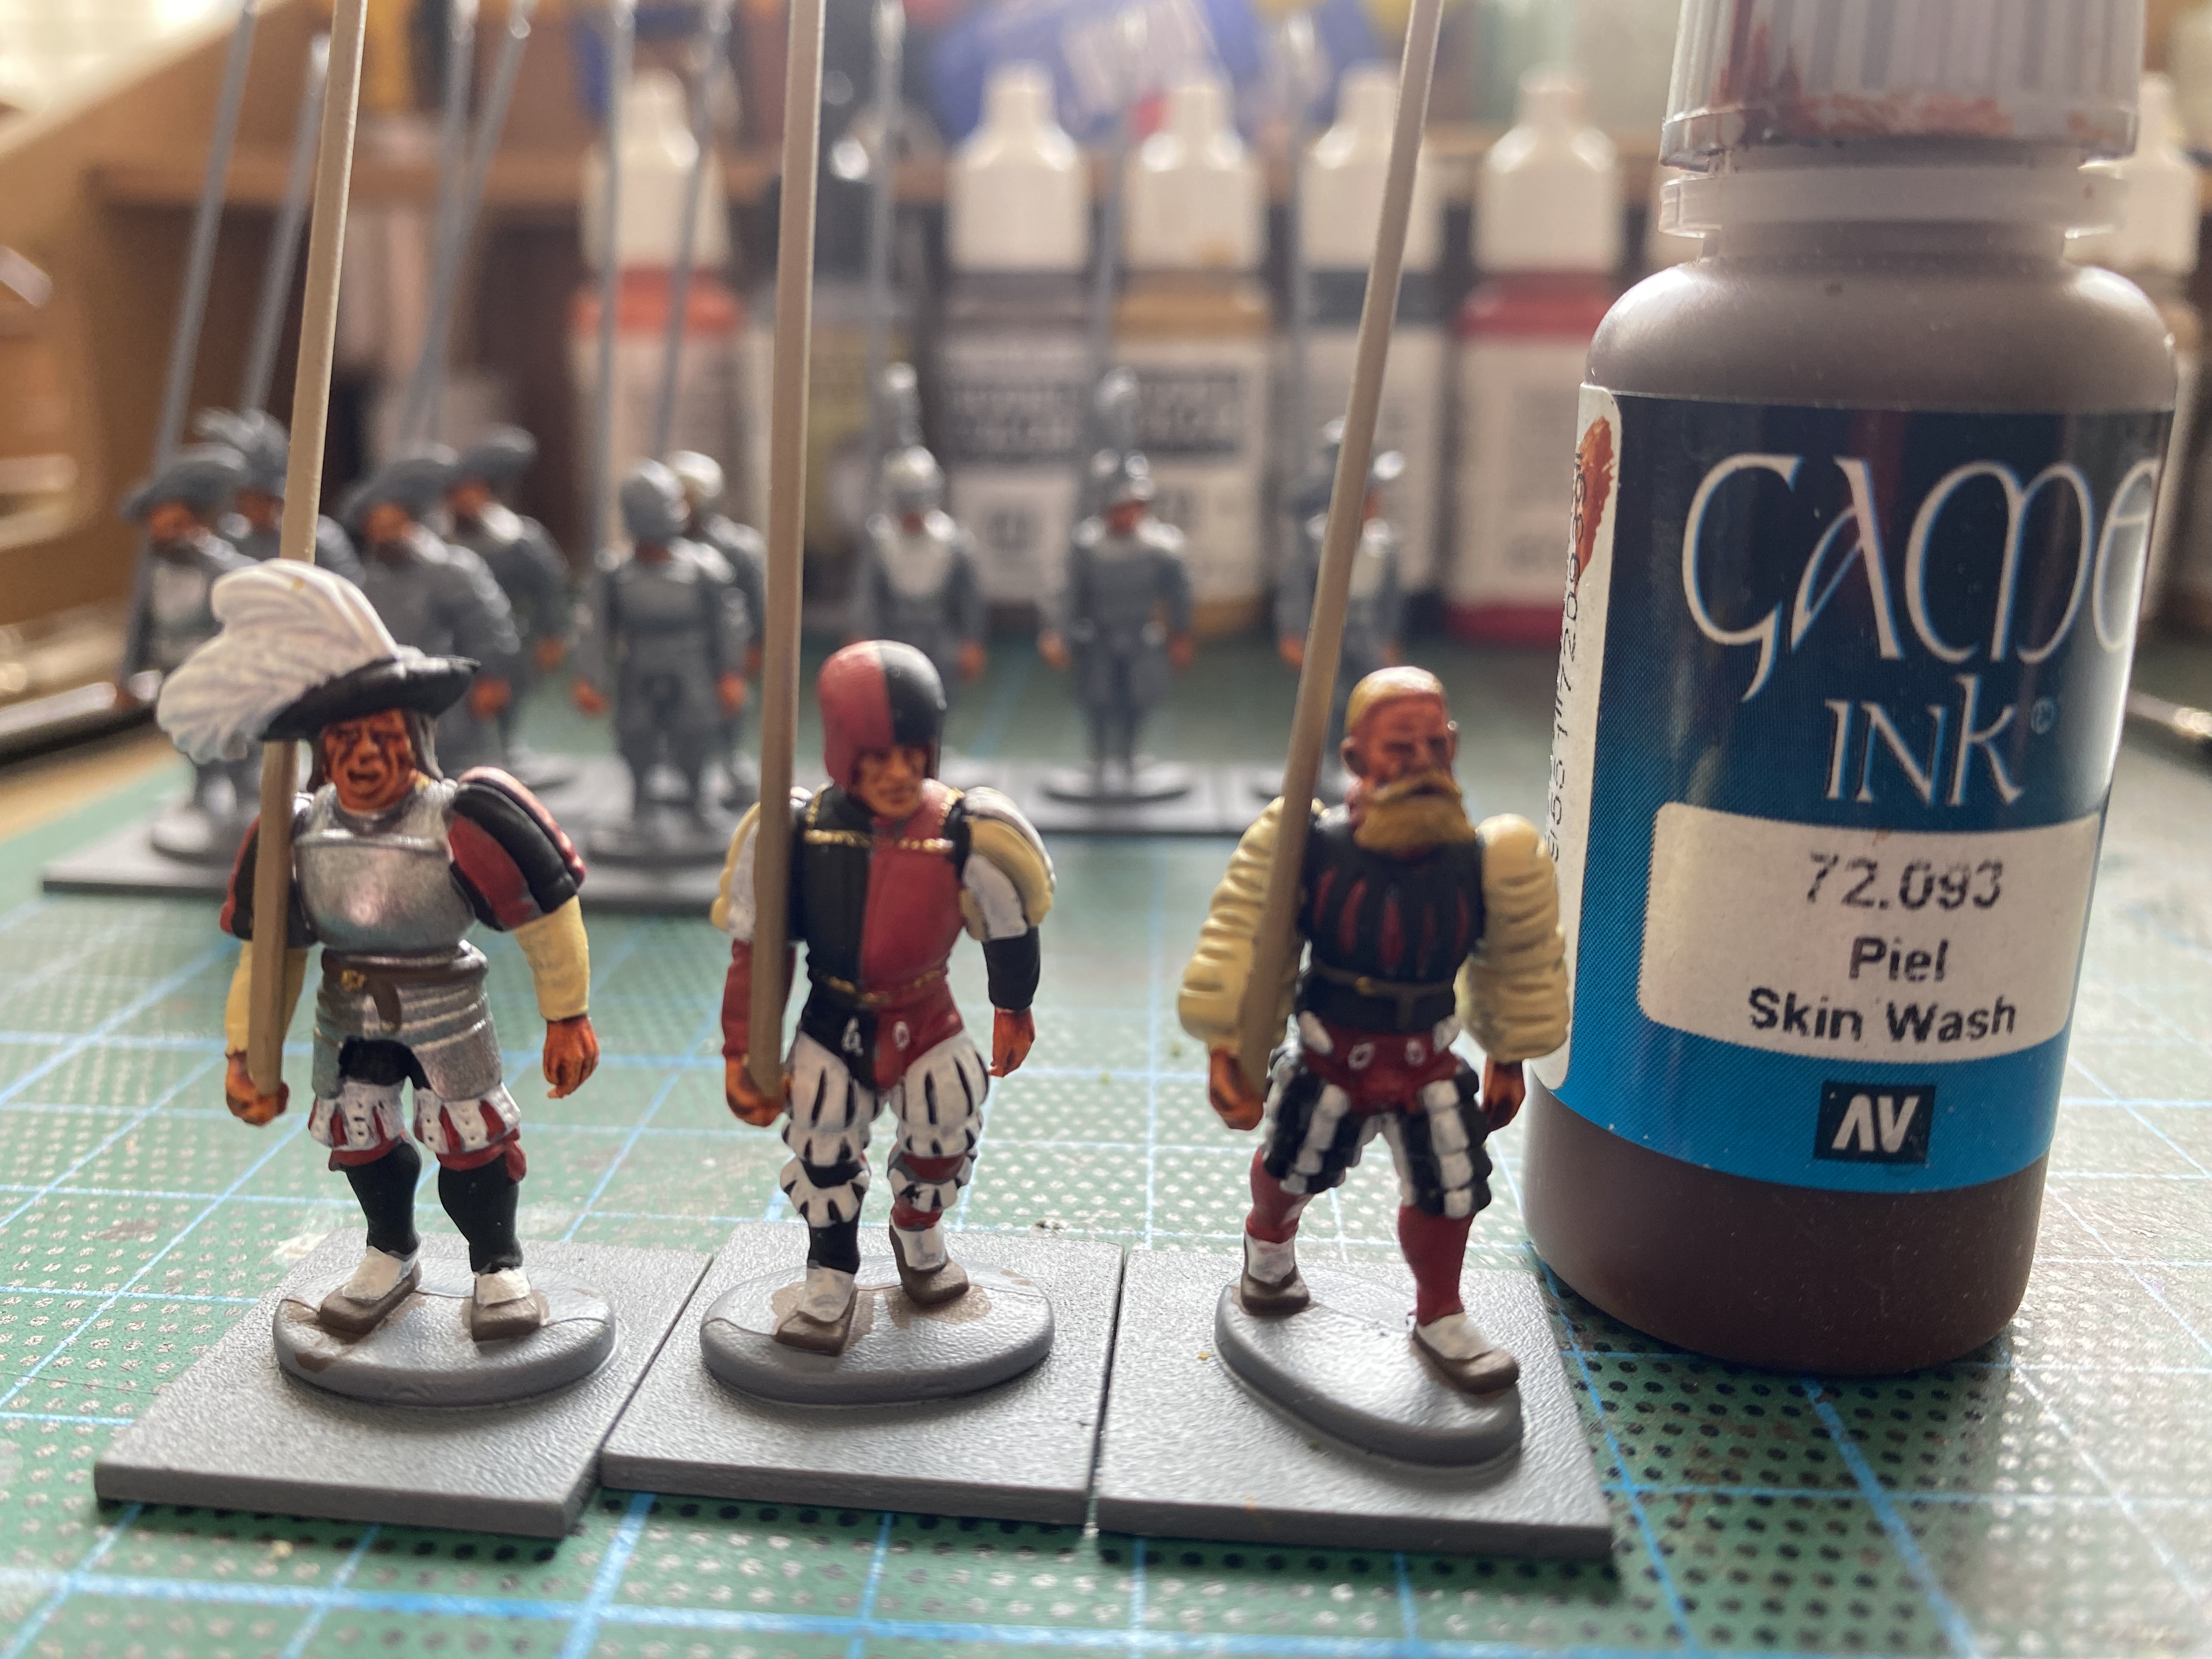
The flesh is now given a wash using Game Ink 72093.
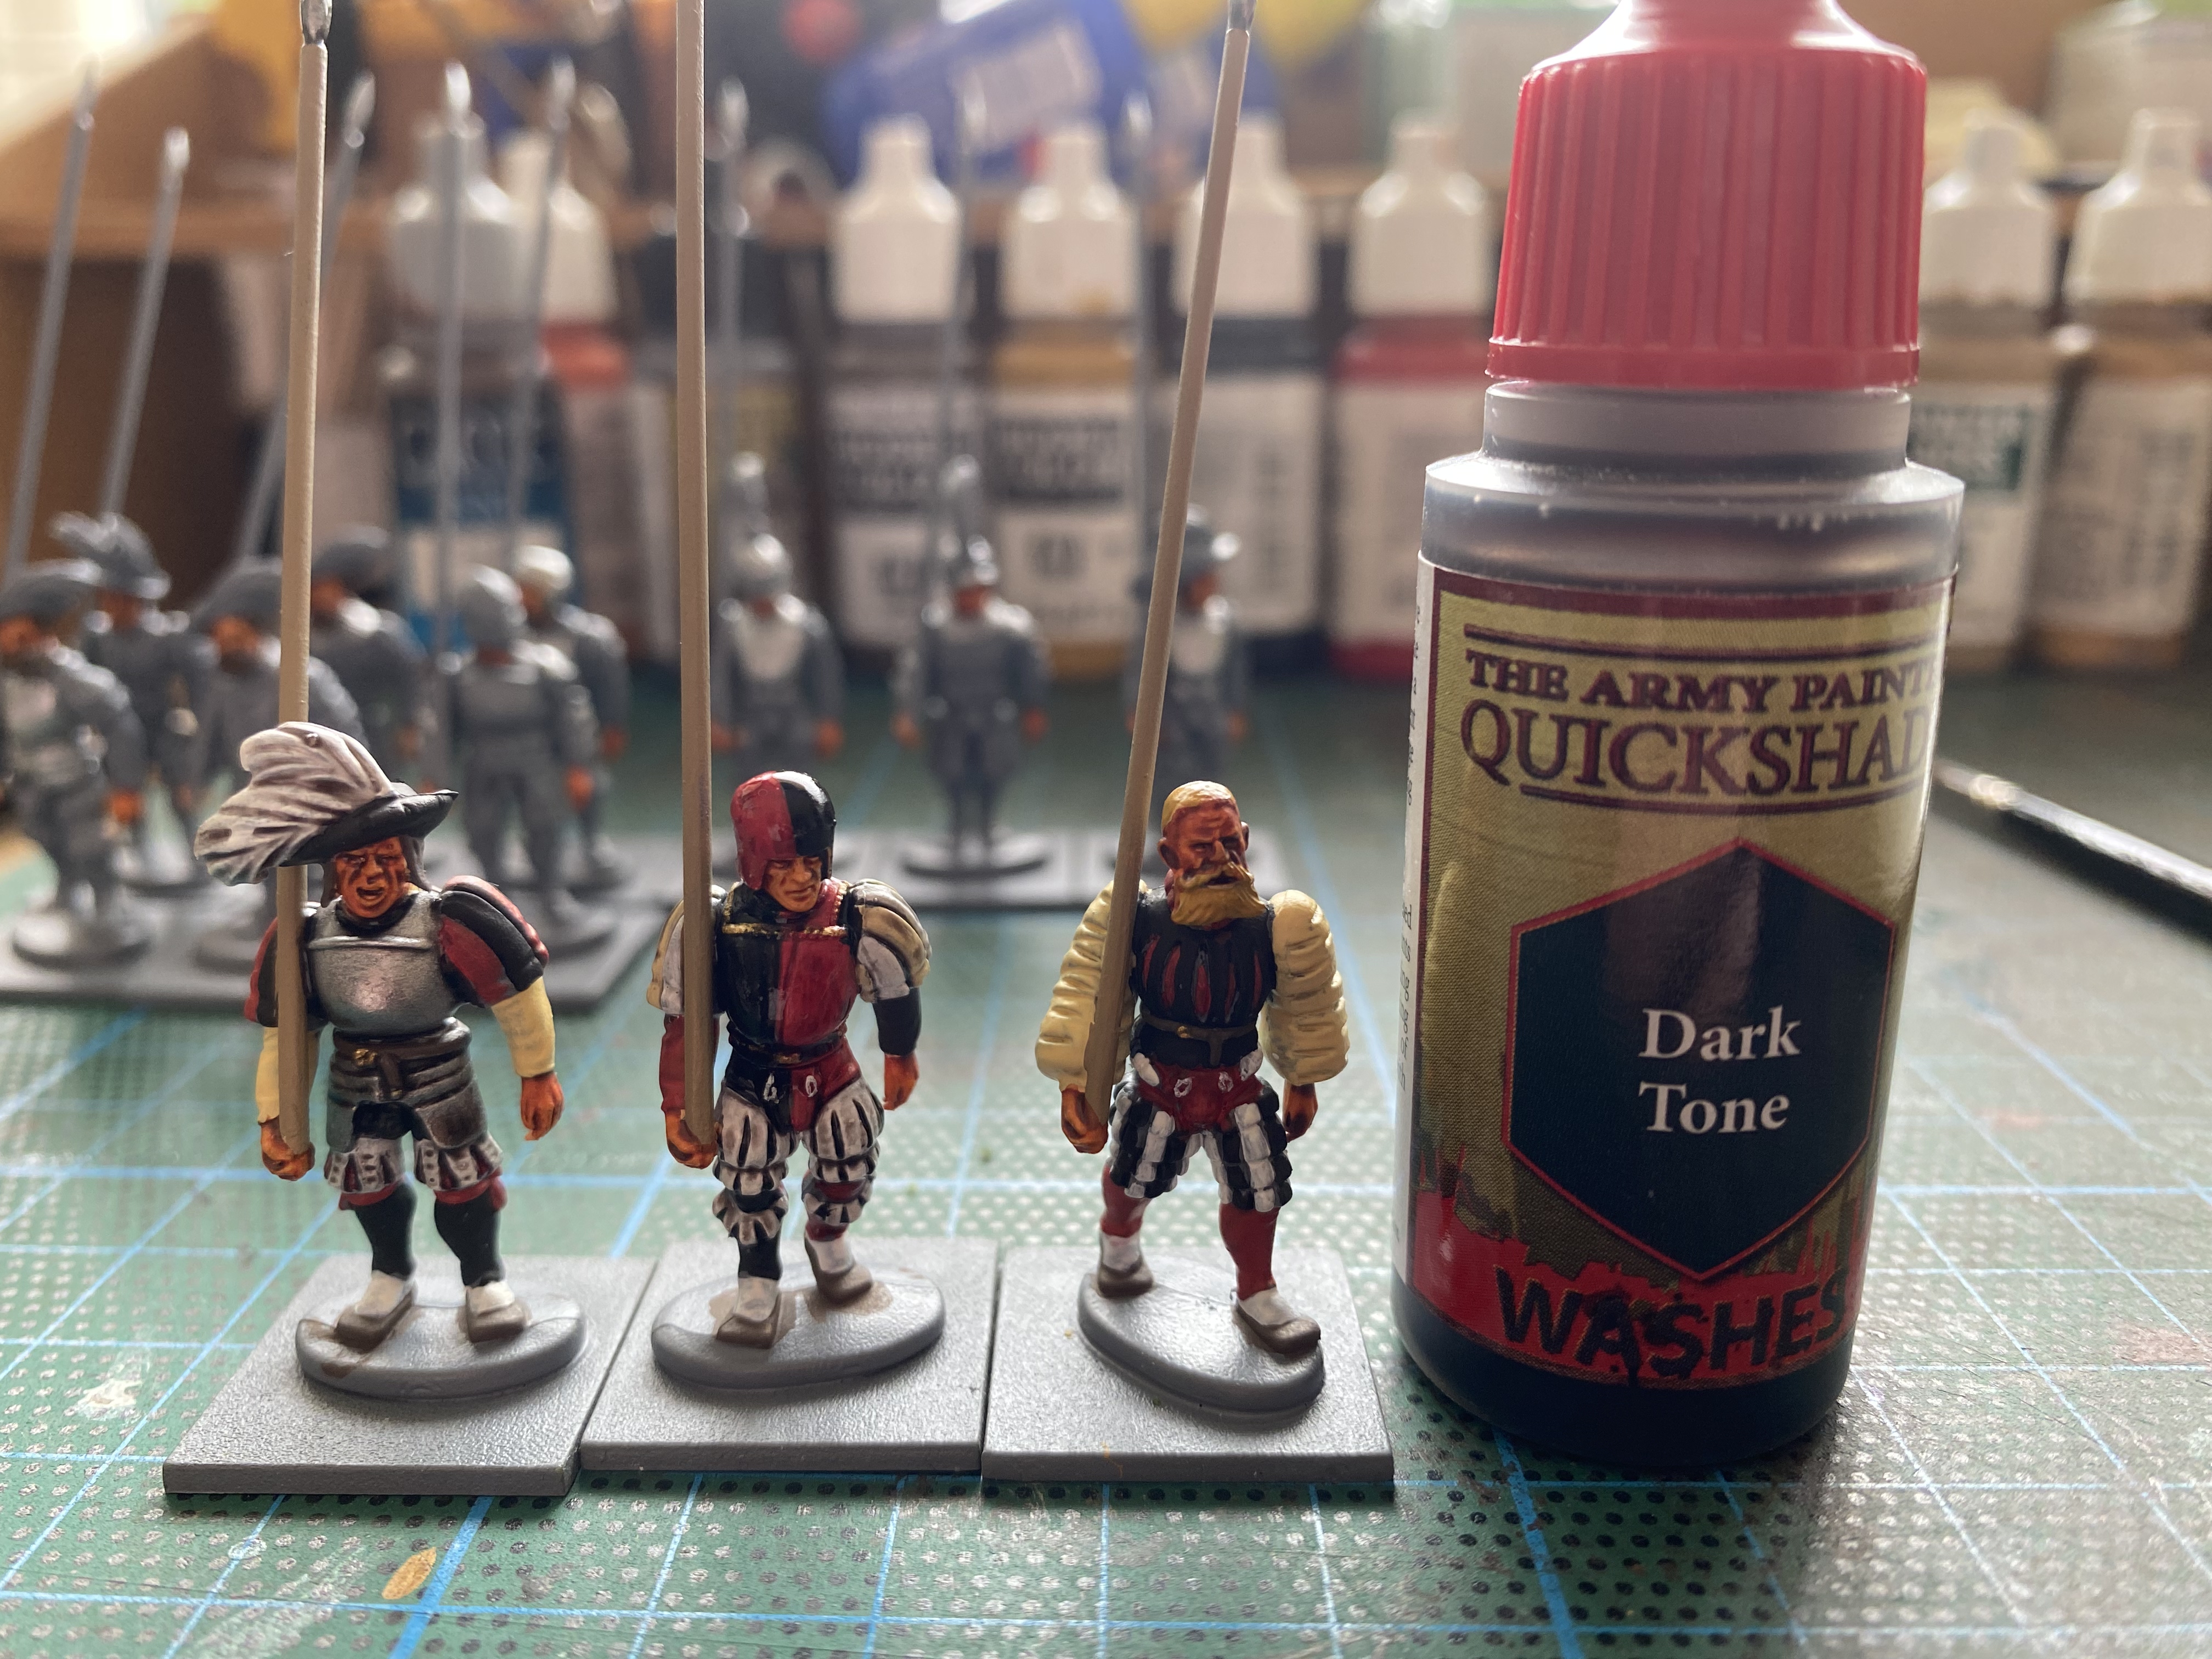
The Black, Red, Plate Mail and White ares are washed with Army painter dark tone – I thin this down slighty with water to make it a bit lighter and easier to flow.
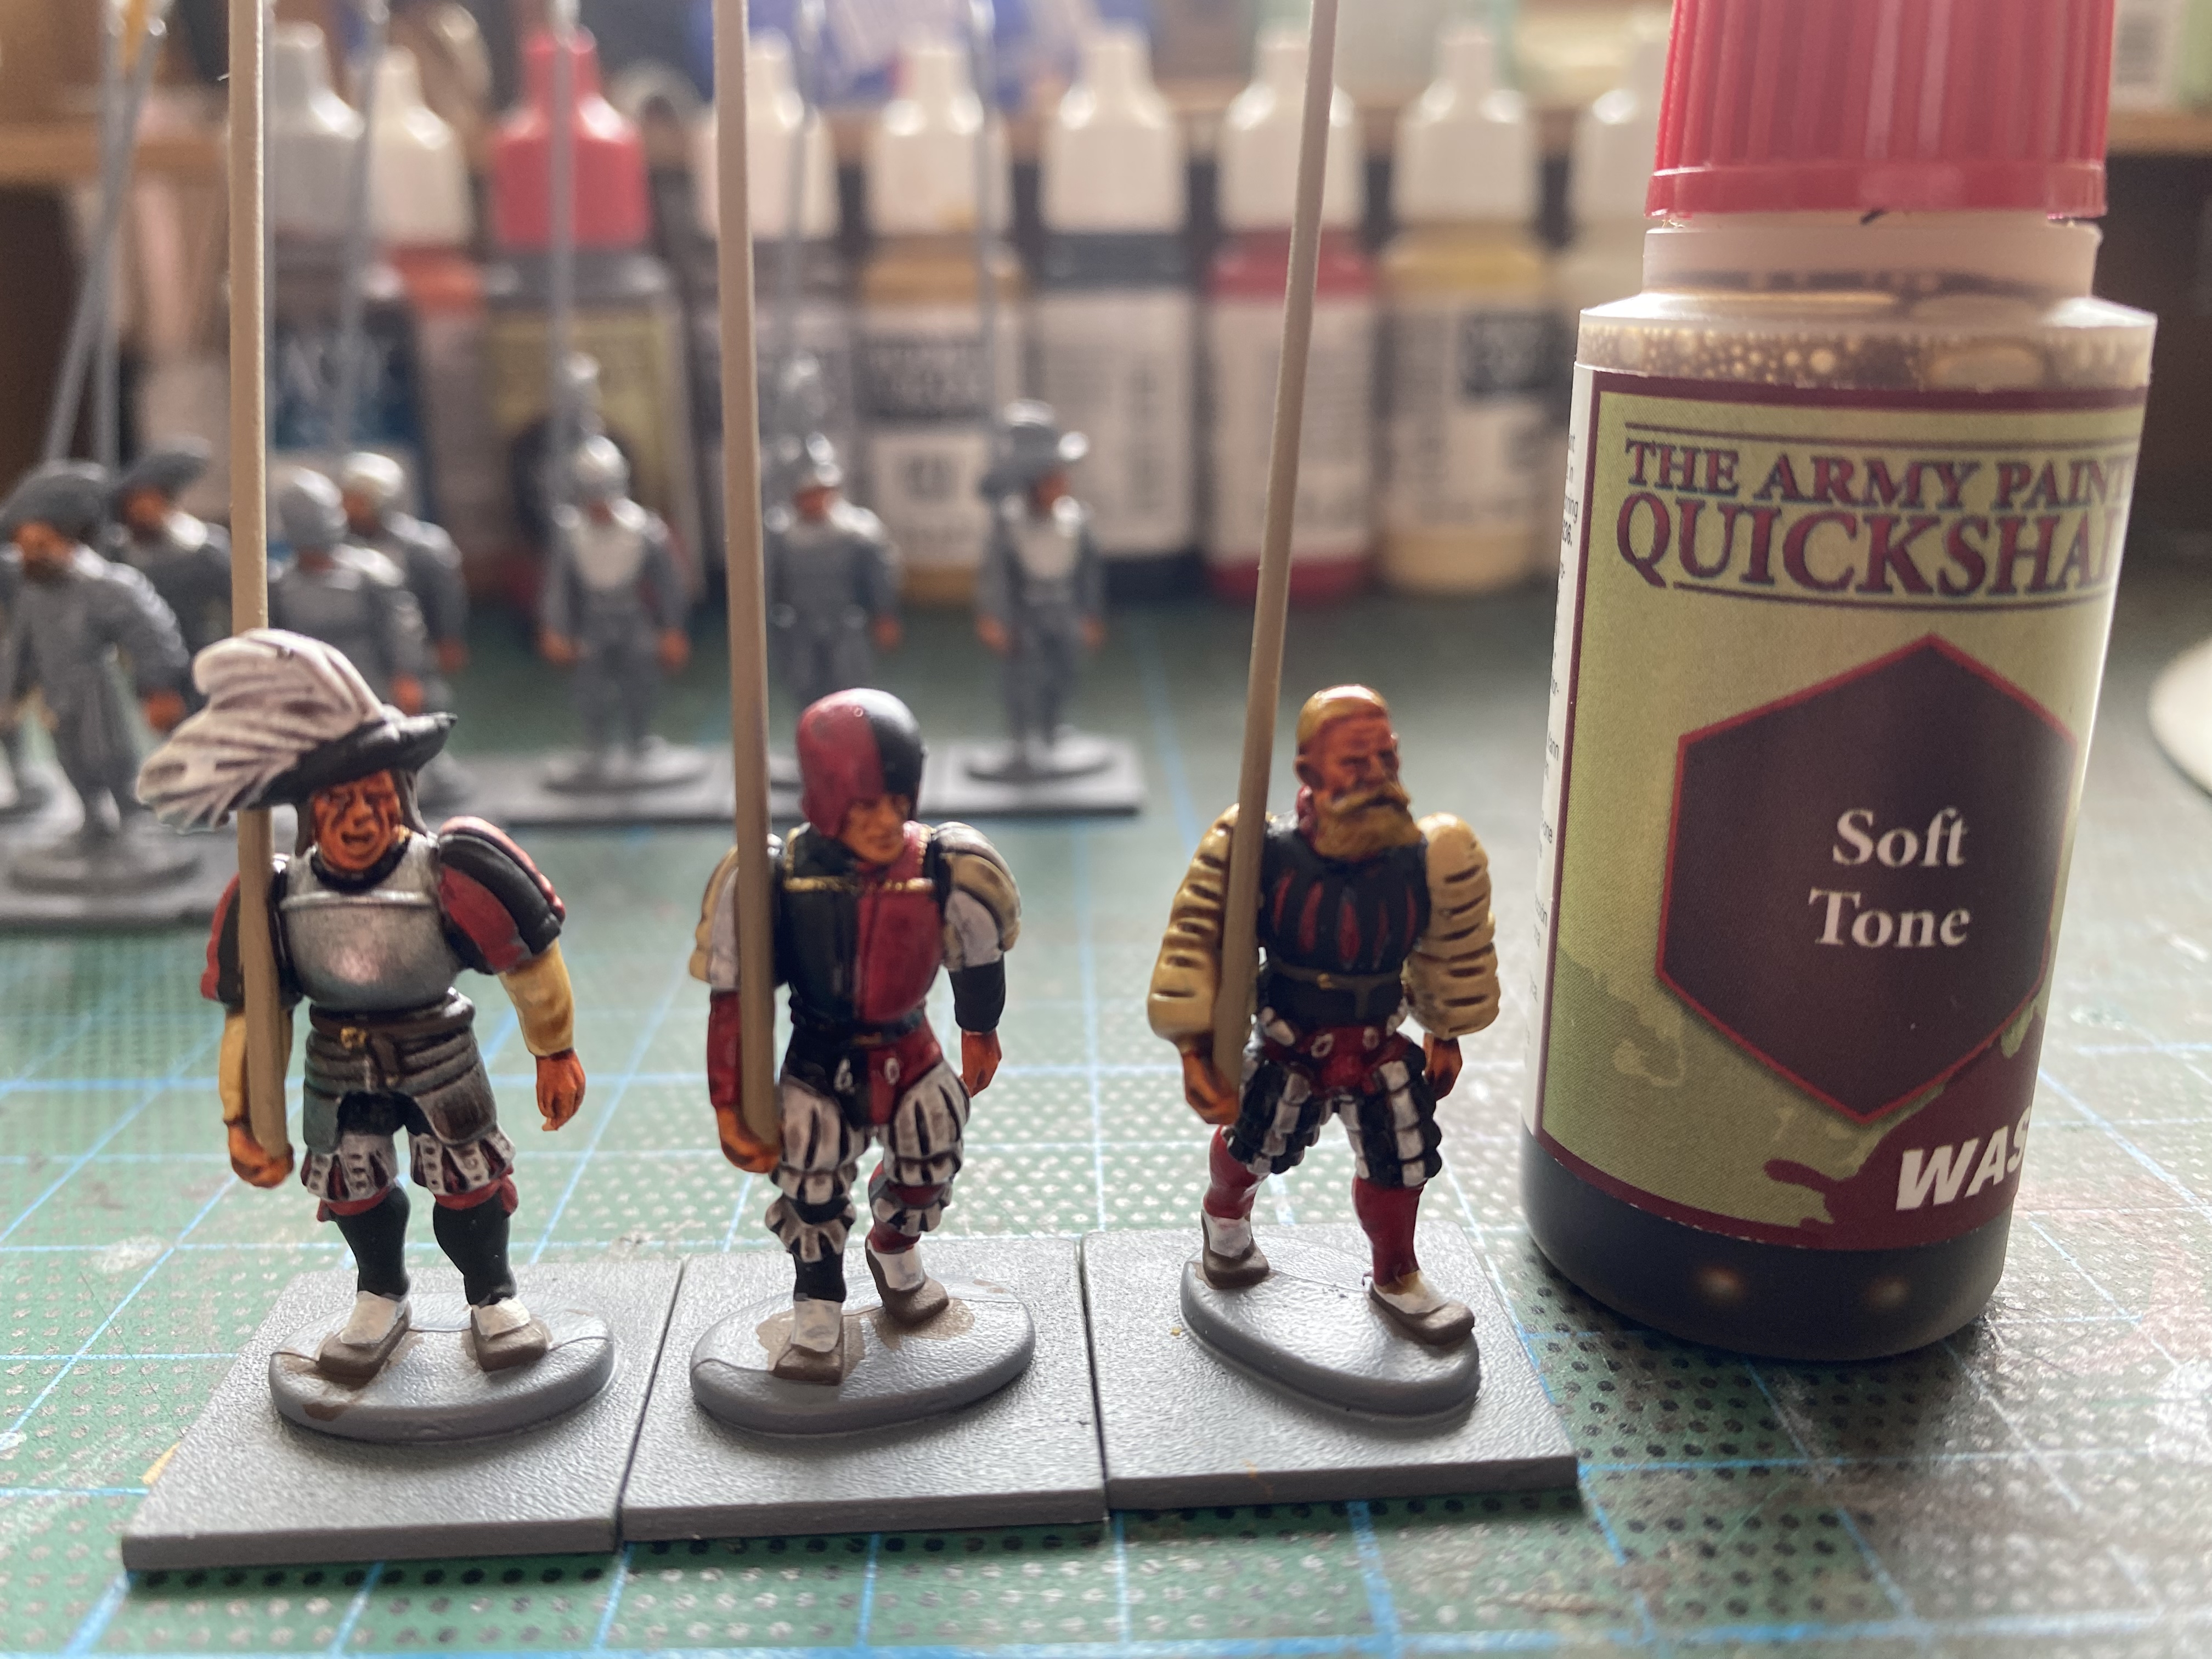
The beige and hair is washed with soft tone.
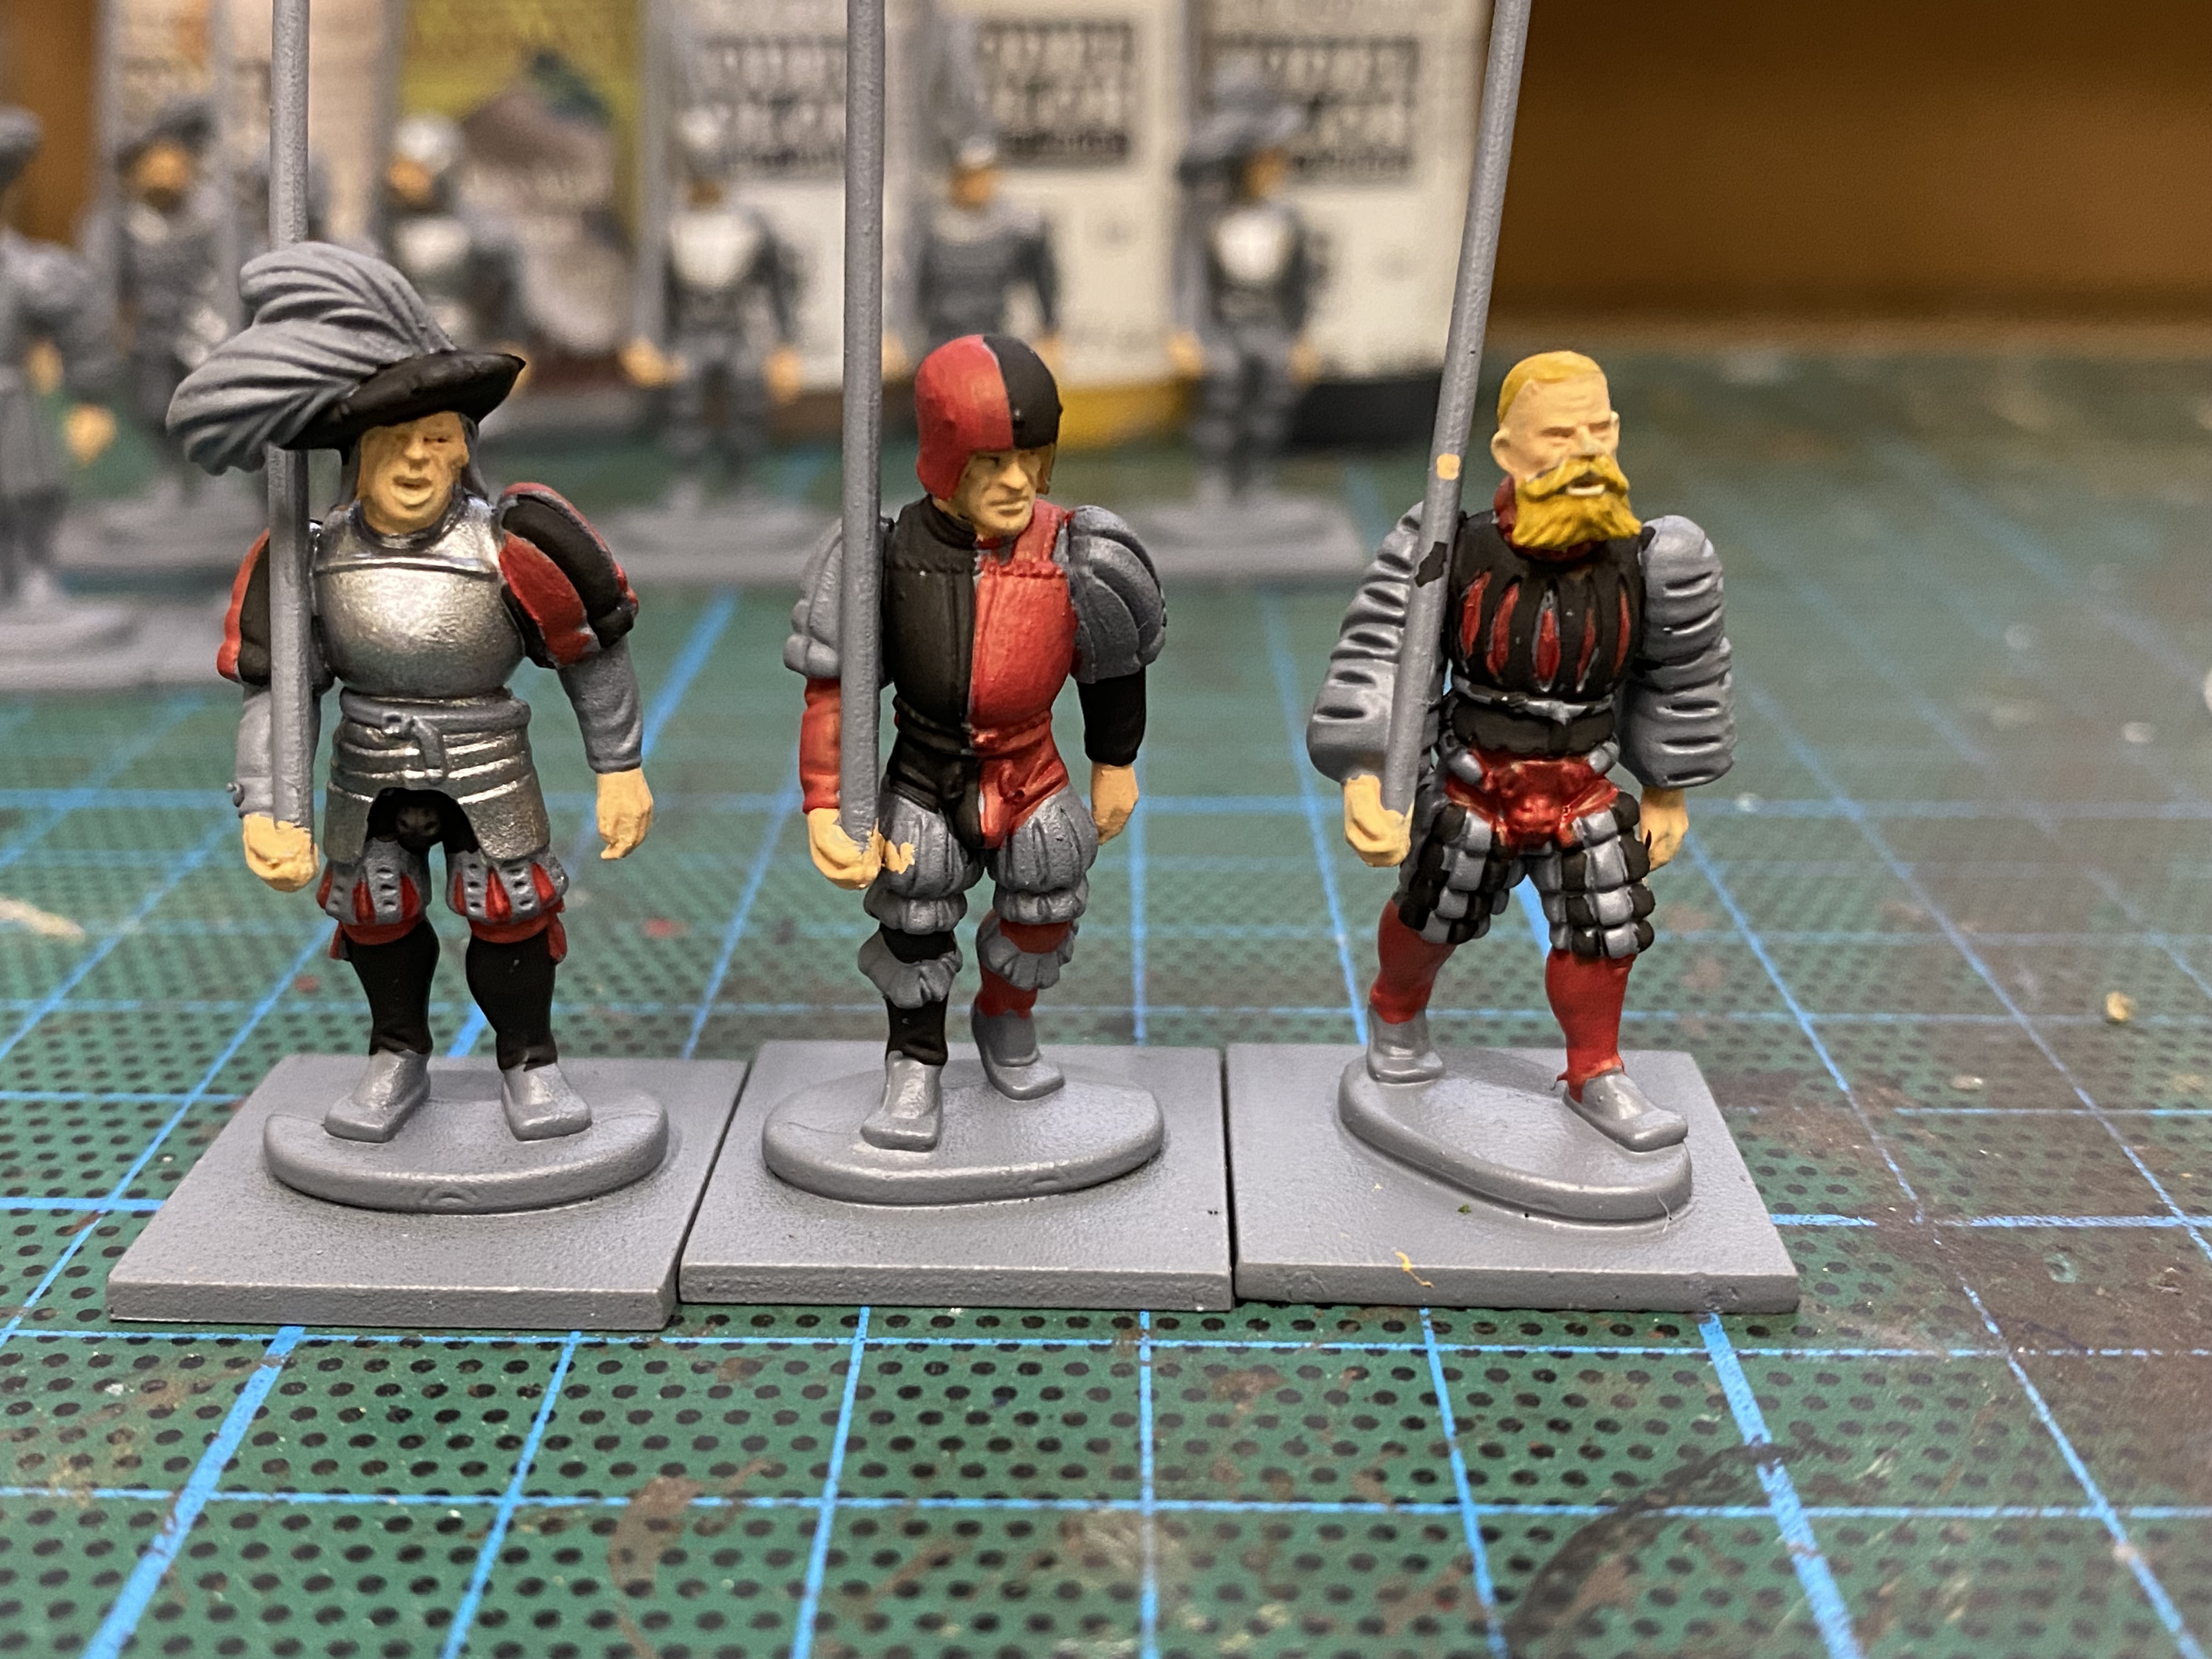
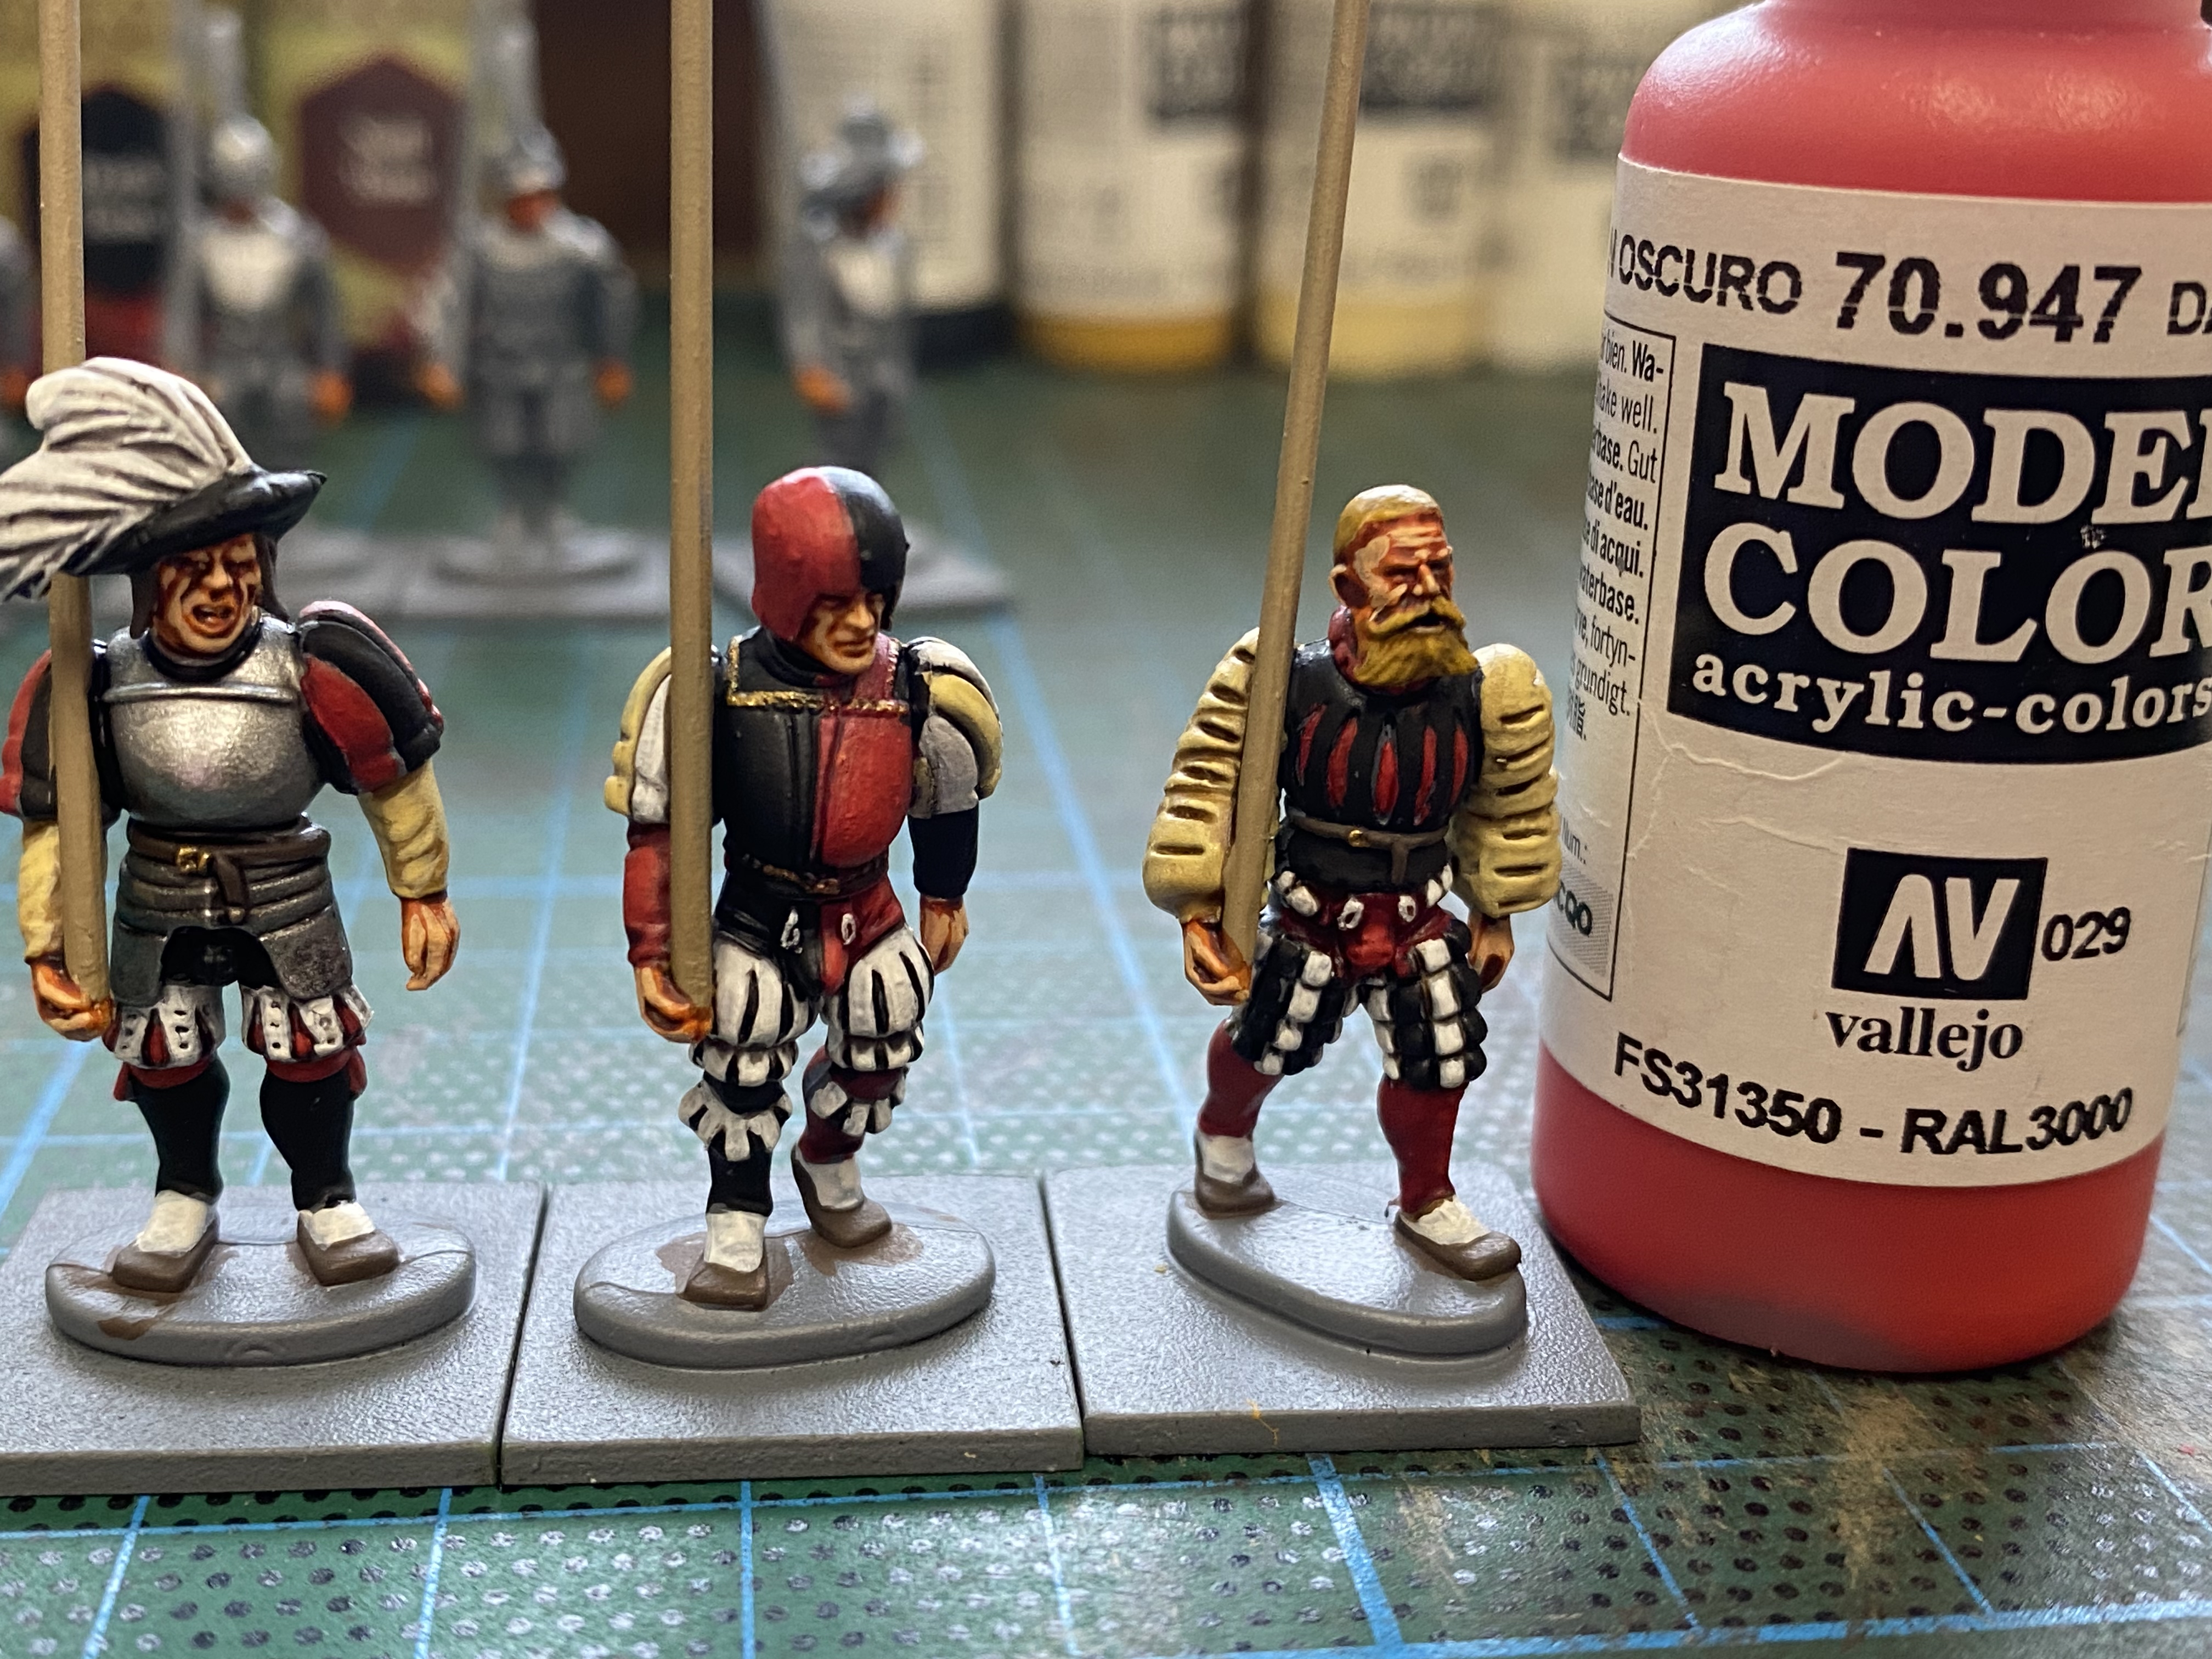
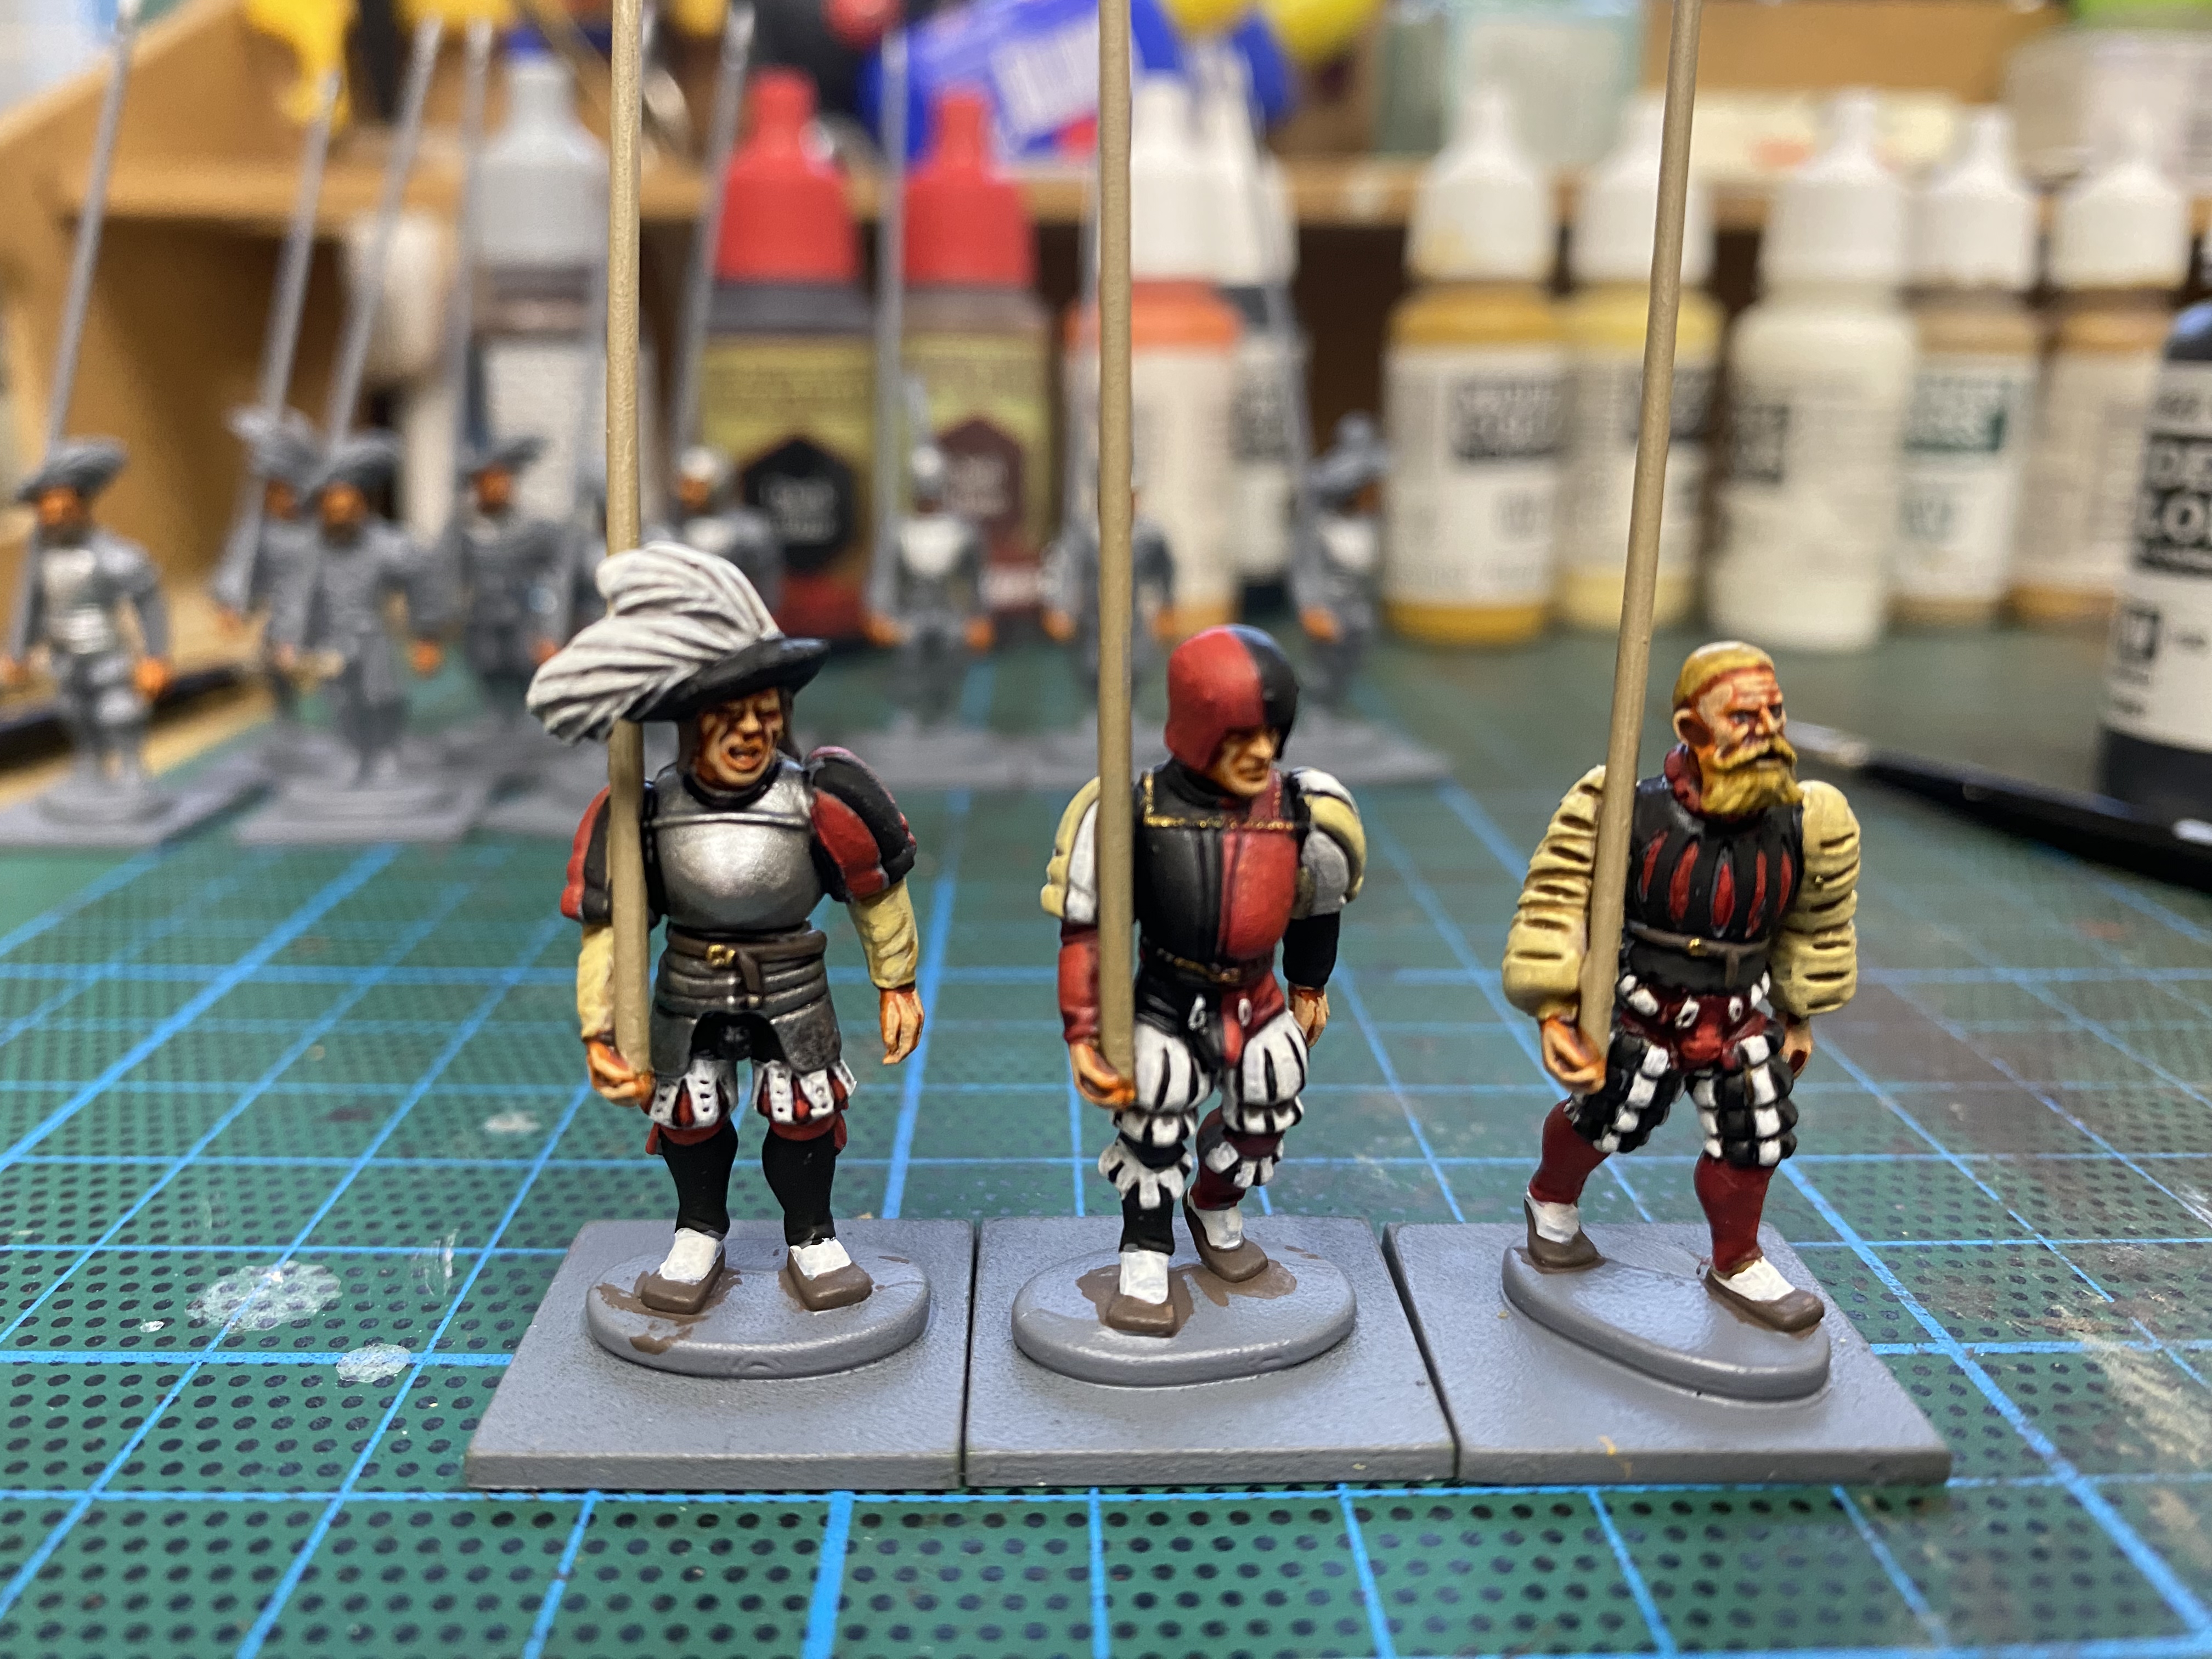
The next stage is to re paint over the washes with the original colours ( including the flesh) where needed, leaving the wash in the recesses as shading. This gives the colours that nice bright look that I like. If you prefer a more weathered look you could ignore this stage. However, it doesn’t take as long as you would think and if you dont retouch everything it doesn’t matter.
I added some detail by painting the belt buckles and the decoration on the armour with gold 70996 and retouched any errors that I’ve spotted.
I’ve started the basing process. I just spread vallejo dark earth texture paste 26218 and added some fine ballast for extra texture. I’ve covered my basing process in many previous blogs. It’s now just a question of painting, dry brushing, and adding some scatter and tufts.
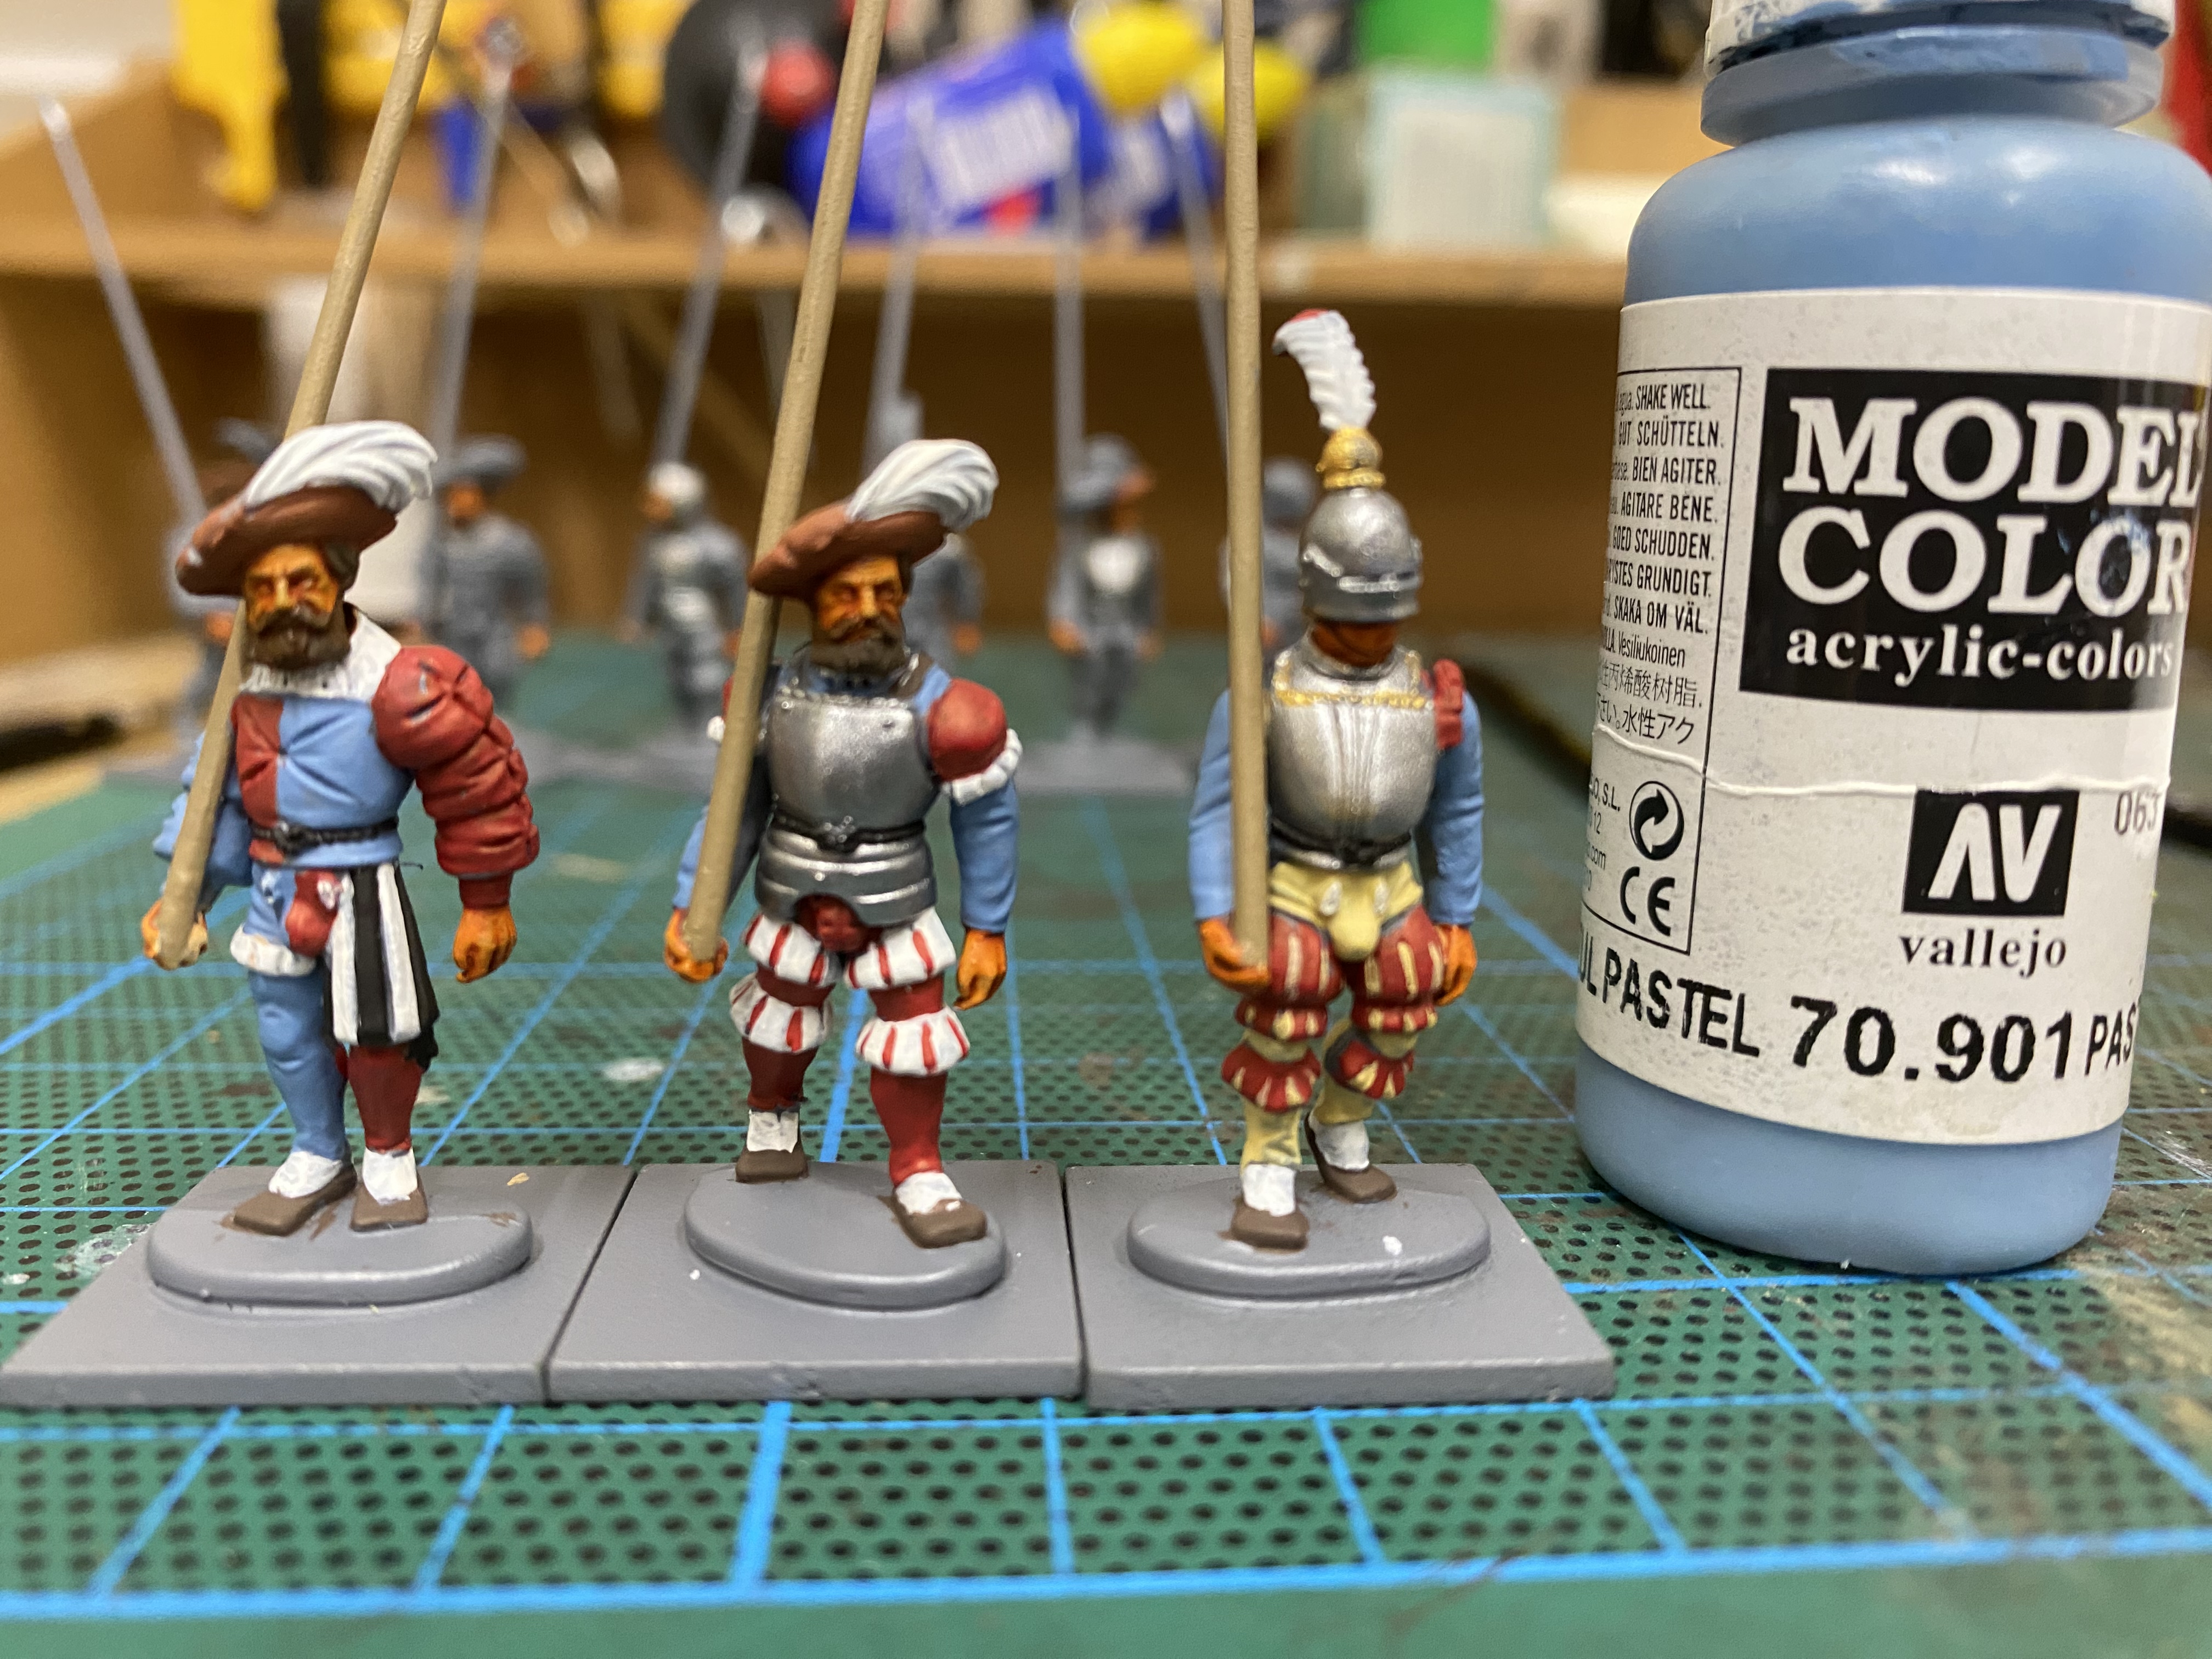
The next three figures are painted using the same process but I’ve used 70901 Pastel Blue instead of Black and the floppy hats are painted with red leather 70818 and varying the hair colour. By changing up the colours in this way, you get a variety of finishes.
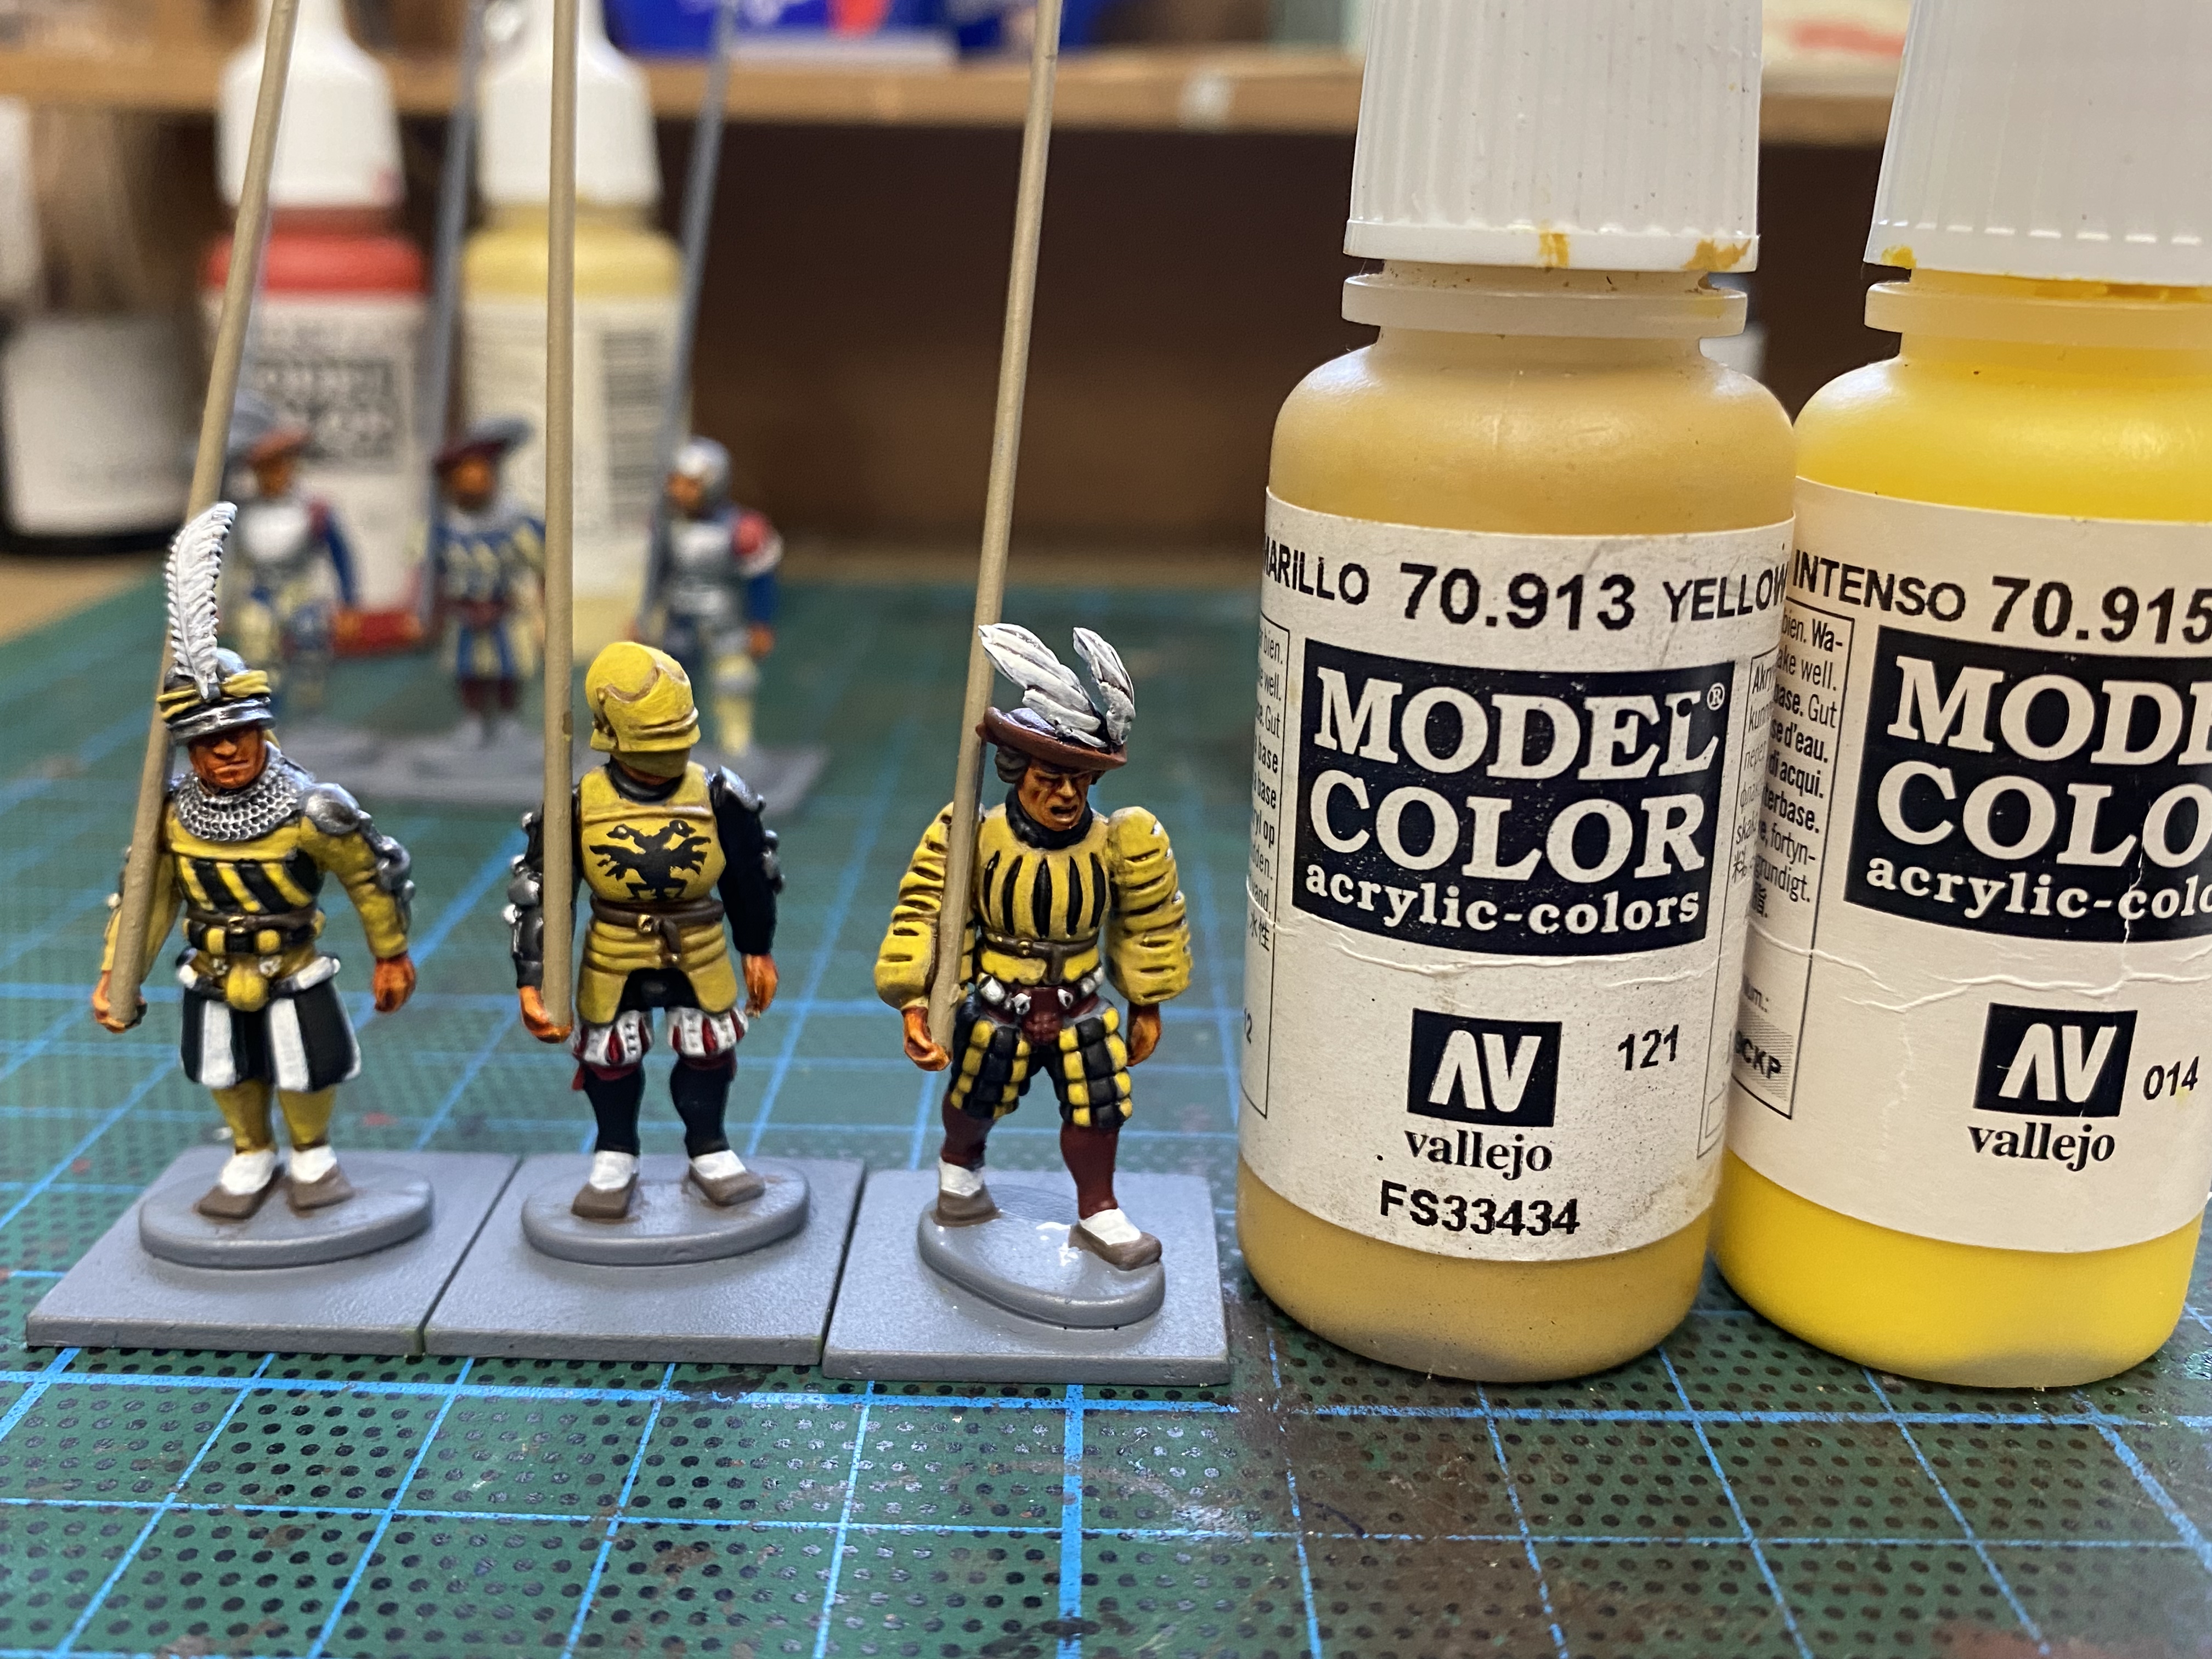
With these three figures I used a very simple yellow, Black and white scheme. the yellow was first painted as Yellow ochre 70913, shaded with Soft tone and then repainted withy yellow ochre before being highlighted with 70915 deep yellow. The imperial eagle is hand painted. It looks a bit rough up close but from a reasonable distance will pass!
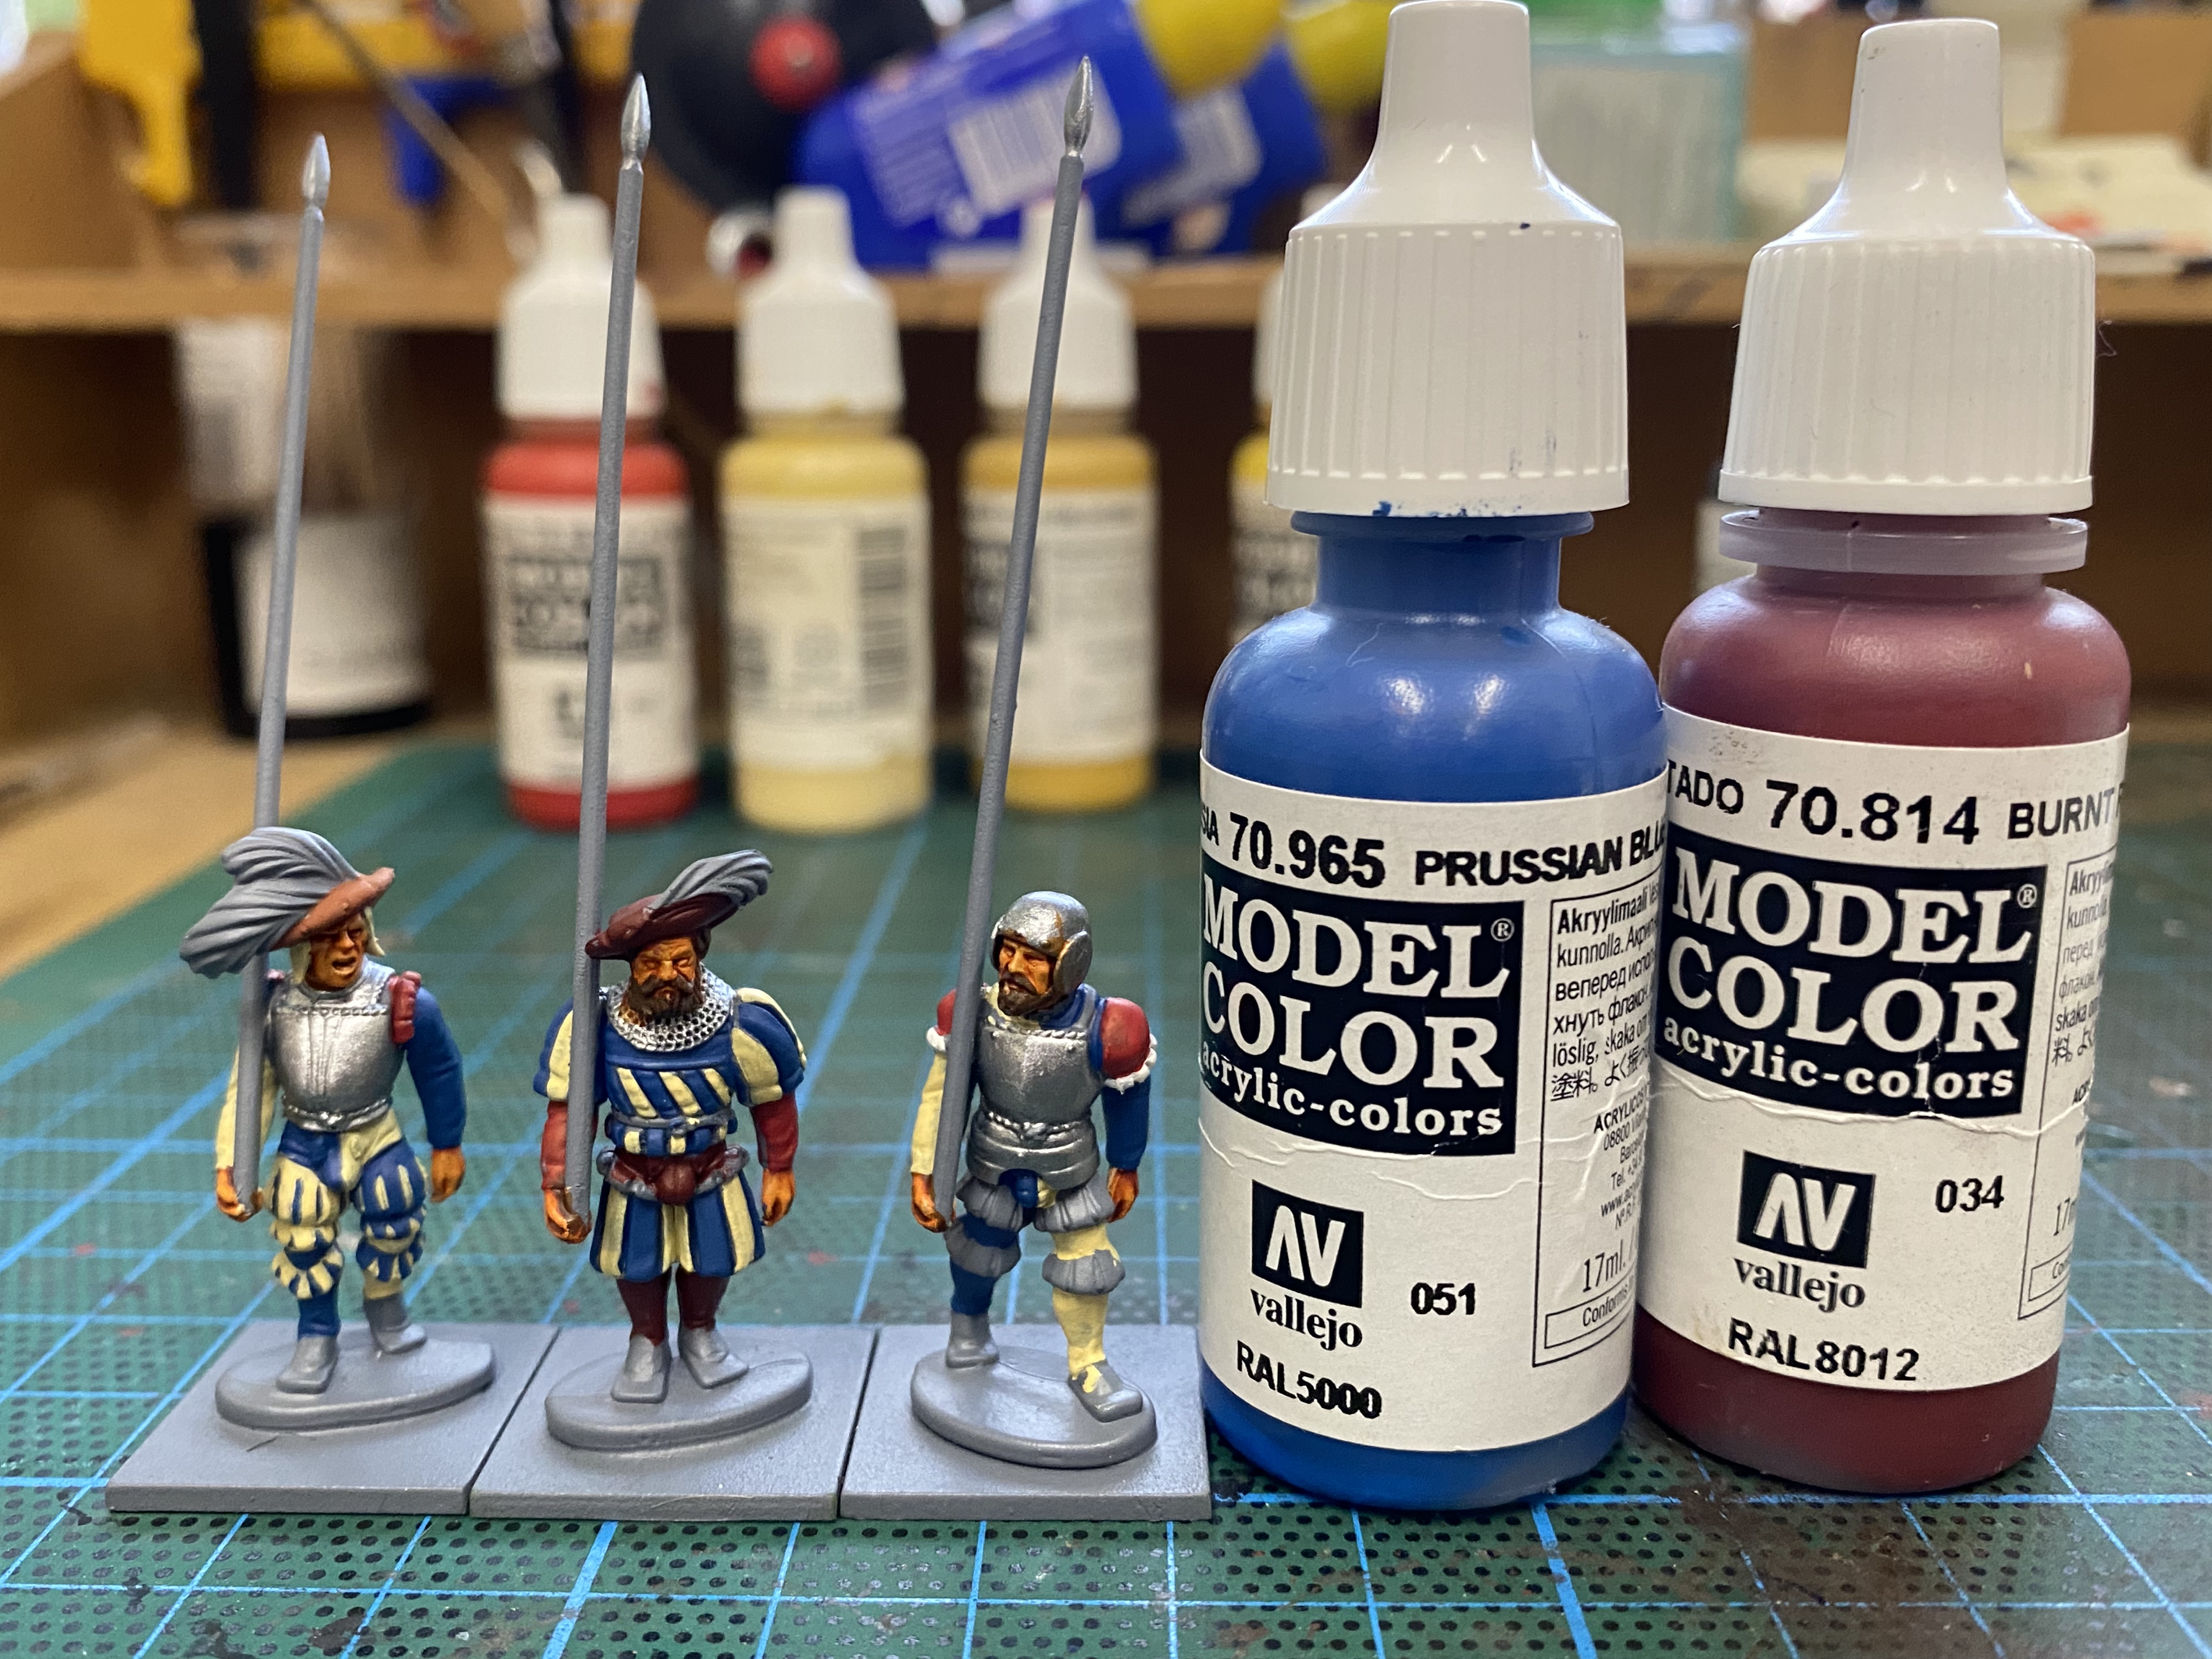
Another colour combo in progress. this time 70965 Prussian Blue with 70814 Burnt red and beige and white as background colours. There’s a multitude of choice when it comes to colour combo’s but I think that by limiting the colours for each batch, it makes painting faster and easier but the end result is still very colourful and varied.
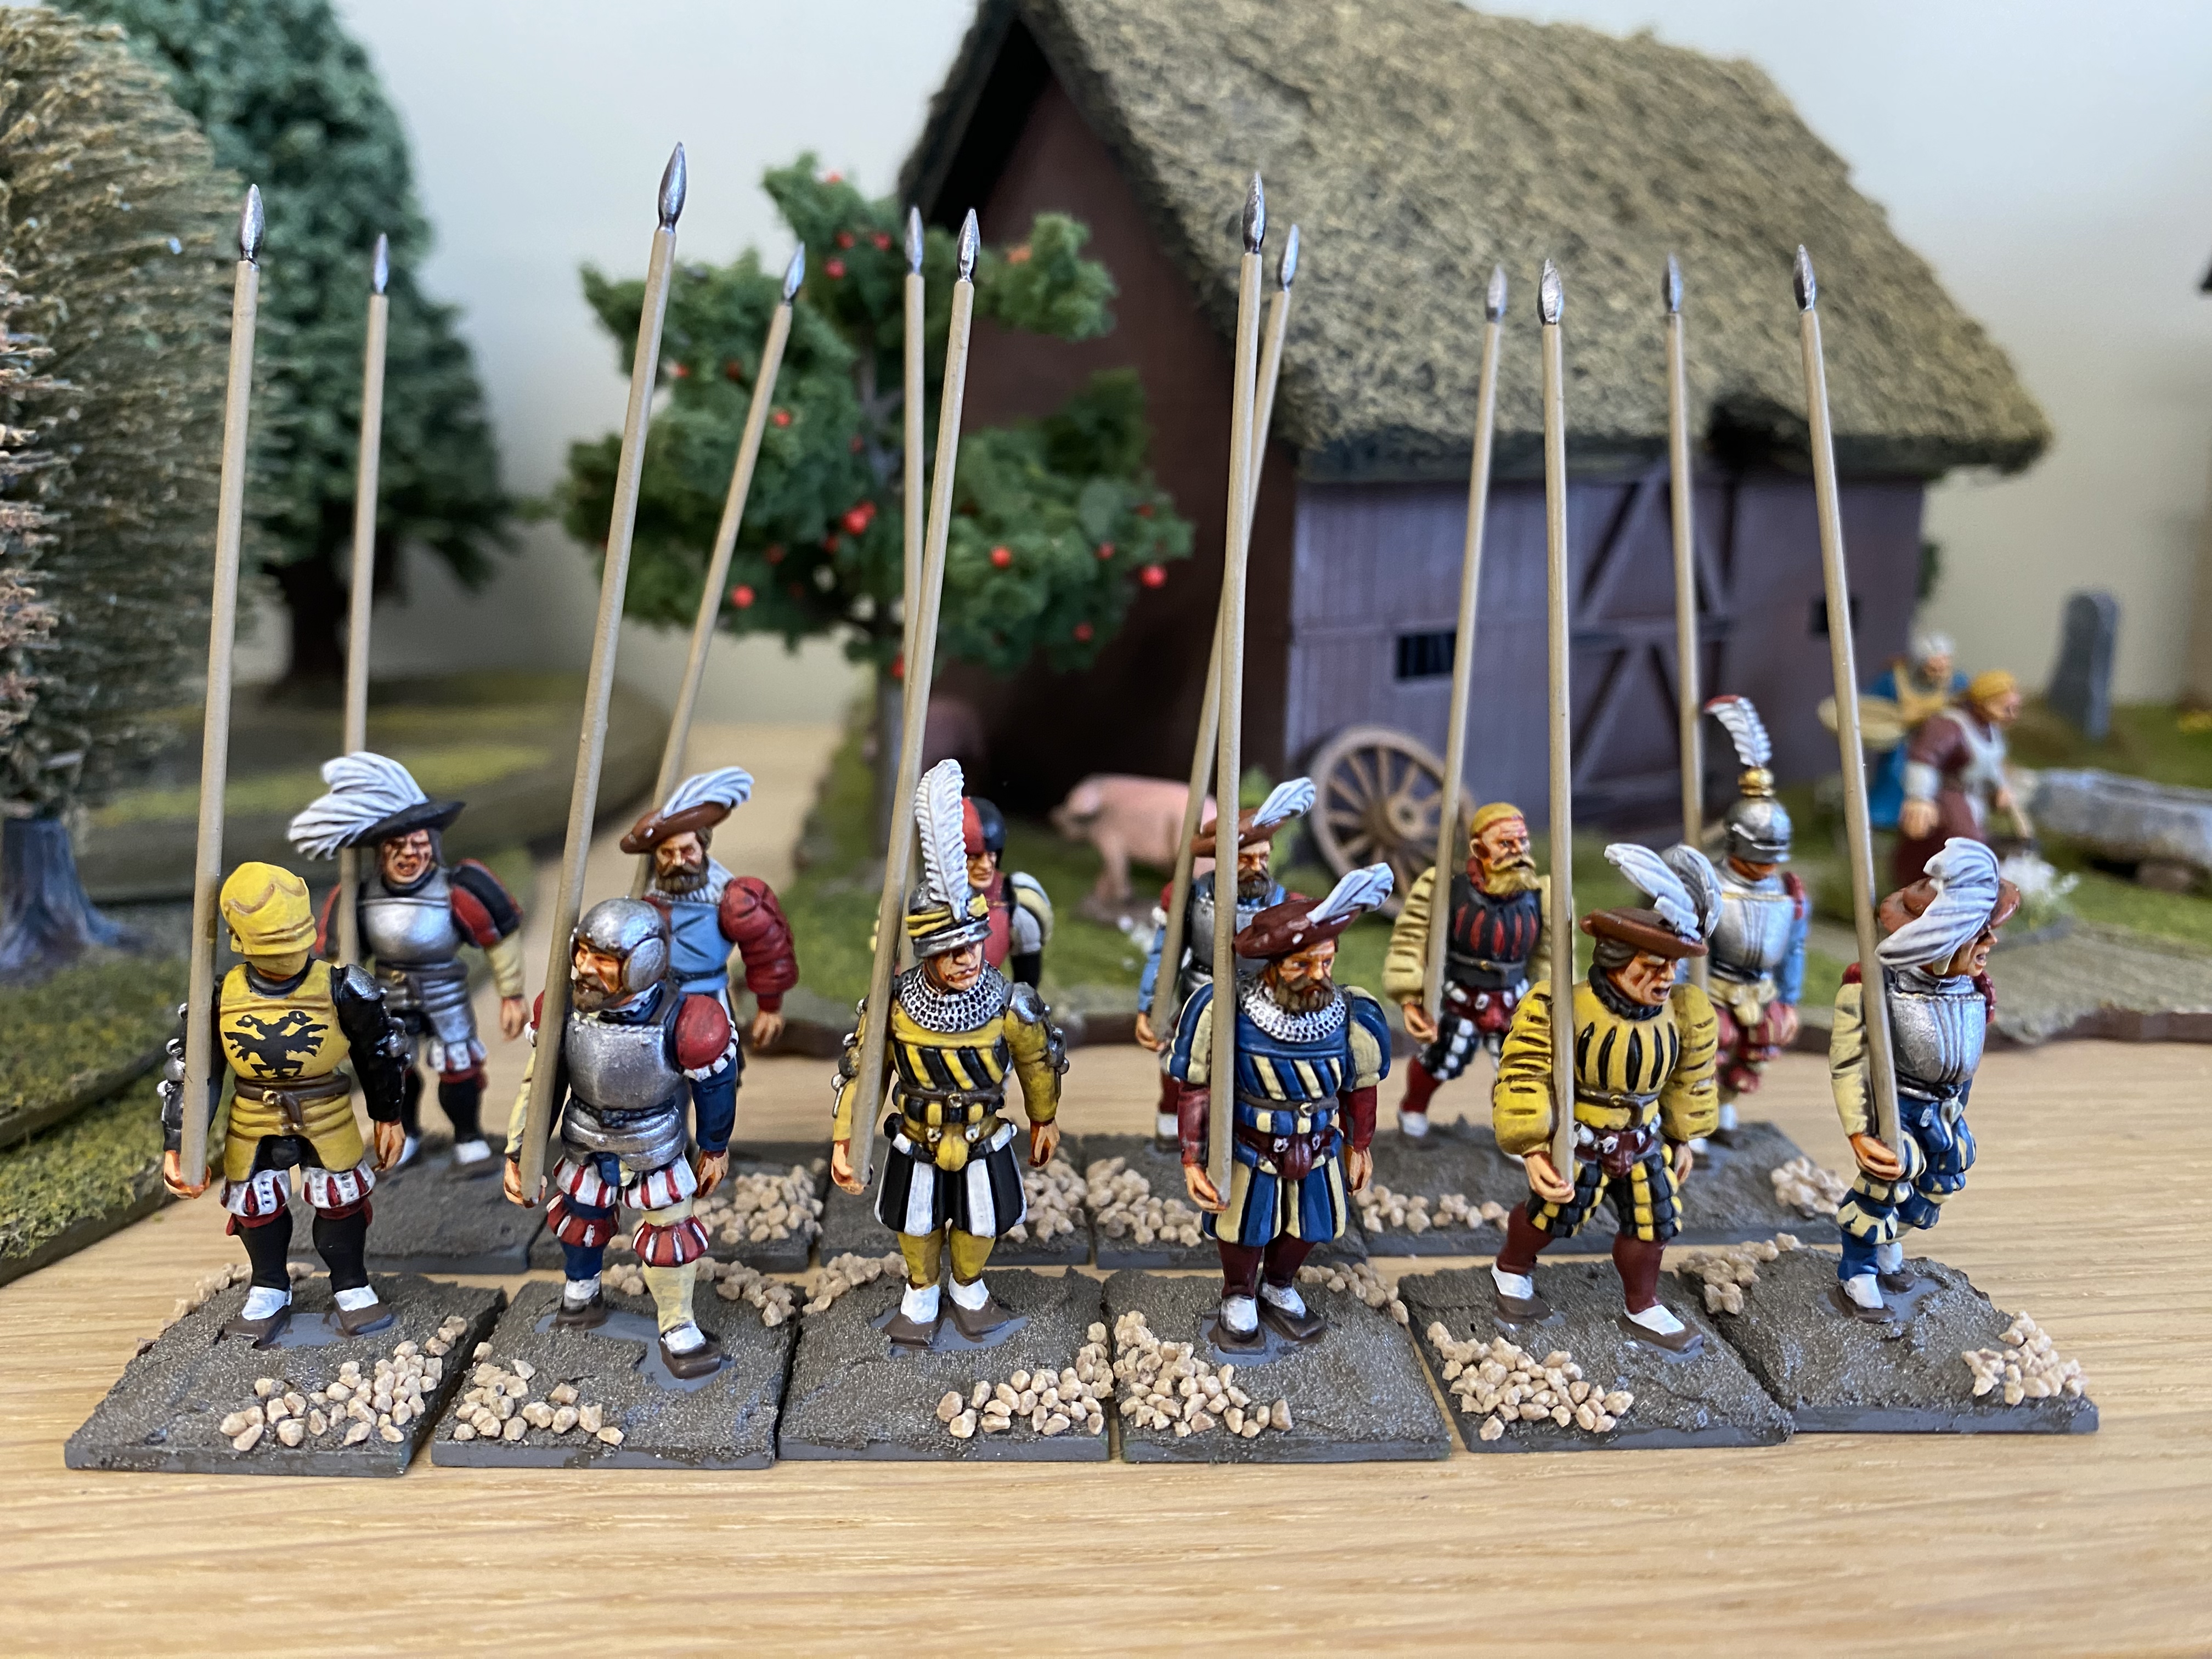
Here is the finished block of twelve prior to final basing. I hope that this is useful to anyone starting out or thinking of painting a Landsknecht force. It’s not a fast project but they do look nice, if I say so myself!
THE COMMERCIAL BIT
I hope that you all enjoy your hobby as much as I do – our web site will have much of what you need! Click here to see our shop.
” When in danger or in doubt, Slow down, Stop, or go about”
I couldn’t help but remember this rhyme that my Father taught me when I was learning to drive and, of course, sailing model yachts. It’s very sensible advice and has served me well through life. The strange thing is, I cant find the actual quote on Google. It’s actually not really appropriate at all for this blog entry but when I came up with the title, the rhyme instantly came to mind!
The idea of this blog was to collect a few ideas that I have used whilst building my Medieval fleet and to follow up my last Blog, building the Sarissa Precision Cog. I am sure that the ideas are not at all unique and as usual, in the main, I have ‘borrowed’ them from other modellers but I thought it useful to gather them all together.
PAINTING WOOD EFFECTS
It seems strange to be painting MDF and Balsa to look like wood when it is in effect, wood but when it comes to models, we are trying to recreate how a much larger original would look. It is also a case that there are different materials being used and the idea to to make them look like one consistent method has been used to build them. I usually prime the completed models with either a matt black or brown army painter primer. This is done as much to seal the wood, balsa or greyboard so that it doesn’t absorb the subsequent coats of paint.
A galley and Cog, both painted as detailed below
Once primed, I start with a coat of Chocolate brown 70872. I will give the model a thorough coat of this colour, ensuring that as much as possible, everything is covered. Once this coat is dry, I will then apply a coat of Flat brown 70982. This is done fairly quickly and I am not too concerned if I miss some of the corners and crevices on the model, leaving the Chocolate brown as a ‘shade’. Again, I will let this coat dry before moving onto applying a coat of Flat earth 70983. This is applied as a ‘wet brush coat’ and it doesn’t matter if you miss some of the nooks and crannies on the model. I follow with another light wet brush of Orange brown 70981. I should mention that using a flat brush rather the the normal round brush helps to give a ‘wood grain effect. The idea of the ‘wet brush’ is to allow the two coat to blend in places and it will begin to build a nice light colour on the raised areas. It’s worth letting this coat dry to the touch dry stage before moving onto the final coat of Yellow Ochre 70913. This is applied as a light dry brush to bring out the details and give a crisp edge to planks etc. You can apply another highlight if you think it’s appropriate. Vallejo Basic Skin Tone 70815 actually works quite well or even 70986 Deck Tan, according to your preference. This should just be a very light dry brush on the tips of any detail.
As well as working on ships, this is also a good recipe for painting wood generally – I use it on my wagons. Here is a link to another project, showing a step by step guide:
I made my sails from an old bed sheet that I had been using as a dust sheet for decorating. To give the impression of panels, I asked a friend to run a line of stitching down the sails. The next challenge was to figure out how to transfer a design onto the sails. My freehand painting would never have been good enough. I then remembered how I used to trace designs as a child. I simply printed of the image that I wanted from the internet, having resized it. I then taped this to my patio window and then taped the sail over the top. It was easy to see the design through the sail and then to trace over it with a pencil. The picture below shows the process.
Design taped to the window and sail taped over – you can see how easy it is to trace the image onto the sail.
The next challenge was to get the sail to look as though it had some shape and was filled with air. To do this, I draped the sail over a balloon. I then gave the sail a very liberal coating of white PVA glue. As well as stiffening up the sail, it also sealed the cloth to enable me to paint it.
The sail is draped over a balloon, as centrally as is possible.The sail is liberaly coated with PVA – dont worry it wont stick to the ballon!The painted sail!
FURLED SAILS
I had quite a problem trying to get a realistic look to my furled sails. After many attempts to try and tie the sails to make them look as though they were hanging naturally, I realised that I would need some kind of former. I cut a former from 5mm foam card and then wrapped the former with some cloth ( bed sheet!). You need to glue the top edge in place, wrap the cloth around the former a couple of times and the cloth is then held in place with sail thread binding. Incidentally, I use a dot of super glue to hold my knots tight! The picture below illustrates the process.
Use foam card to make a shape that resembles furled sails.Furled sail attached to mast with rigging thread.
OTHER TIPS
Some of my ships have planking on the decks. The easiest way of reproducing this is simply to use a ruler and good HB pencil to draw the planking on the decks. See picture above. I’m also sure that you will have noticed that I have used Cocktail sticks for flag poles, BBQ sticks for Oars and Spars and wooden doweling ( from my local DIY shop) for masts.
I’ve also mounted my archers that man the fighting tops on 15mm bases so that they fit in comfortably. To give them some extra weight, I’ve glued some 15mm metal washers to the MDF bases. It just helps to stop them toppling out.
Well that’s about it for now. I hope to complete a further article on a step by step guide to building a galley. keep an eye out for the release of Never Mind The Boat Hooks!
THE COMMERCIAL BIT
I hope that you all enjoy your hobby as much as I do – remember that our web site will have much of what you need! Click here to see our shop:
You may have seen a number of blog posts and post to the Bill Hooks Facebook group regarding our new venture ‘Never Mind the Boat Hooks’, a set of wargames rules based on Medieval naval warfare. Many of the boats that we are using are models made from the Sarissa Precision medieval Cog. My ‘fleet’ currently includes two, so I thought that it would be useful to give a brief review of building the kit and show readers some of the modifications.
One of our early play tests – the sarissa precision cog The ‘White Hart’ has run around in the top of the picture!
First of all, a couple of disclaimers. The kit is a representation of a typical medieval cog rather than a precise scale model. It’s a very good representation and designed for 28mm wargames figures, so it is very practical and robust for table top use. If you are looking for a more accurate model there are some very nice ones out there – the Zvezda Cog in plastic, for example. However, you will find that they are far more expensive and less robust or practical when it comes to gaming. That said, from what I have read in the limited research that I have done, there are no plans based on actual designs that survive. Most of what we know is based on contemporary pictures and descriptions rather than actual plans. There are a few surviving ships that have been recovered but I think that it’s fair to say that our knowledge is limited.
The Sarissa cog fully assembled and rigged
The Sarissa Cog comes with full building instructions and I recommend that you read them first and familiarise yourself with the pieces before you start to build the model. I found that the model went together very well and in some places the pieces were such a snug fit, glueing wasn’t required! However, to be on the safe side you should assemble with glue. I used Expo thick Cyanoacrylic super glue. A good white PVA would also be suitable but I was impatient and the thicker super glue glue gave me sufficient working time. A quick blast with an accelerant made things even faster, once I was happy that the pieces were in place.
Note that the ribs with the ‘eye’s in the top fit to the rear of the boat!
A word of caution when building. It is worth checking and then double checking that the ‘ribs’ that will support the grey board sides are assembled in the correct sequence and that you are clear as to which ones are on the stern end of the boat and which ones fit to the front or bow. The same goes when you fit the deck – ensure that you are clear which is the bow and which is the stern! Otherwise, I found the assembly very straight forward. A bit of patience and care is required when fitting the greyboard sides. This is where I found that super glue was better than PVA due to the fast grab and set time.
The deck and stern castle deck in place. Note the winch goes to the front of the boat.
I assembled the mast but did not glue it in place as I intended to replace it with a ‘fighting top’ for my archers. The mast is snug enough to slide in and out as required.
The completed Cog – original mast is just in place temporarily.
Full rigging instructions are included but I decided that the rigging would restrict access to the deck and get in the way when gaming so I went for a simpler solution. I made a replacement mast with a fighting top from a piece of 10mm dowel. You can pick this up from your local hardware store for about £3.00 for a 3 metre length so you will have plenty spare! Using a saw I cut a slot in the bottom of the new mast so that it would fit into the existing mast hole. Next, I needed to make a fighting top.
I’ve used two different methods of making a fighting top. I have a square one for the ‘White Hart’ ( see above) and I have a round one for the ‘White Lion’ – see below.
New mast and Fighting top added
Both of these fighting tops are made using 40mm bases ( round or square as you prefer). I’ve then made the sides with coffee stirrers cut to size and attached to the bases.
New fighting top and spar
If you look at the top picture you can see that there are some very simple ways of making a fighting top – look carefully and you might just identify a certain fast food outlets’ sauce container!
With the new mast and fighting top completed, my Cog was ready for gaming. However, I wanted to use the original mast with a sail for display purposes. To make the sail, I simply cut a piece of old sheet to size. I then asked for some help from my next door neighbor, Carole, who is an expert with a sewing machine to run some panels into the sail. To get the design of the lion onto the sail, I printed off a picture from the internet and taped the sail over the picture onto my patio window! I could then trace the design onto the flag.
The Sail ready for finishing
As you can see, I then placed the sail over a balloon and liberally coated it in PVA. Once dry, it was easy to peel the sail off of the balloon and it would now keep it’s shape with a bit of ‘belly’ in it!
The sail receiving it’s coating of PVA!
It was then just a case of carefully painting the sail. I used standard Vallejo paints but I ensued that each coat/colour was very dry before completing the next one.
The ‘White Lion’ with its sail !
The anchor that you can see was from Expo – we usually have these in stock, as well as the chain, although as I write this I am waiting for more stock as I have used them all for my projects!
So my cog is ready to take to the table. I will publish a follow up blog, where I will detail how I have painted the model – although if you have followed my blog, you will be aware of my preferred method of painting to simulate wood. If you are able to attend Partizan in Newark on May 22nd, I will be there with Andy Callan and we will be running a game of ‘Never Mind The Boat Hooks’ – you are welcome to come and join in and if you have any questions regarding the construction of the boats, I will be pleased to answer them.
THE COMMERCIAL BIT
I hope that you all enjoy your hobby as much as I do – remember that our web site will have much of what you need! Click here to see our shop:
In my last blog, I showed you how I assembled the Ox cart. Now, on to the painting. I primed everything with Army Painter Leather Brown to give a good base for the paint. I then followed my usual procedure for painting wooden carts. With hind sight this was a bit of overkill for this opened frame cart but the results are acceptable. I started by painting the cart and Oxen Yoke Vallejo Chocolate Brown 70872.
First coat – 70872 Chocolate Brown.
I also picked out some of the wooden pieces of luggage in the cart load with the same colour. Next, I used Flat Brown 70894 to ‘wet brush’ over the same parts. A wet brush technique is like a dry brush technique but there’s more paint on the brush and it’s a bit heavier. The idea is to leave some of the darker brown in the shadows.
Flat Brown coat – again, the luggage is also coated
The next stage is to use a heavy dry brush of Flat Earth 70983 to lighten the wooden frame. This time, I’m not going so heavy with either the paint or the brush. I’m trying not to cover all of the previous coats.
Flat Earth dry brushed on. I’ve tried to avoid the luggage, to keep these a darker colour.
The next colour that I dry brushed on was Orange Brown 70981. This is a lighter dry brush than the other coats and the focus is now the high spots on the wagon, wheels and frame. I tried to avoid the luggage, although any mistakes and over brushing ( as you can see on the sacks) will be corrected when I paint the luggage.
Orange Brown starts to give the ‘wood’ some texture.
Once the Orange brown is done, yet another dry brush is layered on. This time, I used yellow ochre 70913 and I am aiming at the high spots and edges. Incidentally, I’m not waiting for the different highlights to dry. I just layer them on one after the other and I think that this helps to blend them.
Golden Brown layered on and we are nearly done!
You could stop there but there is one final dry brush, this time using 70815 basic skin tone. It seems like the wrong colour to use but as a very careful edge highlight, it works. I have learnt this technique from the ‘Painting War’ Holy War issue. It very effective on on larger areas of wood. Here’s a link to a previous blog where I use this technique for the first time to paint a trebuchet:
Flat flesh top highlights – not essential, you could stop at Golden brown if you are happy with this effect
The next task is to paint the luggage and detail the wagon. All the iron work on the wagon and luggage was painted in 70950 Black. I may go back and paint the wheel rims in gun metal as I think that the paint would quickly wear off. The Bindings were painted in Light Brown 70929 and later painted with Iraqi Sand ‘stripes to give a bit of detail.
Iron work and bindings done!
When it came to the luggage, I use a variety of colours, Stone grey 70884, Iraqi sand 70819, Kahki 70988, Black 70950, Deep green 70970, Off white 70820, and my new favourite colour, Deck Tan 70986! Once the colours were blocked on, I gave everything a wash with Army Painter Soft Tone. Once this was dry, I went back over every thing with the original colour, carefully leaving some of the shadows created by the ink, to add the highlights. The top Highlights were done with the original colours but with a bit of Iraqi sand added to lighten the original colour, I find that Iraqi sand can be less ‘harsh’ than adding white. Deck Tan is also very useful for this. One final thought. As I was struggling to paint the details on the luggage at the sides of the cart, if did occur to me that it might have been easier to paint it separately and add it to the completed wagon.
Luggage with first highlights added
Onto the Oxen. I am no expert on painting Oxen. I did google a few pictures but decided to just copy the picture on the Perry web site as I liked the effect. I painted them with Off White, Vallejo 70820 and then picked out the pattern in Flat brown 70984. After a good liberal coating of soft tone, I repainted the white bits and used the flat brown to highlight the brown areas, although it’s not particularly noticeable. Eyes and noses were painted in matt black and the horns in Iraqi sand. I highlighted the horns with off white and used a black grey 70862 to blend the noses!
Oxen block painted before adding soft tone
I then based the Oxen in pairs on 40mm x 40mm renedra bases. I had left them unbased up until now as it allowed me easier access to the insides of the Oxen teams. This did lead to a bit of chipping as I moved the animals around. So once based up, I touched up any errors and finished off the yokes with black and Army Painter plate mail for the top off the bolts.
Oxen based, shaded and completed
So that’s it for the wagon and Oxen team. The next task is to complete the passengers and base the set. I’ll show you how in the next blog but here’s a teaser of progress so far!
Its, nearly there! Just the basing to complete
THE COMMERCIAL BIT
I hope that you all enjoy your hobby as much as I do – remember that our web site will have much of what you need! Click here to see our shop:
In my last blog I had painted the crew and the actual bombard. It was now a question of basing the models so that they will be ready for battle. I had already planned to use a Sarrissa terrain tile for this purpose. The idea being that should I decide to add to the siege or gun line, the Sarissa tile system would enable this. I also thought that the thicker base would give the Bombard a bit of elevation in respect of my normal troops.
I usually use Milliput for making the ground works on my bases but I had a pack of airdrying Daz clay that I found in my scenery materials stash and I decided to give this a try. I’ve not used this material before for this purpose but I have seen it used in many tutorials and my gaming buddy, Peter Harris uses it to great effect and has created some fantastic effects with it. So without any hesitation or preparation, I slapped it onto the Terrain tile. I then pressed the Bombard into it, carefully making sure that I had lined it up along the centre of the base. The next step was to place the figures onto the base and to cut out ‘sabot’ cavities for the ones that I wanted to remove. I also pressed the Gabions and boards for the mantlet into place.
Base in progress – Daz clay ground work completed and stuck to the terrain tile!
So far so good…except that when the Daz dried, it pulled away from the tile and came free. The tile had also warped. This surprised me as I had thought that MDF was pretty warp resistant. I suspect that when using milliput on MDF, there is no problem because there is no shrinkage and of course, no water. Once the tile dried out, the warpage disappeared and I simply glued the now dry airclay terrain piece back onto the tile with PVA glue. Problem solved – for now. In future, I will prime the MDF first!
Base with Vallejo texture paste.
I had not glued the bombard into place, so it was easy to get on with the next stage of the ground work. I used Vallejo Dark Earth Texture paste to cover the clay to give the base some texture and to blend everything into place. I had also filled the gabions with sand using a big blob of PVA to hold the sand in place. As the texture paste was drying, I placed the cannon balls onto the base and also placed some renedra barrels to leave an indent. It was at this stage that I noticed that the bombard was not quite centrally aligned on the base…When I had glued the clay back on to the base, I had obviously not quite centred it. My inner OCD now chipped in and I started to think about re making it all. However, I decide that I could live with it being slightly off centre and it would be OK. Phew!
Is that gun off centre? It’s staying put now!!!
The next step was to start to paint the items that I would be adding to the base. I painted the cannon balls in grey rather than black. I’m not sure if guns of this size used granite ‘gun stones’ but I thought that it was likely that stone would be used rather than cast iron. As an aside, my Brother has an allotment on the Isle of Wight in the shadow of Carrisbroke Castle and he regularly finds small ‘Gun stones’ that were either quarried nearby or test fired from the Castle. The renedra barrels were painted using the same colours and methods as the woodwork on the bombard. I also added some sacks to the base. I have a stash of these that I have made from Milliput. Whenever, I have some spare milliput left over from a project, I use it to make these sacks. I’m too frugal to throw anything away and they are very simple and quick to make!
The model is taking shape – ground work done.
You can also see that I had painted the Textured earth paste using an emulsion paint, ‘Delhi Bazaar’, highlighted with Iraqi Sand. I’ve also started to add the first layer of vegetation, Woodland Scenics Blended green turf.
Static grass and tufts addedSacks and Gunstones – I’m not sure that health and safety will approve…
Once the base was coated with the turf scatter, I added some Static grass. this gave me the chance to test my ‘Static King’ applicator from woodlands scenics that I had been given as a Christmas present. The results were OK, but it’s fair to say that I need more practice. I spent more time snagging my fingers with the rather fierce crocodile clip and giving myself a buzz of static than I did in getting the grass to stand up! The good news is that what hair I have, is now slightly straighter than before! The static grass added another layer of texture and I finished of the base with an assortment of tufts and a few flowers to add some interest.
Tools and Barrels
I also thought that it would be fun to add some arrows to the Gabions, to make it look as though the enemy were nearby. I made these from scratch using thin Evergreen plastic rod (30/000) and some scrap 10/000 plasticard for the flights. Finally, I added some weathering powders to the bottom of the mantlet and added some black weathering powder to the front of the gun to represent the powder and smoke that would have come from firing the gun.
The completed base
So my Bombard is now ready for the table. There are a couple more details that I will add. I have a bucket and open cask of water to add, as well as a sledge hammer and rammer on the work bench in the final stages of painting. Andy Callan has suggested that I christen the gun ‘Little John’, so Little John will be making his debut in a battle soon!
The Completed model, the the extra barrels and tools added
THE COMMERCIAL BIT
Almost all of the paints, miniatures, bases, basing materials and anything that you are likely to need for your hobby are available from my shop here:
I continue to add to my War of the Roses army and the latest project is a Medieval Bombard from Perry’s. It’s a big old beast at nearly 140mm long and so basing it was always going to be a challenge. I have decided to use one of the Sarissa terrain tiles for the purpose. Although it is a bit on the thick side, the irregular edge will help it blend in to the wargames table. I also have vague ideas of adding siege works to either side of the bombard at some stage in the future. The terrain tiles will work well, should I actually do this!
Planning the bombard layout view 1
I decided that I would paint the crew in Edward IV ‘s retinue colours. I thought that only a King would have the finances and resources to bring such a large piece to a battle or seige. Just to be clear, I haven’t done any specific research on this! I just fancied the colours and thought that having a ‘sun in splendor’ motif on the manlet would look cool! Oh! and the fact that I could probably paint the sigil free hand, given my painting abilities…
Planning the Bombard Layout view 2
The only reference picture that caught my eye was the art work for the Zvezda version of the bombard. I’m not sure how accurate this is but there were a few details that I thought that I would add to my model. The first thing that I noticed was that the bombard was mounted on an earth work slope rather than flat on the ground as most of the other models that I had seen. After much thought and debate with friends, I decided that I would go with a fairly flat piece of ground. The Bombard in the Zvezda model was clearly being used in seige work and I wanted my model to be used in a set piece battle. I did like the idea of adding some extra protection for the crew in the form of some Gabions. I also liked the idea of the ‘special tools’ used to load the guns and of course the sacks and barrels lying around so I had it mind to add these.
Cover Art for the Zvezda Bombard
I also noticed that the Mantlet has small wheels allowing the crew to push it forward to facilitate access to the gun barrel for cleaning and loading. So I would add some timbers for the mantlet to run on. The last consideration was whether to make the crew removeable to facilitate game play in Never Mind the Billhooks. The two guys pulling down the Mantlet would have to be fixed but I would make ‘sabot’ bases for the rest of the crew to allow them to be removed if casualties.
Crew painted and ready for basingView of the painted mantlet
Andy Callan has come up with some instant rules for using the Bombard:
“Huge Bombards fire only straight ahead (no arc of fire) and only on alternate turns but both 5s and 6s are kills. 15 pts inc. crew. Only 3 crew count towards firing dice.”
I think that this early version may be altered to take into account the protection that the crew have and that although only three crew count for dice, there are more to absorb wounds!
Bombard and Crew paintedTop down view of Bombard and crew before basing
As regards the painting details, the crew were painted in my usual style but I have used Army painter inks rather than the quick shade that I sometime resort to. As regards the Gun and wooden block work, I followed a ‘recipe’ that I have used before for siege engines. You can find the detail in another of my blog articles here:
The pictures through out this article show my progress so far. I hope that over the Easter break I will have this model finished and I’ll publish a follow up with a bit more information on how I went about making and painting the base and accessories.
Get ready to fire!
THE COMMERCIAL BIT
Almost all of the paints, miniatures, bases, basing materials and anything that you are likely to need for your hobby are available from my shop here:
In a previous blog, I mentioned that I ‘rediscovered’ my collection of Lord of the Rings Battle Magazines. These were published back in about 2001, I think, and each magazine came with a free sprue of plastic figures or a metal character figure. The magazine was published by Deagostini in close cooperation with Games Workshop. Incidentally, the editor was Graeme Davey who now runs the Grey for now Games Wargames company that produces the ‘Test of Honour’ game. Graeme is now based in the same building as Arcane Scenery!
goblins from the mines of Moria. Issue 1
When I started collecting the magazine, I firmly intended to paint all of the models each fortnight to build my collection. I didn’t manage any until about issue 68, when I painted the Warg riders and then a few of the personality figures. I collected the complete set of 91 issues as well as a couple of specials and then stored them all safely away in my wardrobe, with the figures, never to see the light of day – until now!
Elves and Men of Gondor. Issue 2
Having found the stash, I thought that I would work my way through each magazine and paint the figures as originally intended. At this stage I dont have any plans to play the game but who knows – that may well change once we are out of lock down! In the meantime, it has been an interesting distraction. As well as following the painting instrucions in the magazine, I have also used YouTube as a reference to see how other painters have gone about painting their minis. There is a wealth of info on YouTube, as no doubt you are already aware and I now will often check this source before embarking on any new project. You can pretty much guarantee that somebody has painted or built what ever model you are working on!
Frodo Baggins – issue 3
I was also surprised how useful it was to be taken through, step by step, how to paint a figure. The magazine is very good at starting with the basics and building up techniques so that your painting style will improve and evolve. Looking back, I now realise that there is much to admire in this magazine, other than the pictures from the movies and the models!
Uruk-Hai – issue 4
The magazine breaks down into four broad areas, A guide to Middle Earth, How to play the LOTR battle Game, complete with a battle report, How to paint your miniatures and how to make the scenery. Having started with the figures, I think that I may well go back and work through the scenery articles!
Lurtz – Uruk-Hai Captain. Issue 5
I have now reached issue 6 with my painting, as you can see from the photos, my collection is building! I’ll be taking a break from painting LOTR and returning to WOTR – I have a unit of Archers that I need to complete and some more artillery. These units will complete Lord Callan’s retinue and will feature in a later blog!
Aragorn! Issue 6. Basing not quite finished!
It seems that the lockdown has allowed me to work on projects that I had long forgotten and if my wargaming has been curtailed, my painting has thrived. Without the pressure to produce another unit for our next game, I have been able to dig into my lead pile and paint some of the miniatures that I had dreamed of adding to my collection.
My LOTR collection in front of my WOTR collection!
It might seem strange for a retailer to be giving this advice, but rather than buy more stuff, what have you got in your lead pile that you would like to complete? I don’t think that there will be a better time to do so!
THE COMMERCIAL BIT
The magazines that I am referring to are long out of print but still available on ebay should you wish to collect them.
If you need help in completing a project of your own we have a massive range of stock in the Arcane Scenery shop. Almost all of the paints, miniatures, bases, basing materials and anything that you are likely to need for your hobby are available from my shop here:
This weeks blog is a bit different – it’s supposed to be a picture tutorial as to how I made my Medieval tents for my Never Mind The Bill Hooks army. The idea of the tents, is that you store your army morale tokens in them during the battle. This means that the tents have to have removable tops and I wanted something that was fairly durable. I came up with the idea of using Pringles tubes as the core of the tent but needed a way of making the tube look more tent like! Having done a bit of research on the internet, I found a plan for a full sized Medieval tent on Pinterest, complete with dimensions. When I scaled the dimensions down to 1/48th scale ( a bit on the large size but I can handle the maths easier than working with 1/56th!), it turned out that Pringles tubes were ideal for the job!
Plan for Knights Tents – Dimensions are for a full sized tent.
I also found a superb youtube video showing how to make Medieval tents for Dungeons and Dragons. The video link is at the end of this article. I was all set to go but first I need to gather the raw materials and tools. I jumped right in and built the first tent in about an hour but wasn’t entirely happy with the result, so I moved onto the second tent. This took a bit longer as I was more careful with the measurements and I made some improvements to the structure. If you would like to have a go at making you own tents, you will need the following tools and materials.
Glue Gun – you can just use PVA but a glue gun is ideal for most of the work here.
Cocktail sticks
Tissues ( kleenex type)
Cardboard or Foam card.
Compass or compass cutter
Sharp knife
Clippers.
Ruler and pencil.
Set Square if you want to be precise with your measuring ( I used the markings on my steel ruler as a guide.)
Step one
Get your Pringles, any flavour, although I like the plain and the sour cream and onions, and eat the contents.
Pringles tube! First task is to empty it!
You may need some lubrication to help with the Pringles. Beer seems to work well, my current favourite is Shipyard!
You may find that you get thirsty eating Pringles!
Cut the base of the Pringles tube off ( the end with the metal base.) using a sharp knife. It’s tricky getting a straight cut around a tube. I used a felt tip pen blu-tacked to my work board, exactly 5cms from the side and holding the tube firmly against the edge, rotated it so that the pen marked a guide line around the tube. I then cut through the tube using my scalpel. Dont worry if you dont get an exact straight edge to your cut, the top will hide any errors.
The first tube cut down. The height of the cut is 5cms – you can make this smaller if you prefer.
The next task is to cut out two circles. One at 11 cms in diameter will be for the base of the tent – I used a compass cutter for this task on the second tent rather than a compass and scalpel that I used for the first tent. The other circle is the same width as your pringles tube – just draw around it. The tent base is made from cardboard. The top is foam card. You could use cardboard for the top but I wanted to give the top a bit of strength.
Circles cut out – note that I have marked out the centre and divided them into eight segments with pencil lines.
Next glue the pringles tin to the base, making sure that you have it centred as best as you can. Using the pencil marks as a guide, glue eight cocktail sticks to the base and tube as shown below.
Cocktail sticks added to form the structure
I used my flush cutters to clip off the excess length of the cocktail stick. I then took the top disk of the tent and glued a cocktail stick through the exact centre. You need to leave about 5cms of this cocktail stick as the centre pole. Using my clippers. I then cut eight more cocktail sticks( at a slight angle on one end) and glued them to the centre pole at 3.75cms up the pole and again, used the eight pencil marks as a guide.
top of the tent in place – dont glue this – you need to be able to remove it!
The next part of the process is both the trickiest and the most messy! I used standard three ply kleenex tissues cut roughly to size and dipped in watered down PVA to clad the base of the tent. I left one section opened and used two pieces of tissue to make the open door.
Tissue covering the main structure – complete with tie backs on the ‘door’!
There’s no doubt that this is the trickiest part of the operation. I did find that it was easier to place the tissue on the structure and using a large brush, ‘paint on’ the PVA. With hind sight, I think that Crepe paper or perhaps kitchen towelling would have worked better as these products are stronger and less likely to rip when wet. Also, for some reason, I felt the need to explain to my wife why I was going out to the garage with a box of tissues, pringles and my iPad….
Tent with tissue added to the roof.
The whole structure was left to dry for at least 24hours. I then spray primed the tents with Army Painter skeleton bone and dry brushed them with white.
The two tents primed and ready for painting.
The tent on the right was my first attempt. I’m not entirely happy with this one as I got into a bit of a mess with the tissue and I’ve used some filler to try to hide mistakes – if you look closely you will see that I haven’t been too successful! I only used six ‘poles’ for the structure rather than eight. I’ve also added a decorative edge to the top.
The painted tents
I then painted alternate segments of the tents – Prussian blue for one and Burnt red ( my new favourite colour) for the other.
The tops are removable so that you can store your army morale tokens:
Storage section revealed! Big enough to get your hand into pick out the tokens.
The final touch was to add a bit of dry brushing to the colour panels and to add some flags. Here are the finished tents on my wargames table.
The finished tents.
I’ll be honest, they do look better from a distance than close up. I have learnt a few lessons whilst building these and in the future, I may add a few more tents to my scenery – perhaps trying crepe paper rather than tissue. But for now, they serve their purpose and function as a place to store the army morale tokens. Talking of learning, here’s a couple of really useful videos.
The next video shows where I ‘borrowed’ the idea of using tissue to make the tents. There are some amazing ideas here and I will be stealing a few more of his tips to make some different style tents in the future. The guy who makes these videos has a whole series of fantastic terrain videos that are well worth your time if you enjoy building scenery.
I hope that you find the above helps. as usual, here’s the commercial bit, although I dont sell Pringles, Cocktail sticks or Tissues….
THE COMMERCIAL BIT
Almost all of the paints, miniatures, bases, basing materials and anything that you are likely to need for your hobby are available POST FREE from my shop here:
The next piece of scenery that I have made for my NMTB’s project is the ‘Hidden Ditch’ piece to represent the special event card ‘Terrain Advantage’. First I took a base – actually, it was a spare base to a movement tray and at 180mm long and 60mm wide, overlaps the length of the average unit. I wanted the ditch to look hidden, so I built up the front of the base with a piece of scrap balsa. I then added the rest of the ‘landscaping’ using standard milliput.
Ditch, covered with texture & rocks added.
I neglected to take a picture of the base under construction but you can see the base above with the milliput and balsa now coated with a thick coat of Vallejo Dark earth texture paste to blend everything together. I’ve also added some ‘rocks’ – pebbles from my garden and some ballast for additional detail and texture. I then painted everything with my usual basing emulsion colour and dry brushed it all to bring out the different textures. The base of the ditch was left smooth and I also painted this with a darker colour to give the illusion of depth.
Hidden Ditch under construction
As you can see from the picture above, I wanted to add a ‘casualty’ to the scenery, so I converted a Perry’s Bill man by sanding down the front of the figure to make him lie flat in the ditch. I then cut and repositioned (with pliers! – it’s suprising how much you can bend plastic figures!) the arms and legs to make him look as though he had fallen. The arrow was carefully snipped from the arrows on the command frame and the body drilled to take the arrow.
casualty for the ditch
Once the casualty was dry, I just retested the fit into the ditch and filled any large gaps with Vallejo plastic putty.
Casualty in ditch – scatter added to the banks
As well as the scatter, I also added a variety of Gamers grass tufts. I used a mixture of the 12mm long jungle, light green and dry green tufts as well as the shorter 6mm dry green tufts. The casualty was painted to my standard method, covered in my previous blogs. I used a red and white livery as I don’t have any of my troops in these colours!
Tufts added to the ditch
I think that the effect is better when seen at table top level – you can see that there is a barrier of some sorts but not actually see the ditch. I was quite pleased with the way that this has worked out but it is not quite finished. I am going to add some acrylic ‘deep pour water’ to the ditch to make it look even more realistic. However, this product is quite expensive, so rather than purchase it just for the ditch, I intend to make a bit more scenery for my table. I am planning to make at least a couple of ponds and once these are completed, I will add the water. With another lockdown about to start, I cant see me gaming for a while, so there is no rush. Meanwhile, My next project – Medieval Tents is well underway – more on those in the next blog!
Hidden Ditch!
THE COMMERCIAL BIT
Almost all of the paints, miniatures, bases, basing materials and anything that you are likely to need for your hobby are available POST FREE from my shop here:
I’ve still yet to start gaming and to make matters worse, my figures for NMTBH’s are on loan at Wargames Illustrated, so I cant even play a solo game! It’s all a bit frustrating, particularly now that the rule set is out in the public domain and other people appear to be having great fun with it! The upside is that the Facebook page and blogs have been a source of inspiration and there have been some great ideas out there to ‘borrow’. One of these is a custom arrow storm counter. It’s so obvious, I cant think why we haven’t made them before but we just relied on a dice next to the unit. Functional, but not so pretty!
Arrow counters
So as a side project I made up enough counters for my four archer units. I had some micro dice from a kids game in my stash. I also had a couple of spare command frames from the Perry’s WOTR infanty that have the spare arrow groups. It was a simple matter of combining these with a 25mm round MDF base to make the counter. I just covered the base in Milliput and whilst it was still wet, pressed the dice into it to get the correct sized dice cavity. To keep the dice from being covered in Milliput, I wrapped it in cling film. I then pressed in the arrow group from the Command frame.
arrows on the Command Frame
Once that was done, it was left to dry, spray primed and then a thin coat of Vallejo dark earth texture paste was spread over the base to tie everything together and a bit of ballast added for extra detail. I then painted it with my usual basing paint, added some Green Flock and tufts to finish. The arrows were painted with Iraqi Sand for the shafts and white for the feathers.
Hidden Ditch by Andy Callan.
The next diversion was inspired by Andy Callan. He decided that it would be fun to have some scenery pieces to represent some of the special event cards so that we could add them to the table if they were played. Andy had made a piece for the ‘Terrain Advantage’ card – a hidden ditch. Andy had also added a touch of humour – a couple of Coots swimming in it! The picture above is stolen from Facebook, hopefully Andy wont mind!
A new cart for my Army!
That started me thinking that perhaps a marker or piece of terrain for the special event cards would be good fun and an excuse to add to my collection. The ‘Extra Arrow Supply’ prompted me to order a cart (I already have one, but any excuse…) to load up with extra arrows so that it can make an appearance on the table if called for. I also liked the idea of making a terrain piece full of arrows to represent ‘Fauconbergs Gambit’. All I had to do was to make some arrows.
Evergreen Rod & Strip for arrows
I had some Evergreen rod that looked about right – pack 211, .040″ width. With hindsight, it is a bit on the thick side and a slightly smaller diameter would have been better. But I used what I had rather than wait for the better solution. To make the arrow flights, I again used Evergreen strip, this time .040 wide by .010 thick – pack #102. I cut the strip into lengths about 3mm – 4mm long and then using a sharp scalpel blade cut them into triangles. It was a bit fiddly but surprisingly quick to do. I then used Tamiya liquid poly to coat the top of the rod and using the point of the scalpel, picked up a ‘flight’ and attached it to the arrow shaft. Once three flights were attached, I clipped the arrow off and started on the next one. Again, it sounds fiddly but once I got into the rhythm, it only took 30 minutes or so to make over twenty arrows.
Arrow production line!
I then had a spare MDF base that I covered in Milliput and simply pressed the arrows into the milliput. Again, after priming, Vallejo textured paste was used to tie everything together and cover any imperfections and the usual paint scheme followed to finish the arrows and terrain. I’m not sure whether I will get to use it in battle, but it will be fun to slap that piece off scenery down, along with the card, if I get the chance to play it!
Testing the arrows layout!
The finished piece.
So I am now thinking of other little additions to make in between my other painting projects. My version of the hidden ditch is already in the planning stage, and the ‘False Colours’ or ‘Treachery!’ cards could be represented by a flag with the Stanley colours on them! I also need to make some tents to hold my Army Morale markers, so that should keep me busy for a while. I quite like the idea of the symbolism of adding something to the table when playing the special cards. However, I think that taking a water spray bottle to represent ‘Sudden Heavy Rain Shower!’ may be a step too far….
New gaming pieces fr NMTBH’s
THE COMMERCIAL BIT
If you have yet to get your copy of Wargames Illustrated, including the free copy of Never Mind the Bill Hooks Rules set, we still have some of stock at the time of writing. It’s available, post free here!
Almost all of the paints, miniatures, bases, basing materials and anything that you are likely to need for your hobby are available POST FREE from my shop here:
I thought that it might be useful to document a step by step guide to painting WW2 British infantry, as much for my own reference but I hope that it might be useful for other wargamers. The figures that I am using are Crusader Miniatures British infantry. I wanted some additional troops for my growing BEF force and fancied a bit of variety from the superb Warlord BEF figures. The Crusader miniatures are every bit as good, both in terms of sculpting and casting and completely compatible size wise. However, I had made a mistake in thinking that these were early war as opposed to the Late War packs in the Crusader Miniatures range. I am by no means an expert on uniforms of WW2 but these figures are missing the gas mask pack worn on the chest, the rifle bandoleer and the entrenching tool is a two piece item rather than the earlier one piece. I suspect that this means that a purist would say that they are not suitable to join my BEF force. Fortunately, I am by no means a purist and they look great, so they are in the platoon!
The picture above shows four of the figures, cleaned up, primed with leather brown Army Painter spray, attached to Sarissa 25mm MDF bases and the first vallejo colour applied, Vallejo Flat Flesh 70955. Unless specified, all of the paints used are from the Vallejo model colour range.
All of the uniform is painted with Burnt Umber 70941.
The helmets and water bottle are painted with 70887 US olive drab.
The webbing, packs, belt and gaiters are painted with 70988 Khaki.
The rifles and entrenching tool handle were painted with German Cam. Black Brown 70822. I also paint the hair with the same colour – not that there is much to see!
The detail on the rifles, bayonet cover and boots were painted Black 70950.
The faces, hands, Helmets, water bottle and all khaki were painted over with Army painter soft tone ink. It doesn’t matter if you get some on the uniform, you will be over painting this in future steps
The uniforms were painted with English uniform 70921, leaving the burnt umber in the shadows and creases.
The Helmets and water bottles were repainted with 70887 US Olive drab, leaving some of the shading at the base of the helmet and around the webbing of the water bottle. All the Khaki, except the gaiters was repainted, again, leaving the shadows caused by the soft tone ink. I decided to leave the Gaiters a dirtier dark colour.
The Webbing and packs are highlighted with German Camouflage Beige 70821. The wood on the rifles highlighted with flat brown 70984.
The uniform is highlighted on the tops of the creases with 70880 Khaki Grey.
The flesh is highlighted with Flat Flesh 70855 and then skin tome70815. The rifles and shovel handle highlighted with 70846 Mahogany Brown.
The flesh is highlighted with Flat Flesh 70855 and then skin tone70815. The rifles and shovel handle highlighted with 70846 Mahogany Brown.
Bases painted with Dehli Bazaar Brown emulsion and then highlighted with an Iraqui sand mix. Sprinkled with Woodlands Scenics green grass T1349.
Crusader and Warlord WW2 British Infantry
And that’s another section completed – well nearly. They need a bren gun team to join them – I’ll get that painted later. Here’s a final shot of the two sections that I now have completed. On the right, the warlord figures, on the left, Crusader. They are in Movement trays for organisational and display purposes. If they ever do take to the table, the movement trays wont be in use.
THE COMMERCIAL BIT
Almost all of the paints, miniatures, bases, basing materials and anything that you are likely to need for your hobby are available POST FREE at the time of writing, from my shop here:
This website uses cookies to improve your experience. We'll assume you're ok with this, but you can opt-out if you wish.AcceptRead More
Privacy & Cookies Policy
Privacy Overview
This website uses cookies to improve your experience while you navigate through the website. Out of these cookies, the cookies that are categorized as necessary are stored on your browser as they are as essential for the working of basic functionalities of the website. We also use third-party cookies that help us analyze and understand how you use this website. These cookies will be stored in your browser only with your consent. You also have the option to opt-out of these cookies. But opting out of some of these cookies may have an effect on your browsing experience.
Necessary cookies are absolutely essential for the website to function properly. This category only includes cookies that ensures basic functionalities and security features of the website. These cookies do not store any personal information.