Well ‘Artillery August’ is coming to an end and I had planned to complete some extra support for my Waterloo based army but I’m afraid that I will fall short. To be fair, my goal of completing two limbers, and five artillery pieces and the crew was very ambitious for the amount of time that I have to paint. To put this in perspective, I had planned to paint two limbers, 12 horses, four riders on the limbers, 6 outriders, 5 cannon and 20 crew in four weeks. Still lets look on the positive side. I have completed the two limbers, four limber riders, six outriders, 6 horses and 6 more are nearly complete. I also have 2 more cannon nearly ready for service, so another month should see this project finished…

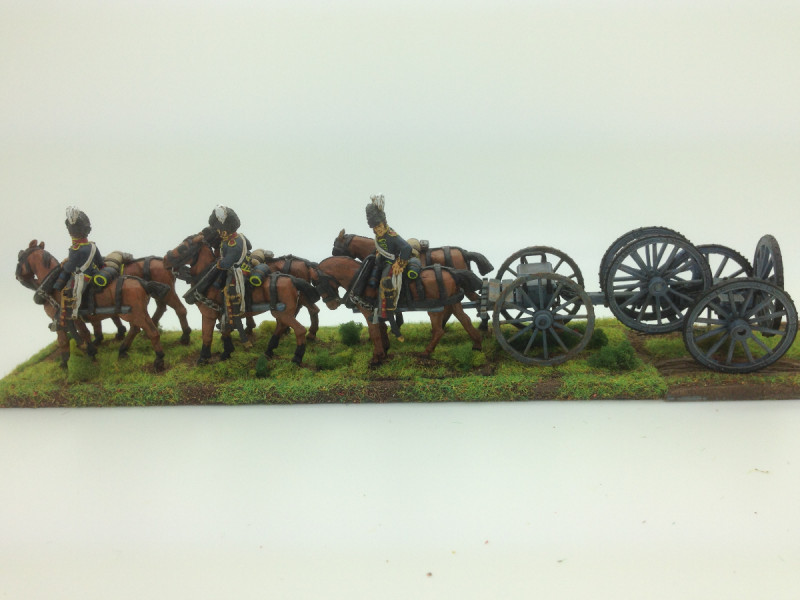
British Horse Artillery Limber completed – awaiting basing.
So, to back track a bit and give some details of how I went about painting these lovely models from Warlord games. I have already discussed my choice of ‘grey’ for the limbers and guns in my previous blog, 50 Shades of Grey here:
50 SHADES OF GREY AND A TOUCH OF BLUE
This article was posted on TMP and as a result of some really good feedback, I’ve gone a bit heavier on the weathering of the wheels. There was quite a discussion regarding whether the wheel rims on the wagon would really be black – they were painted so for the ‘Parade Ground’ but it was felt this paint would soon rub off in service. So I think that I will re visit the weathering on the cannon and limber wheels and make the steel a bit more obvious. This then of course leads to the debate as to how much to weather equipment and uniforms. That topic in itself would be worth a blog article or two but I think that it is a question of personal taste. I am focused on producing units for wargames to the best of my ability, with the time that I have, not diorama standard figures. If you would like to have a look at the TMP thread, click here, there is some superb research in one of the links on the British Artillery.

Foot Artillery Cannon and Limber awaiting weathering and horses!
When it comes to painting the horses, I am now happy with my ‘triad’ of colours method. I prefer to start with a black undercoat, and then paint the base coat, with the other two colours wet and dry brushed over the top.

Limber horses – work in progress.
You can see that the right hand horse is a bit messy from dry brushing but once the horse furniture is repainted in black, things look a bit more natural. For the Foot artillery horse I used triad of Chocolate brown, Flat Brown and then Mahogany Brown. I added a touch of Iraqui sand to the Mahogany Brown for the final light dry brush. For the Horse Artillery Limber I used a triad of Flat Brown, Flat Earth and Cork Brown for a lighter finish.

Saddle Horse for the limber
Once the detail is painted – steel chains, brass buckles etc the horses are ready to be based. I’ll also add some white or black ‘socks’ to at least four of the horses for some variation. I don’t usually quick shade my horses but I did use army painter quick shade to finish the Horse Artillery Horses – it does make them more durable and helps with shading the saddle blankets etc.

Horse artillery limber – Lighter brown horses after Army painter quick shade applied.
As always, after the quick shade has been applied, I use a brushed on Matt varnish and I will usually rehighlight any whites and metallics to get rid of the ‘dirty’ effect.

The full limber on it’s Renedra Base.
I have used the new Renedra specially designed Limber bases for the limber and team. These bases are a bit thicker than normal and are reinforced underneath to help support the weight of the model. I have also used a standard 25 x50mm base to raise the limber up to the same height as the horses, who have their own integral bases moulded on.

Out riders mounted for painting
To paint the out riders, I use a blu-tack ‘saddle’ to mount them on Plastic tubes. They are then undercoated with a grey undercoat and block painted. I then paint on Army Painter Dark Tone quick shade and when dry, use a brush on Matt varnish. Once this is dry, I re paint the whites, leaving any shading and re highlight the metallic and lighter colours where I think necessary.
So with one limber more or less complete, the other awaiting it’s horses and both needing the basing completed it’s just a small matter of finishing the crews of the two foot artillery guns:

Foot Artillery crews ready for priming
and of course, getting on with the Horse Artillery – which is what prompted this project….

Horse Artillery still in their packets
As you can see, I have no hesitation in mixing manufacturers figures. I think that it gives a nice variety in poses and any minor difference in size is barely noticeable on the table. I will have Victrix, Warlord and Perry Miniatures happily mixed together on the table! So Artillery August looks like turning into Artillery Autumn but once these are finished I will not be adding any more British artillery to my army for a while…..
The Commercial bit
All of the paints, tools, brushes, glues, and finishing products are available post free from my shop here:
I would particularly recommend the new Renedra bases if you have a similar project:
The rather superb Warlord Limbers are not held in stock but we can order them in for you and still send post free! Use the shop contact page here:
I hope that you enjoy your modelling!