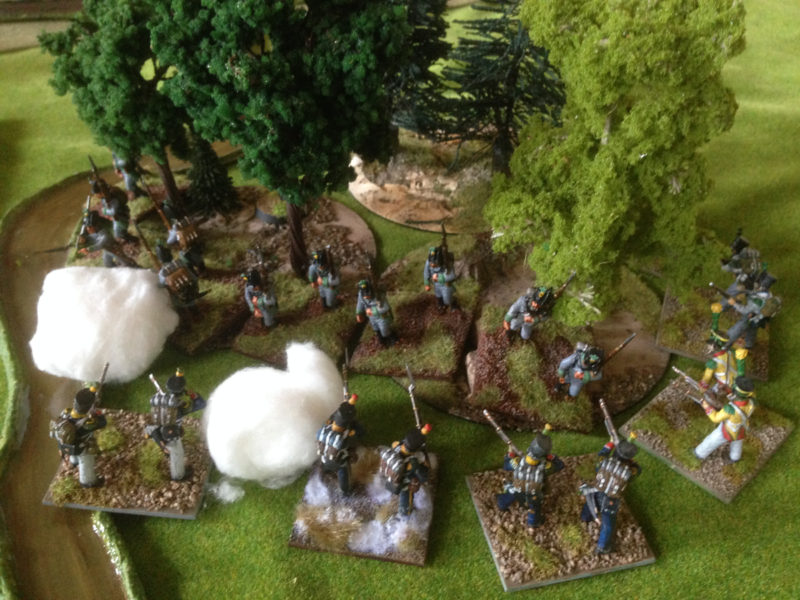
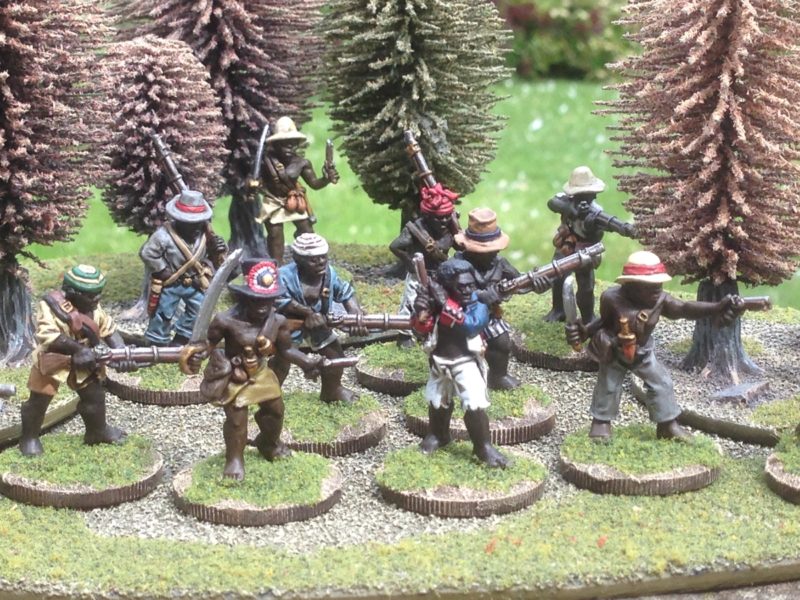
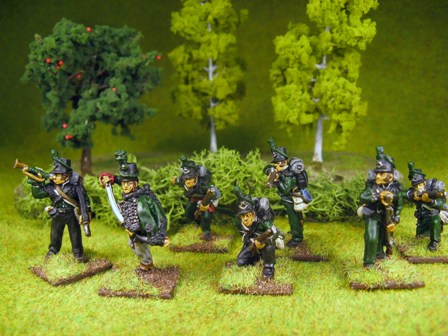
A Review of the Year Part 2

To continue with my wargaming year, the latter half of the year was as much about gaming as it was painting. In July, inspired as much by my attendance at the Wargames Illustrated Saga Iron man day as by the fantastic Footsore figures, I decided to paint a new War Band – Dark Age Irish. The Iron Man day at WI HQ was great fun and despite my poor results, I had a great time. If there is anyone out there thinking of attending one of these events, I would thoroughly recommend that you do so. The atmosphere is very relaxed thanks to the hosting skill of Dan Falconbridge, WI head man, and it is an ideal opportunity to try out something new. I think that Congo, Deadmans Hand and Frostgrave are just some of the events set for this coming year.

Irish Slingers ready for action

Irish Slingers ready for action

August continued with the focus on gaming. The club had decided to add ‘Muskets and Tomahawks’ to our gaming repertoire. However, as we had mixed success with this rules set, Andy Callan came up with one of his rules amalgamations, ‘Sharp Tomahawks’ or ‘Rules for old war gamers with short attention Spans’. I’ll repeat the link to the condensed rules here:

Sharp Tomahawks

Please feel free to print them off and use them for your own games.

Skirmishers engage at the woods edge.

Skirmishers engage at the woods edge in a game of ‘Sharp Tomahawks’

In September, I made good progress with the Irish Warband as well as fitting in a short break ‘Up North’ to visit Hadrians Wall, Lindisfarne Island and other iconic Castles in the area. Great inspiration for more games of Saga!

 Irish warriors ready for battle

Irish warriors ready for battle

By October, I had finished my Irish warband, including making some scenery for my Saga games and had re started work on Napoleonic Portuguese.

Brian Boru surveys the battlefield.

Brian Boru surveys the battlefield.

My Irish War band consists of 51 figures, all of the Footsore Irish! I thought that the sculpts were so nice that I might as well paint the lot. Looking forward, I can see the same thing being repeated for either the late Romans ( If we ever do see the new Saga supplement Aetius & Arthur) or AngloSaxons. I really enjoy playing Saga, it’s just a struggle to get my gaming buddies to join in!

The finished dark age house, complete with new owner.

The finished dark age house, complete with new owner.

In November, the Portuguese took over the painting desk as I committed to finishing the brigade, some 96 troops in total. Unfortunately, I didn’t quite get there but I do have 72 finished now! I did also get to see my article published in WI!

Painting Portuguese article

Painting Portuguese article

And so as we come to the end of the year, I am finishing off those last 24 Portuguese as well as a couple of mounted officers. My tally for the year is just shy of 200 painted figures. If you include horses as separate figures, it’s just over that! I’ve played well over 50 games, including Black Powder, Saga, Lion Rampant, Sharp Practice, Muskets and Tomahawks, Sharp Tomahawks, Chain of Command and The Men who Would be Kings,  visited at least a dozen museums or historical sites, completed a distance learning course on the Battle of Agincourt and I have not counted the books, magazines and internet articles that I have read.

23rd Ameida Regiment take shape.

23rd Ameida Regiment take shape.

All in all, I’m quite happy with the enjoyment that my hobby has given me and I can only hope that the same is true of my customers and friends that are part of this hobby that we call wargaming. So Once again, I would like to wish everyone a Very Merry Christmas and of course, a Happy New Year. I mentioned last week that there was a bonus for those who bothered to read the blog. If you do decide to shop at Arcane Scenery and Models over the Festive period, please enter the code blog2016 when you go through checkout. You will get 10% off of your purchase as well as the usual free postage worldwide. There are some exclusions, we can only post aerosols to limited locations in the UK and some of the woodland scenic products are banned for export to Australia, New Zealand and Japan but you still have another 5000 or so lines to choose from! Of course, feel free to pass the code on to your gaming buddies – the code will work until mid January 2017.  Once again, Merry Christmas!

I forgot to mention that I painted the goats...Goats in a manger is about as Christmassy as it gets here...

I forgot to mention that I painted the goats…Goats in a manger is about as Christmassy as it gets here…

A Review of the Year

Before you are put off by the title, this will be a Brexit, Trump, Sport and Dead Rock Star free zone, which I suspect will make it unique amongst reviews of the year. Mind you, there is a danger that it will read like one of those round robins that you sometimes get in Christmas Cards. I just thought that it would be worth reflecting on what I have achieved this year in my Hobby and perhaps it will help anybody reading this to reflect on their own achievments. I do find that writing a blog helps to keep me on track with my hobby and whenever I am feeling jaded, the thought of writing the blog spurs me on. I must enjoy it – I have written 48 blog entries so far this year, so I should hit 50 by the end of the year.

Napoleon & his Guard

Napoleon & his Guard

Strangely, for me, I started the year with a French Napoleonic subject, Napoleons Coach. I have no intention of ever painting a Napoleonic French Army, but this model from Warlord Games caught my eye. I think that the figures are beautifully sculpted and the piece makes a nice addition to my display Cabinet! I like making these mini diorama pieces and I hope that in the coming year, I will spend a bit more time on this sort of project. I already have my eye on my next display piece, the new Napoleonic boat from Perry Miniatures:

The latest from Perry Miniatures!

The latest from Perry Miniatures!

Talking of Perry Miniatures, my next project was the Perry’s British Napoleonic Dragoons boxed set. I completed these as the British 11th Light Dragoons for my Waterloo army.

11th Light Dragoons

11th Light Dragoons

Looking to the future, I hope to finish two other regiments to complete the brigade but I suspect they are on the distant horizon..

February saw slow progress as regards painting but our Wargaming group did stage a ‘mega battle’, the Retreat From Bitteburg. These battles are an opportunity to put all of our ‘toys’ on the table and fight for a full day rather than the usual club evening battle that we conduct. The battle ended in a French Victory and inspired me to try and put together a campaign for the club. It didn’t quite work out but I haven’t yet abandoned the idea.

The Scots Greys prepare to charge

The Scots Greys prepare to charge

In March, I completed yet another British Napoleonic Infantry battalion, the 32nd Foot. The intention is to build the 5th Infantry Division, with the 28th North Gloucester and the 79th Camerons.

First Battalion 32nd Regiment 'Cornwall' ready for duty!

First Battalion 32nd Regiment ‘Cornwall’ ready for duty!

I have actually started the 28th but they will feature in a future blog!

And so into April, which despite being a busy month with us attending Salute in London, I put together a small Vignette, my Campaign General, Sir Sydney Ruff- Diamond.

Sir Sydney Ruff- Diamond watches on as Private James Riddles rebukes the French!

Sir Sydney Ruff- Diamond watches on as Private James Riddles rebukes the French!

As well as Sir Sydney, I also knocked out some Snow bears as a little project for DeeZee;

The finished Snow Bears

The finished Snow Bears

May saw a change of direction. Inspired by reading a book about the Napoleonic campaigns in the Caribbean, I painted another batch of troops for this theatre. This time it was a company of 14 Maroons from Trent Miniatures. Who knows, may be this year I will get to play a Caribbean themed game!

 Maroon skirmishers

Maroon skirmishers

At the start of the Summer, June seemed to be a bit of a flat month in regards to painting but in reality I had several projects on the go. I started my Portuguese Infantry for the Wargames Illustrated article that I was writing, the Dark Age Irish were under way. In reality, it was quite a productive month and I was ready for my weeks holiday in the beautiful island of Skiathos.

11th Penamacor Regiment

11th Penamacor Regiment

So that was the first half of the year over. In the next blog post, I’ll show you what I have been up to in the last part of the year and for those reader(s) that do stay with it, there will be a little bonus at the end…

Merry Christmas!


O.C.D? – No, just organised.

Good grief! What happened to November? I was supposed to have finished my Portuguese brigade by now. As usual, life has got in the way, and as we approach the ‘Season to be Jolly’ there is less opportunity to sneak off to the garage and get some painting done. I guess the clue to my progress has been in my blog – no pictures of Portuguese in the last few posts. Mind you, I have had some good wargames with my friends and as I will show you, I have nearly finished the complete regiment of the 23rd Portuguese line infantry.

In the meantime, chaos theory has proved it’s existence in my games room (garage) and the amount of stuff lying around is preventing me from actually using my gaming table. Quite how it all got there is a mystery. It was time for a tidy up again. I find that too much clutter is just a distraction. The first task was to get rid of all the sprues with spare bits from the Portuguese Infantry that I haven’t used. I just cannot bring myself to throw away anything that might be of use in a future, as yet, unimagined project, so like most modellers I have a fairly comprehensive ‘bits box’ or rather a collection of bits boxes. They actually date back to the start of my hobby in the 70’s. I kid you not! Here is a picture of one box:

my early bits box

My early bits box – spot the Almark Japanese Infantry figure..

The sharp eye’d amongst you will see crew members from the Airfix Dennis Fire Engine, Old Bill bus, the bits from an Airfix Highlander and some racing car crew, some of whom found life as converted snow speeder crew for a star wars diorama that I built. Part of the fun when building from scratch or converting was to rake through the bits box in search of a piece that you knew would be just right if only you could find it. I decided that some sort of organisation was required. So my sophisticated solution was to put all the little bits into a plastic bag…

My first attempt at organisation - seperate out the small bits!

My first attempt at organisation – seperate out the small bits!

Even now, it’s fun to look through the heap. Oh look! There’s a frozen Han Solo from the Boba Fett ship that I built. Clearly, there must be a better way. As I re started historical war gaming, I needed a new system for spares. So I treated myself to a set of mini drawers – I now had the height of sophistication in bits boxes. A separate drawer for Dark ages, a drawer for Napoleonic Heads, a drawer for right arms – you get the picture.

The New Bits system!

The New Bits system!

However, there is still a slight problem. Never mind the space that the drawers started to take up, I have to remember what’s in each drawer and finding the right arm (literally!) is still a faff! And so, I now introduce my latest innovation in the world of bits boxes!

Zip lock bags and post it note technology!

Zip lock bags and post it note technology!

Oh yes, zip lock bags and post it notes are some of my favourite stationery essentials, so why not combine the two and use them to catalogue the spare bits as I cut them from the sprue. As you can see, the hand writing is a bit dodgy, as is the spelling – I meant ‘Barretina’ – but once they are placed in a card index box, I will always be able to locate the bit that I want…..

And so back to the Portuguese. The regiment is taking shape and here is just a quick preview:

23rd Ameida Regiment take shape.

23rd Ameida Regiment take shape.

As you can see, I have included a couple of British Officers as part of the command, which I think adds a bit of ‘flavour’ to the regiment and is a fair reflection of the composition of the Portuguese Army in the late Peninsular period. Once the basing is complete, I’ll post some better pictures of the whole regiment. In the meantime I’m off to write some Christmas cards. Bah! Humbug!


Are you Napoleon or Wellington?

Before anyone gets too excited, it’s worth pointing out that the question is aimed at Black Powder players and is somewhat rhetorical. The question arose from my last battle at the White Hart with Duncan. A battle that I lost and as is often the case, as I drove home, I reflected on the turning points of the engagement. Of course the dice could have been kinder but that is often the first thought when you lose a battle. You remember all those failed saves, poor rolls to hit, command rolls that failed and of course the dice imposed blunders.

Sir Sydney Ruff- Diamond watches on as Private James Riddles rebukes the French!

Sir Sydney Ruff- Diamond watches on as Private James Riddles rebukes the French!

However, there was a moment when I recognised that some of my frustration should have been reserved for the way in which I had been managing my army, in particular the use of my Commander, Sir Sydney Ruff-Diamond.

The battle between Duncan and I was a pretty standard club game, although Duncan had chosen to make one of his Brigades reflective of a French Avant Garde brigade. It was composed of four small light battalions, three small light cavalry regiments and two horse artillery guns. A strange mix to be sure and not from the standard Black powder order of battle. To add to the unfamiliar line up, another brigade was composed of ‘large’ units of Polish Battalions, with a further brigade of French Infantry, supported by Heavy cavalry. I was fielding my usual British force of 3 Brigades of infantry in the centre, supported by a brigade of Light Cavalry on the left and a brigade of Heavies on the right.

The battle at first followed my usual plan. Form a decent defensive line, hold the flanks with the cavalry, threatening when there was an opportunity and break the opposition with fire power. There was a problem though. At first the French Avant Garde brigade (or light Brigade), was just a nuisance, picking away at my superior numbers. It was also somewhat cumbersome in that with so many units to move, brigade orders were not suitable and inevitably a failed order resulted in many of the units not moving.

Napoleon takes charge!

Napoleon takes charge!

That changed when Duncan committed his commander in chief ( Napoleon no less) to the far flank of his army to support the brigadier. With two attempts at command rolls, the brigade stated to function even more effectively. Not only were the units moving as they should but there were two commanders on the spot to rally shaken units and send them back into battle again.

Meanwhile, the British continued with the time honoured method of leaving the army commander some where in the middle of the battlefield just in case he was needed to move a unit. Of course the problem being, the further you are from your units, the more likely you are to suffer a penalty on your command roll and fail. By not committing my Commander he became ineffective, whereas Napoleon was right on the spot, controlling the critical thrust of the French attack.

Polish Artillery supported by infantry

Polish Artillery supported by infantry

The outcome of the battle was resting on either flank. To my left, I was losing to the French Light Brigade who were gaining territory and gradually shaking more units than was healthy. To my right, I was enjoying a certain amount of success,  although in driving back the large units of Polish Infantry I was again taking casualties. Things came to a head when my right flank failed to sort itself out from repelling the Polish and began to fall back. Had Sir Sydney been on hand, he may have been able to rally a unit or order a spare battalion to plug the gap. He was however,  sitting serenely in the centre, just in case he was needed…

The balance tilted in favour of the French and it was Napoleon himself who was on hand to observe the final casualties forcing the British from the table!

So in future, I will remember that the Commander figure of my army is not just there as decoration. He needs to be near to the critical action to support the brigadier should things not work out as planned.

As we all know, at Waterloo, it was Wellington who was the ‘hands on’ General, riding up and down the Allied Lines all day, bolstering his troops where necessary. On the other hand, it was Napoleon that was ‘hands off’ delegating control of the Battle to his Marshals. Perhaps in future, Sir Sydney will be more like Wellington!


The Battle of the White Hart 1815

Well actually it was nearly half past six (1830) by the time we had laid out the table and decided who was battling who. As it was some six weeks since my last wargame, I was very much looking forward to a game of Black Powder and a chance to deploy my troops on the table. My opponent, Keith Tait, was fielding a force of Austrians against my usual force of British. Neither of us was particularly concerned about points and as we each had the same sized  Really Useful troop boxes, we decide to just put everything on the table and commence battle. As far as deployment went, we just got on with laying out the troops as they came out of the boxes without worrying too much about what went where in relation to each other. If that all sounds a bit too casual for some, I can assure you that sometimes the best wargames can come from the worst preparation. This Battle was a case in point. As I had low expectations of the outcome I didn’t actually take any photos of the game as it unfolded so you will have to use your imagination as to how the battle looked. Fortunately, I can include some pictures of the troops involved on my army and I have attempted to draw a simple map showing the general deployment of the troops.

deployment

The map above shows the deployment with the Austrians at the top of the page, with the light blue depicting light cavalry, dark blue the heavy cavalry and the grey blocks are the infantry brigades. The British are deployed at the bottom of the page, but in this case, the red blocks are the infantry brigades. The green ovals represent woods on the battlefield.

The Austrians had superiority in cavalry, with two additional regiments and had decided that their plan would be to break through the British left flank threatening the rest of the line. In the meantime the two centre brigades of infantry would advance to engage the British centre whilst the largest Austrian brigade would secure the right flank, preventing the British Infantry brigade and cavalry from threatening.

The British plan was simply to hold the Austrian cavalry as best that they could with 4 regiments of lights facing a total of 8 regiments of Austrians. In the centre, the two infantry brigades would secure a defensive line between the two woods, with the final Brigade and heavy cavalry , holding the right flank and attempting to break the Austrians here.

Two problems arose for the Austrians. Despite their numerical superiority in cavalry, they were unable to bring their numbers to bear to any great effect and by committing both brigades of cavalry they simply got in each others way. Even worse, the heavies failed to charge home leaving themselves exposed to the british infantry and artillery fire, resulting in heavy casualties for one of the regiments, which was to break and retire from the battlefield.

The british hussars charge!

The british hussars charge!

The British Cavalry were able to beat off the Austrian Light Cavalry and for once, held their discipline, regrouping to face the next charge.

In the centre, the British infantry were able to form their defensive line but a blunder fractured the left hand brigade as two battalions mistakenly moved to the left of the woods and formed square. In the event, this worked well for the British as they were able to constrict the space preventing the Austrian cavalry from maneuvering and protecting the flank of the remaining battalions. In addition, a small detachment of 95th Rifles were able to take up position in the woods to give covering fire and further harass the Austrians. Seeing that the centre needed reinforcing, the British brigade on the right flank moved across to the centre, effectively conceding this flank to the Austrians. However, the two regiments of British Heavy cavalry were able to charge the opposing Austrian infantry, forcing two battalions into square and pushing the remaining infantry further to the right, relieving the pressure on the centre. The two centre Austrian brigades pushed forwards regardless and the battle began to reach it’s climax.

Battle situation at half time!

Battle situation at half time!

With the Austrian Cavalry snarled up on the left Flank and the Austrian infantry brigade held up on the right flank, the decisive fight would take place in the centre. Initially, the British fire power stopped the Austrians in their tracks. The British first fire was extremely effective, causing numerous casualties and disordering many of the Austrian battalions attack. Even worse for the Austrians, the large brigade out on the right simply refused to move and remained pinned by the British cavalry and a failure to pass command rolls. Despite this, the next round of combat saw the British fail to inflict any further damage to the Austrian centre and at last the Austrians were able to charge home. The outcome remained in the balance.

Btish fire superiority proves effective!

British fire superiority proves effective!

The Austrians smashed into the British lines and were able to break through, breaking one British battalion and pushing back the rest of the brigade. The cost to the Austrians was to lose two of their own battalions and to take further casualties. Even as the Austrian Infantry broke through, on the left, their heavy cavalry had accumulated sufficient casualties to shake the whole brigade and to the Austrian armies dismay, they withdrew from combat. On the right flank the Austrian General was becoming increasingly frustrated with his Infantry, who, despite all attempts, refused to move to support the centre and continued to be harried by the British heavy cavalry.

The Blues are not for moving.

The Blues harry the Austrian Infantry!

The Austrian success in the centre was short lived. Despite being pushed back and losing a further battalion, the British had inflicted sufficient casualties on the Austrians to break the Infantry. Both sides brigades were fragmented but it was the British who had sufficient reserves to recover and reassert their dominance in the centre.

The Austrians break through but are fragmented. They are nice easy targets!

The Austrians break through but are fragmented. They are nice easy targets!

The Centre of the Austrian army had lost all impetus and was picked off battalion by battalion until the two brigades broke. This was effectively the end of the Austrian army, with three of the five brigades now broken. Victory for the British! For once, the British Cavalry had kept it’s discipline, holding both flanks whilst the infantry used the superior fire discipline to beat off the opposition. No doubt the Austrian Brigadier in command of the right will have questions to answer as to why he failed to support the centre!

95th rifles were a thorn in the Austrians flank throughout the battle!

95th rifles were a thorn in the Austrians flank throughout the battle!

A most enjoyable battle for me, particularly as I had such low expectations, having been away from the wargames table for some time. Once again, I am convinced that Black Powder, whilst not the most accurate representation of Napoleonic warfare, is certainly one of the most ‘playable’ games that I have come across and as far as an evening club game, I think that you would be hard pressed to find a better rules set.


Painting War

001

Marvellous! Just as you finish a project ( my Irish Warband) along comes the ideal publication that would have helped get an even better result. I’m talking about the release of the latest magazine in the Painting War series, ‘Dark Ages’. If you haven’t come across this series before, then I think that you are missing out. Each magazine, or more accurately, bookazine, takes a particular subject and using a guest artist, shows you how to paint a series of models. They have previously covered WW2 German army, French Napoleonics, WW2 US and Japanese Forces, British Napoleonics, The Spanish Civil War, Feudal Japan and now the Dark Ages. You can see the range here:

Painting War Magazines

The Dark Ages Magazine is by Alberto Mateos. It starts with a general painting guide and some basic techniques before covering general subjects such as how to paint skin, hair, fabric (including tartan), Armour, shields, flags, horses, accessories and even terrain. All of these subjects are referenced against the colours the artist has used and have clear step by step instructions. That’s just the first half of the mag! In the second part, there are 39 tutorials showing you how to paint individual figures, practically all of which are taken from the Saga Warbands. Most of the figures used are from either the Gripping Beast or Crusader ranges but of course, the techniques are applicable to any suitable Dark Age model. An example page is shown below:

002

With so many practical examples of how to paint your Dark Age army, you really cant be lost for inspiration or ideas. There’s one other clever idea. A colour reference chart in the centre of the magazine. So if you want to know how to paint Lambs skin, turn to page 63, not sure how to paint Red hair, turn to page 70, Scottish tartan – Page 20 – you get the idea and it’s very useful. So it’s another title that I will be adding to my reference library and I thoroughly recommend it for yours. If you would like a copy, just click here:

Painting War – Dark Ages

Meanwhile, back at the work bench, the Portuguese are slowly coming along.

Portuguese on the workbench

Portuguese on the workbench

I am at stage 5 out of 8 in my batch painting process, with the red piping to complete before tidying up, and painting the details – brass plates, buttons etc.

Red Piping done. Brass & other details to complete

Red Piping done. Brass & other details to complete

I think that I will struggle to get both Battalions completed in November but given a good couple of sessions, these boys should be ready for basing next week.

Stay Focused…Portuguse and Panzers

I don’t know about you but when I embark on a long project, I find it very difficult to stay on track. The Portuguese being a case in point. I have rather ambitiously decided to batch paint 24 models in one go to complete the 23rd Ameida Regiment before going onto the next 24 to complete the 11th Penamacor. That will give me the bulk of the Brigade that fought under Stubbs as part of Coles division at Salamanca and Vitoria. According to the little research that I have done so far, they were supported by the 7th Cacadores as well as a Battery of 5 6pounders & a 5.5 inch howitzer. All in all, a tidy little force once I have them completed.

step two in batch painting

step two in batch painting

So the 24 figures are assembled, primed and on the painting bench and I am at ‘step 2’ in my batch painting process. The flesh, hats and boots are done and the dark blue uniforms are coming along. I’ve built my two English officers. One is a Warlord Peninsular officer, the other a Victrix figure that I have put together from various bits.

British Officers attached to the Regiment.

British Officers attached to the Regiment.

I’ve also used a couple of the field caps rather than shakos for two of the troops to add a bit of variety.

Portuguese infantry in field caps

Portuguese infantry in field caps

But as you can see I am a long way from completing these first 24 figures which brings me back to my opening statement. As I am working my way through these figures my mind and eye is wandering and I am constantly being drawn in other directions. This next part of my blog might sound like an advert but I am genuinely impressed with the Zvezda ‘Art of War’ range. The tanks and APC’s are all produced in 1/100th scale and just look superb when built. We have recently received the King Tiger from Zvezda, which started me drooling but this week the Sturmtiger arrived as well. It looks a lovely little model and at £2.99, whats the harm in getting one….

Tempted by the Sturmtiger!

Tempted by the Sturmtiger!

Come on now, I bet that there are loads of wargamers out there that have fancied making a little collection of all the German tanks and the variants just for fun. Well I certainly have – a nice sequence from the Panzer I through to the King Tiger, all sat on my desk, the evolution of the Panzer! Maybe I’ll mount them on a card like a sort of family tree. It’s almost possible to do this now with the range available from Zvezda. So far, I have resisted, as there lies madness BUT maybe I will just treat myself to a bit of something different once this batch of Portuguese are finished and based!


The Portuguese Project Progresses

11th Penamacor Regiment

11th Penamacor Regiment

If you read last weeks blog, complete with upside down pictures (Now correct if you read this on a PC but still upside down on an mobile device…) you will know that I have committed to paint a Portuguese Brigade from the latter stages of the Peninsular War. I have spent a little bit more time researching the structure of Portuguese units and as with details of the uniforms, there is a bit of contradictory evidence out there.

The best information that I could find is as follows:

A Portuguese Infantry regiment consists of a small cadre of Head Quarters staff and two battalions of Infantry. The Battalions were composed of 5 companies of men, four of which were Fusiliers and one being a Grenadier Company. I am indebted to a contributor on TMP who has given the detail for the composition of the regiment based on a translation of the actual 1810 regulations:

A regiment composes a headquarters staff, and two battalions, each of five companies, one of grenadiers and four of fusiliers. 

 The detail which goes on from this shows the entire 36 personnel establishment for the Headquarters, identifying 24 regimental headquarters staff (including medical and musicians) plus 6 staff for each of two battalions of 1 major, 1 adjutant, 1 quartermaster, 1 sergeant major, 1 quartermaster sergeant and 1 standard bearer.  

The detail then shows the structure for each company of 4 officers, 6 sergeants, 140 corporals and soldiers and 2 drummers (a total of 152 per company).

When it came to the distribution of the flags, it seems that they had one King’s colour and one Regimental colour per Regiment. It is generally assumed that the 1st battalion carried the King’s colour and the 2nd battalion carried the Regimental colour.

This information is confirmed elsewhere, although different versions and strengths for the Companies are also given. As usual, I tend to go with the set of ‘facts’ that best fit my purpose, which is to produce a set of figures for the wargames table in general and units for Black Powder rules specifically.

Command Group 11th regiment

Command Group 11th regiment

So, as I had previously decided, with 5 companies of 152 men per company, it seems that the theoretical battalion strength would be about 750 men, making it similar in size to a British battalion. In which case, a unit of 24 men will be about right for my Black Powder units. The composition of my Battalion units do not worry me unduly when it comes to representing individual companies or officers present. I know that some wargamers get hung up on whether they should use say, one figure for 20 men, but that all falls apart when it comes to the officers, ensigns, musicians and NCO’s. So long as these are represented in some way, I’m happy!

23rd Almeida Regiment - nearly complete.

23rd Almeida Regiment – nearly complete.

One final thought to add into the mix is that during the re construction of the Portuguese Infantry force undertaken by William Beresford, a small number of British officers and Sergeants were transferred into the Portuguese Army. This meant that there was at least one British officer at the top of the regimental command structure. On 6th July 1811 there were approximately three British officers in each of the battalions.

23rd Almeida Command Group - basing not quite complete.

23rd Almeida Command Group – basing not quite complete.

With all of the above in mind, my task is now to complete the modelling and painting of a typical Portuguese Brigade. As I have previously painted 24 figures for the 11th Penamacor Regiment and I am about to complete the 23rd Ameida Regiment it is just a question of adding another 24 to each Regiment to bring them up to strength. At first I was somewhat daunted by the thought of committing to this task but armed with the above information I felt that I had to complete the brigade as it would have appeared at Salamaca and other subsequent battles.

The battalion expands

The battalion expands

The good news is that there are some opportunities for adding a bit of variety. The obvious being to include a British officer with each battalion. I’ve also challenged myself to have this part of the project complete by the end of November. In next weeks blog, I’ll add some more detail to the composition of my brigade and perhaps add some detail of the Brigades exploits in the Peninsular.


Portuguese Men of War.

My attention has been very much on domestic and nursing duties this past week and so my hobby has taken a back seat. That said, I have still found the time to sneak off and get some painting done and so I have made some progress on my latest batch of figures, Napoleonic Portuguese Infantry. As I have mentioned previously, I have painted these for an article that will appear in this months Wargames illustrated, issue 349. If you would like a copy, it will be available, post free from my shop here:

WARGAMES ILLUSTRATED

Wargames Illustrated 349

Wargames Illustrated 349

As you can see from the article, I had painted a full battalion as well as part painting another battalion to show the various steps that make up the process of batch painting these troops.

Painting Portuguese article

Painting Portuguese article

The article is entitled, The Perils of Painting Portuguese, not because the figures themselves were difficult to paint but because of the problems that I had in getting good reference materials to confirm the various colours. To find out more you will have to purchase the magazine but I am willing to share some of my references here:

https://uk.pinterest.com/horzawood/portuguese-napoleonic-uniforms/

It’s a link to my pinterest boards and if you are interested in painting some Portuguese infantry, I hope that you will find it useful. If you haven’t come across this site before it is a very useful way of gathering reference material for a project and if you check out the rest of my boards you will have a clue as to what I am interested in painting next!

So back to my work bench and as you can see, I have finished and based the Infantry:

Portuguese Line Infantry

Portuguese Line Infantry

And the command group are nearly finished. They are just awaiting the last touches of paint, a coat of quick shade, matt varnish and then basing!

Command Group still W.I.P.

Command Group still W.I.P.

I’m afraid that the pictures were taken in haste for this blog post – once the battalion is complete I’ll post some better ones! That said, Portuguese infantry may be occupying my work bench for some time to come. The reason being  is that I have decided to build the full regiments for both the 11th Penamacor from the Central Division and the 23rd Ameida Regiment which were brigaded together in the Peninsular War. Each regiment consisted of two Battalions, the first battalion carrying the Royal Standard, the second battalion carrying the Regimental flag. So in all, I will need 96 figures, which means that I have another 48 to paint. I have decided that I might as well complete these whilst I am ‘in the groove’ so to speak, rather than come back and of them later. It will also force me to do a bit more research as to which battles they fought in and who they fought alongside.

Portugese Infantry in movement tray

Portuguese Infantry in movement tray

So there will be plenty to keep me busy as we go into the Autumn and the clocks go back! My target is to have a full brigade of Portuguese, complete with Cacadores as skirmishers and some artillery support. Unless of course I get tempted elsewhere…..


Man Down!

Well actually, Woman Down! My wife, Julie has just had a Hip replacement and so I have been confined to domestic and nursing duties. It also means that we are missing both Julie and myself from the business at the moment. Fortunately, Hayley, Rob and Kevin are doing a great job holding the fort and keeping things running whilst I am away. However, I have found some time to sneak off to the garage when Julie has been resting to do some modelling, so some progress has been made with my various projects.

Sarissa Dark Age Stable

Sarissa Dark Age Stable

I have managed to finish another of the Sarissa Dark Age buildings for the village that will form the centre piece of my scenery when playing Saga. This building is the barn/stable J10, the third building in my collection. I have just one more building that I am keen to finish, the Grain store, although I am in no particular rush to do so. The method used to paint it was of course exactly the same as the previous buildings so that they all blend together.

Sarissa Dark age Grain Store

Sarissa Dark age Grain Store awaiting its coat of daub!

I also have a Sarissa Dark age/Saxon church that I started work on some time ago but never actually completed. As usual, I decided that painting figures should take priority and so the Church was relegated to being in the background of many of my pictures but never quite was finished. Perhaps now is the time to get this project completed as this really will give me a nice little village for my warbands to fight over!

Dark Age Village - work in progress

Dark Age Village – work in progress

As I hinted, the lure of painting figures is always a distraction for me and I have already strayed back to my beloved Napoleonics! To be fair, the figures in question were already part finished as I had painted them for an article that will appear in this months Wargames Illustrated ( issue 349 November). The article is entitled, the ‘Perils of Painting Portuguese’ and explains step by step, how I batch paint my Napoleonic infantry units. I was using the Warlord Games Portuguese boxed set and in order to complete the article I actually painted 24 figures to completion to illustrate the main article but also then painted a further 20 in various stages so that the reader could follow the painting process. These figures have been sitting on my work bench queue for some time and I thought that it would be a good idea to get them finished. The other prompt was that I had found some of the old Victrix Portuguese metal figures in the ‘Bring and Buy’ at the recent Derby war games show. There are some really nice Officer, ensign and musician figures, so I will be using these to complete my next Portuguese battalion.

Portuguese 23rd Regiment awaiting final highlight and basing!

Portuguese 23rd Regiment awaiting final highlight and basing!

As you can see the rank and file are now completed and just require basing. Incidentally, the goats are not mascots but will be living in the dark age barn!

Portuguese Command.

Portuguese Command.

The picture above shows the Victrix Figures that I will be using for the Battalion command. I really like the fifer and it makes a change to have another musician present as well as the drummer. Musicians were of course a key part of the Battalion or Regimental organisation in most Napoleonic armies but the tendency is just to field drummers. Trent Miniatures make some very nice Musicians that will eventually find their way onto my paint table to flesh out my Waterloo collection! As ever, plenty to keep me busy, although, as mentioned above, my hobby time may be slightly curtailed over the next couple of weeks.


Doing Up The House.

Following the completion of my Irish Warband it was time to move on to a new project. I planned that this would be some scenery for my Saga games and rather than dive into the next pile of miniatures that are waiting on the painting table, I thought that now would be a good time to try my hand at some scenery making. The goal is to have some generic scenery for each period that I am gaming in, so that when I am off to the wargames club, I can just pick up the appropriate boxes and I’m ready for battle. I also thought that having some nice scenery would also improve the look of our games. I dont expect to reach Wargames Illustrated standards but having scenery that is relevant to the game will improve the visual appeal. I have some nice Sarissa Precision Dark Age buildings that I am working on at the moment. Previous blog posts have shown the first of these buildings that I have completed, the A frame Hut,  in the background of my Irish figures.

Fiana, Kern and A frame house.

Fiana, Kern and A frame house.

My next building was to be the Timber Framed House J14. I covered the roof in ‘Teddy Bear Fur’ thatch, to match the A Frame hut and then coated the fur in PVA glue to flatten it down and stiffen it up. Teddy Bear Fur is just one way of making roofing for these buildings. Gary, from March Attack, the designer for the range, prefers to use pan scourers as roofing and they look just as good, if not more effective. Other choices include flannel cloth or even coco fibre hanging basket liners. I think that it is a question of taste as they can all look realistic. I went with the teddy bear fur primarily because I had some to use up! I think that it’s worth pointing out that the Sarissa Buildings look very good with just a coat of paint, I just fancied trying a few ideas to pimp them up! So having covered the roof, the next stage was to add the timber framing.

To do this I used some standard matchsticks. I didn’t actually use the headless hobby variety – we do sell these in the shop in bags of 2000 for just £2.99 – but as I was at home, I resorted to a box of Swan Vesta’s that were handy! I  used the etching on the building as a guide and cut them to the right length. It is then a simple matter to glue them to the building using PVA glue.

Sarissa Dark Age House j14 with framework added

Sarissa Dark Age House j14 with framework added

You need to gently sand down the tops to let the roof fit nicely but it is a relatively simple job to do. Once the frame work was glued into place and dried I used Vallejo Dark Earth Paste to represent the mud or daub filling in the panels. Actually, you can use any of the Vallejo pastes as you will be painting over them At a push Polyfilla or a similar product will do! I used a squared off coffee stirrer to apply the paste, leaving the frame work showing. You can see that I used the stirrer to roughen up the paste to get more of a texture.

Applying the daub!

Applying the daub!

Once the paste had dried the next stage is to paint the building. I confess that I had made a slight mistake here. It would have made more sense to paint the inside of the building black before assembly or even afterwards, before I started to add the framework. As it is. I forgot and it doesn’t really show.

Dark Age house with daub

Dark Age house with daub.

The picture above shows the effect achieved before painting and the picture below show how the building looks from the end with the door.

Dark Age house viewed from the end - note door is left unpainted at this stage.

Dark Age house viewed from the end – note door is left unpainted at this stage.

Once everything was dry, I painted the building with my favourite brown, Vallejo Chocolate Brown, including the door. I then dry brushed everything with a couple of lighter coats, using Iraqi Sand to lighten the brown on the panels of mud. Now, I’m no expert on Dark age buildings, so I wasn’t sure whether to paint the panels in a lighter colour or even whitewash them but I decided that they were best left a dry mud colour – this village hadn’t received a visit from the travelling Dulux Salesman! The next step was to paint the timber framing. I choose a very dark brown. Vallejo German Camouflage Black Brown was a good contrast. I used a light grey to lighten this and then gave the building, in particular, the timber frame, a gentle highlight using the dry brush technique. The final task was to pick out the door hinges with black and to  add some black & grey to the smoke hole in the roof.

The finished dark age house, complete with new owner.

The finished dark age house, complete with new owner.

The building is now ready for the table and my village now consists of two houses. I have a couple more to finish in a similar style and that should give me a nice little settlement for my Dark Age war bands to fight over! Whilst I was thinking about other scenery that I could use, I remembered that Arcane scenery has it’s own small range of Neolithic monuments. Although not specifically designed for the dark ages, they seem to be useful additions to the table top and will add a bit of atmosphere! Here’s a couple of the pieces:

Neothithic Stone Circle

Neolithic Stone Circle

Neolithic Burial Chamber

Neolithic Burial Chamber

If you are interested, the DeeZee scenery range can be found here: DeeZee Scenery

So, my aim of building some new scenery for my wargames has moved forwards. If you would like to undertake a similar project, I would recommend that you visit the March attack site for some very useful Tutorials of how to get the best from the Sarissa Precision MDF buildings. Just a very simple paint job will give superb results as Gary demonstrates in these PDF’s

http://www.marchattack.co.uk/Painting%20Building%201.pdf

http://www.marchattack.co.uk/Painting%20Laser%20Cut%20Terrain.pdf


Sons of Dana are ready for battle

The Warband Gathers

The Warband Gathers

It seems like I have been painting my Irish warband for half the year but at last they are complete and ready to take to the table. I actually started to paint them in July, so it has taken me some time to finish the warband. It didn’t help that I had decided to paint the complete collection of Irish warriors from the Footsore range. I had actually finished enough Hearth Guard, Warriors, and Levy to field a warband some time ago but the Heroes in the Footsore range are such lovely sculpts I had to add them to the band. So I now have Ulf The Quarrelsome ( no you don’t…who said that..); Brian Boru, the High King of Ireland; a Priest; Standard Bearer and enough assorted heroes to give me the flexibility to easily field up to 6pts and more, in a Saga game.

The Heroes all took a bit longer to paint than the standard rank and file troops. I wanted them to be wearing more decorative clothes. However, I did stick to a limited pallet of paints and tried to avoid really bright colours. I agonised over how to finish the shields. I couldn’t make up my mind whether to use shield transfers or whether to paint them free hand. I decided to go down the free hand route but as I am no artist, I have kept the designs very simple. I had the same conflict when it came to producing the banners. Despite my concern that the Dark Age Irish would not have access to a graphic designer, I decided that the Little Bigman Studio Banner transfers were too nice not to use…

Brian Boru surveys the battlefield.

Brian Boru surveys the battlefield.

When it came to basing up the figures I put all of them onto 25mm round MDF bases, with the exception of Brian Boru and my ‘reserve Warlord’ – these went on 40mm bases. Although the Footsore Brian comes as a set of three figures, I decided that I would just mount him and the standard bearer on a 40mm round base. I also swapped out the Footsore Warlord with the mean looking guy from the Irish Command set. I think that he makes a better warlord, so the other figure has been relegated to Hearth guard status! So I have the luxury of two warlords to play. If I use Brian Boru, although he is ‘free’ in terms of points, his effectiveness as a warrior may be a challenge. Generating three saga dice and costing no additional points is a great bonus but his combat abilities are very limited – he will need protecting!

My newly promoted warlord displays his latest victim!

My newly promoted warlord displays his latest victim!

I mentioned that all the other figures are separately based on 25mm MDF bases. This gives me the opportunity to field these figures as separate units or even add them to another warband. I think that the heroes armed with Dane Axes will be quite at home in an Anglo Dane army.

Ulf The Quarrelsome, Priest and Hero

Ulf The Quarrelsome, Priest and Hero

I’ve also been playing with movement tray design for Saga. Whilst my rectangular trays ranked my figures up nicely for display purposes, I didn’t think that they would look so good on the table. I was messing around with some other options and found these smaller skirmish trays that were designed for fire teams in bolt action by Sarissa. A quick conversation with those very helpful people and they produced a Saga Movement tray set. You can put four figures in the tray, allowing you to deploy units of 4, 8 or 12 very simply. The way in which they wrap around each other means that you can change the shape of the unit from a ‘clump’ to a line fairly easily. Of course when you get to combat, it will make sense to take the figures out of their tray but it will make the initial moves in a game easier. They are also good for transporting your army.

movement tray for Saga

movement tray for Saga

My intention is to use some Vallejo paste on the trays to make them blend with my basing scheme, but the picture does show how they might work. So the sharp eyed amongst you will see that I am two war banners short and those with long memories will be asking where are the dogs that you were going to make? Well the banners are ready, I just didn’t have the time to fix them to the poles before I took the pictures. As for the dogs, they are at the back of the work bench. My next project beckons…time to do some scenery!

If you would like to have a go at building your own Irish Warband, Footsore do a 4pt warband (26 figures) for just £36.00. Even better if you purchase before the end of the month through my shop, we are supplying free bases and spears for the warband. Just add the code WARBAND in at checkout. Even better, if you enter SEPT5, you will get an additional 5% discount and of course free postage. Free postage is worldwide, so yes, that does include USA and Australia… Click here to purchase your Warband:

Footsore Irish Warband

If you would like to buy the Saga movement trays that we have designed with Sarrisa, just click the photo:

saga-trays

By the way, the trays also include the 25mm bases, so you will have some spares!

If you would like quick links to my other saga articles for details of the paints used and the basing scheme, just click here:

Saga Articles

Right! I’m off to fight a battle!

1 20 21 22 23 24 42