An early May Bank holiday is usually an opportunity to get some painting done as the weather is generally pretty poor. This was not to be the case though. What with gardening, ‘Granddading’, and DIY, I barely managed to get to the painting desk. I have made some progress, though, and my warband is gradually taking shape. I’ve mentioned previously that I have not done any real research into Japanese Samurai other than to look at lots of pictures of other peoples models, casually flicking through my one Samurai book and putting together a Pinterest board of various Samurai images. You can see my board here:
There was one colour scheme that caught my eye, the blue and red Ashigaru looked pretty good and so I based my colour scheme on this with a few tweaks.
My warband inspiration!
The picture also helped to clarify how the various armour plates and bits of clothing were supposed to look. There are slight differences between the bowman and the musketman but I now had the general idea as to how they should look. As usual, I would take a few liberties, or as I prefer to think, ‘artistic licence’ when it came to painting the figures – usually to simplify the painting process. I also like my models to look a bit on the ‘bright side’ for the gaming table.
So, having assembled the figures I gave them a priming coat of Army painter black spray. I then used a size 6 brush to drybrush the figures all over. The main purpose of this was to bring out the detail on the figures so that I could see what needed painting and where. The secondary purpose was that the armour was then highlighted and the detail brought to life.
Painting the warband
This was the first batch that I did – you can see that I have also painted the flesh and trousers. I used Vallejo 70992 neutral grey to dry brush these guys.
The bowmen, dry brushed and ready for painting.
The bowmen have been given the same drybrush treatment but this time, I used a lighter grey 70870 medium sea grey to up the contrast. I think that a light blue would also work well and I might try this on the next batch! I painted the flesh with 70927 Dark Flesh, the shirts with 70840 Light Turquoise and the trousers and weapons (spears & bows) with 70957 flat red.
Ashigaru Bowmen with detail added
I then painted the ‘socks’, face scarf, ties on the legs, detail on the bows and arrow feathers in off white 70820 and the arrow shafts in 310 old wood. At this stage most of the block painting is done. However, to give a bit of definition to some areas, I have given the faces a coat of skin wash 72093 and used both army painter strong tone and Dark tone ink . The initial effect is to make things look worse.
Ink washes applied
The ink does help to define the shadows and the next job will be to carefully repaint the same colours but to leave the ink shadows in the recesses. It might sound like a bit of a faff but it does work. That is as far as I have got with the bowmen and obviously I need to finish these off but here are the Spearmen that I have completed.
You can see that by carefully repainting the raised areas on the faces, you get a bit more character with the figures. I have also painted the sandals using 70822 black brown and added some detail to the weapons using Steel 70864 and brass 70801. I’ve also painted the hats 70862 black grey for no other reason than I wanted them to look slightly different to the armour. I’ve used 70817 scarlet and 70961 sky blue to add some highlights to the tunic and trousers. The basing is very rough at the moment. I will be adding some grass tufts and probably some flowers to make them a bit more interesting!
So that is how my warband is shaping up so far. There is still some way to go to have them completed. It doesn’t help that I tend to fuss and go back over models that I thought that I had finished as I learn how to paint the models and review the pictures that I have taken. It is also a different process to the one that I use to paint my Napoleonics. With these small skirmish warbands I like to try and have a go at painting using inks & highlights rather than resorting to quickshade. I think that it is worth the effort though, I hope that they will be well used in battle over the coming months!
If you would like to purchase the Vallejo & Army Painter colours that I have used, you can find them in my shop here:
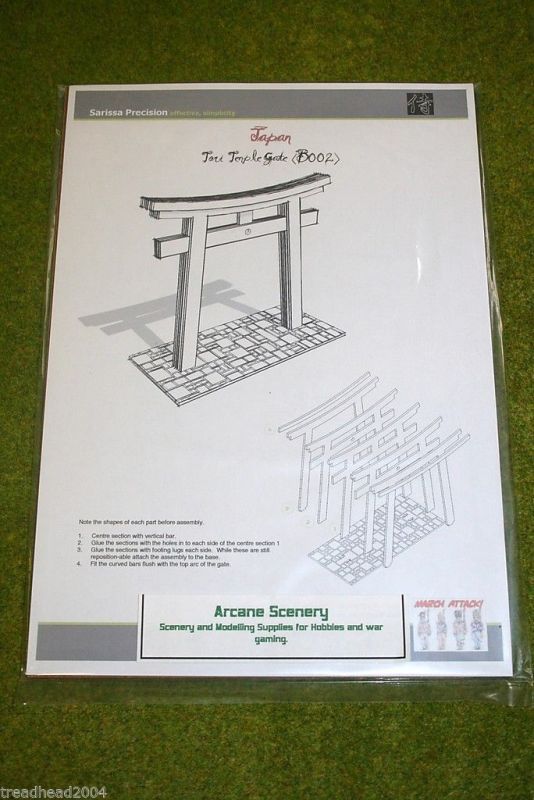
No, it’s not a headline from the Sun Newspaper regarding a scandal in the Conservative party but the first piece of scenery that I have made for Test of Honour. A very straight forward and easy piece to finish, it is the simple Tori Temple Gate from the Sarissa Precision range.
Made from Laser cut MDF, assembly is very simple using PVA glue. Painting is just as straight forward. There seem to be a lot of questions as to how easy is it to paint MDF. The answer is very easy. I just use the same paints (Vallejo) that I use on my miniatures, unless I am painting a large area. In which case, match pots of emulsion from B&Q (other DIY superstores are available) also work very well.
Completed Tori Temple Gate
So, once I had assembled the gate, I sanded down any obvious mis matches on the pieces to get a smooth surface. I left the main gate separate from the base and just sprayed it with Army Painter red. The first coat will bring out any imperfections and it is easy to remove these with another sand over with fine wet & dry paper. Once this was done I just resprayed it a couple more times to build the colour and that was that. I’m not sure if it’s the right shade of red but it will do for me!
As for the base, this was just as easy. I took a fairly large brush and simply dry brushed it, with out priming, in a Dark Grey. I think that I gave it a couple of coats to cover the wood. This technique ensures that the laser etched detail is not covered. I then repeated the dry brushing with a Medium grey and then again with a lighter grey until I was happy with the effect. I picked out the etched cement between the flag stones using a small brush and a watered down pale grey to get the effect shown above. It was a simple but laborious job to follow the pattern.
Tori gate & warriors
So with my first piece of scenery made the next job was to sort out a playing surface. Of course I could use one of my other mats but I have a cunning plan for Test Of Honour. I think that it is an ideal club night game and my intention is to put together a ‘Pick up Set’ where by I can just grab a couple of boxes of Scenery and figures and head off to the club knowing that everything is there, ready to play. The solution to a playing surface can be found at Aldi at the moment if you are quick! For just £6.99 you can get a 1 metre by 2 Metre green Awning mat. Cut it in half and you have two ideal sized mats for Test of Honour, so if you ‘go halves’ with a mate, you pay just £3.50! Here’s mine:
Aldi Mat
OK, it’s not as glamourous as a Cigar Box mat but then at the price…If you look on the Test of Honour Face book page , I’ll post some pictures of how it looks with scenery and figures on it later. If you follow this link, you can see details of the mat online:
You will also notice from the pictures I have some trees in Blossom. The story behind these is that I picked up a job lot of trees that were being discontinued by a supplier two years ago to sell on the stand at Salute – just £1.99 for a pack of two. Nobody wanted trees in Blossom and these were left over after the show. I decided that they would look nice on my table and here we are two years later and I cant get Blossom trees at such a price to sell for love or money…. They still look nice on my table though!
So if my playing surface and scenery box is taking shape, how am I doing with the figures. As usual for me, painting is slow but I am getting there. I now have six spearmen done.
My war band takes shape.
The basing isn’t really finished – I need to add some grass tufts or even better flowers but I haven’t quite decided on the final scheme. I am also waiting on some decals to add onto the back banners. They are ready for tonight’s game though. Next up, the archers and I will give a bit more information on how I went about painting my war band.
Close up of Spearmen – I’m not sure why they look so happy.
In the meantime, you can see the range of Samurai items that we have in stock, including the superb Sarissa Japanese buildings range, here:
Well, it turns out that have I succumbed to my urge for something different and my Easter present to myself was a copy of the new Test of Honour game. I am not an ‘early adopter’ by any means and get far more pleasure from deferring a purchase than actually making one! However, I had played a couple of games and had really enjoyed the simplicity of the game mechanics. The fact that I had a great deal of fun playing the game also helped – I don’t remember laughing so much in a wargame but that may have had more to do with the poor Japanese movie impersonations that were being carried out as each Samurai moved…
My first game – unpainted figures!
I had also been slightly put off by the chatter on some social media pages by the apparent problems with the Wargames Factory/Warlord plastic figures. Having seen the completed figures for myself, I thought that they looked pretty good and the painted ones that I had seen had convinced me that I could work with the figures in the set. So I grabbed a box whilst I still could and spent some of my spare time over Easter building and painting Samurai.
I wont do a full unboxing review – there are plenty on You tube and other forums but here are my general thoughts. First of all, I think you get a good deal for your money. In effect, you have a complete game for £35, including, albeit 2D, card board scenery. As well as all of the cards, tokens, rules, and markers that you will need to play, you also have the sprues & parts to make 35 Samurai and Ashigaru miniatures. All you need to supply is a Tape measure and a 3 foot playing surface. You do have to assemble those plastic figures though…
Ashigaru Archers Assembled!
So first things first, yes the figures are plastic! If you don’t like plastic figures then jog on son, you’re in the wrong aisle! Metal figures are available from other suppliers and may just cost a tad more than those figures included in the game. Are they complicated to put together? I don’t think so, you’re not going to be building the Battleship Yamato. Each figure has about 7-8 pieces and there are some clear assembly sheets included in the game. You just need to take some time to look at them.
Are they fiddly to put together? Hell! Yes! I lost count of the number of heads that I dropped and even with my small fingers, the parts are a challenge to handle. Don’t even try to rush the assembly, you will get into a mess. Here’s my best advise on how to proceed.
Spearmen assembled and undercoated
First of all, you need to be seated comfortably, at a decent work station with a nice cup of tea and plenty of time – don’t rush!
Study the assembly sheets and match them up with the correct sprues – Spearmen, Archers and Samurai.
You need a good sharp pair of clippers, A good scalpel and a sanding sheet, whether it’s an emery board or something similar, what ever suits your budget!
For assembly, use a good polystyrene glue – I prefer the Revell Contacta glue with a needle applicator. Don’t use super glue – it may be faster but the beauty of polystyrene glue is that you will have some working time to position those fiddly parts. Because the glue melts the surfaces you will get a bit of ‘Fill’ to hide the joints and actually the bond will be better than superglue once the glue has dried. Here’s a tip, when you put the glue onto a piece, don’t immediately slap it onto the model. Wait a few moments to let the glue start to melt the plastic and then put the part into position. It will stick into place but you will still have some working time to position it to your preference.
Start with one of the simpler models. Either a spearman or bowman using the one piece torso. Once you get the hang of assembly and become familiar with the pieces you can be more ambitious and start to try different poses and combinations.
I found that the best assembly method was to stick a pair of legs together. Then attach these to a base. From there it was easier to handle the model and build the figure from the waist up.
Once you have built a few of the models, you will find that it becomes easier & faster as you become familiar with the process. The real joy of plastics though is that you will be able to customise and convert your models to make a really unique warband.
the warband takes shape
It took me about a couple of hours to assemble my first 12 models. In fairness, I was taking my time and as I became familiar with the different pieces I started to change the poses and think about conversions.
I also wanted to start to paint the models. Once again, they look to be a challenge but I am going to opt for a simple approach. For a start I don’t intend to spend too much time on research. I have one book on Samurai in my home library ( The Book of the Samurai by Stephen Turnbull) that I have been flicking through and the rest of my information has come from the Test Of Honour Face Book Group. If you haven’t joined , then it is worth it just for the pinned post at the top of the page which has some fantastic links to resources.
For me the process of painting will be just to produce some gaming figures and not to get too involved in historical accuracy. If I really get bitten by the Samurai bug, I may revisit that statement but for now, my intention is to produce a couple of small warbands that I can use at the club to take a break from my Napoleonic Games. So at the moment, my ambition goes as far as painting the 35 figures in the box and perhaps building a few nice scenery pieces.
Painting the warband
You can see my progress so far. I’ll use these test models to see how I get on and to figure out the best way for me to paint the models as a batch. At the moment I have simply primed them with Army painter black, dry brushed them with neutral grey, Faces and hands are dark Flesh and red for the Trousers(?). There’s a way to go yet so I’ll return to these in a future blog. In the meantime, I’ll finish this entry with a picture of the limited Edition Samurai that came with the set. I really enjoyed painting him and his ninja mates….
Banzai! The limited edition Samurai takes on some North Star Ninja’s!
You can see our current stock of Samurai and the Test of Honour range in our shop Here:
If you have been following the series of blog posts, you will know that from the outset, the aim has been to produce a unit for the Black Powder rules set. So deciding how to base the figures is now a straight forward task. I prefer to base my figures on Renedra plastic 40mm by 40mm bases, four figures to a base. This gives each figure a 20mm ‘frontage’. Other basing configurations can be used – the Perry’s use six figures on a 45mm by 40mm base, each figure having a 15mm frontage. To be fair, this looks more realistic, with your troops standing shoulder to shoulder. However, it would involve painting more figures per battalion and by now, you will know that I prefer to take the easier option.
The other point that I would make concerning basing is that by using a consistent 20mm per figure approach, you can get around the need for multiple basing by using movement trays. In the early days of my change to Napoleonics from Scifi gaming, I based figures individually on 20mm square bases to use them in Sharpe Practice skirmish games. It was easy enough to then change these into battalions by putting them into movement trays when I started to play Black powder.
Ready for basing Sir!
I now base in fours and you can see from the picture above the start of the process. I take the Renedra 40mmm square base and cover it in Vallejo 26218 Darth Earth paste.
Splot! put figure on the base!
Then just push the figure into the paste. I don’t even glue the figures, there’s enough adhesion in the paste to hold them solidly in place when the paste dries. It even is good for metal figures. In the unlikely event that I decided to rebase my collection, it would be a simple task to gently pull the figures from the bases.
Four on a base
As each figure is placed on the base, I use a sculpting tool ( it could be a cocktail stick!) to bring the paste up over the figures base to blend them into the groundwork. You could at this stage, add some other detail to the bases – small rocks, logs etc – on this occasion I’ve kept it simple.
Whilst the bases were drying, I went back to the Grenadier company. I should confess – My OCD had got the better of me and I decided to change the badges on the back of the shakos. They are still slightly oversize but by using a smaller strip of evergreen, I managed to cut some slightly smaller diamonds. It was then a case of using a scalpel to slice off the larger ones and to replace & repaint the badges & any damage to the shakos. I also have decided that I would paint 28 figures for the Battalion. I thought that a full base of four grenadiers (the guys with all white plumes) would look better than just two on their own as they would have the French backpacks. I then would have four figures in the Light company (all green plumes) that I would base seperately to be used as skirmishers. All of this will be clear when you see the finished unit.
French back packs
To make the french back packs it was a simple task to cut the water bottle & cartridge case from a British pack pack and then glue them to the cleaned up French style packs as shown above. I then painted the packs in leather brown with off white patches – everything else was painted as standard. These were then super glued to the Grenadiers and they were finished as per the rest of the unit using the quickshade & rehighlight method described in last weeks blog.
Light company will skirmish!
The picture above shows the four figures from the light company on their seperate bases. The Vallejo paste has dried and I have painted it first with Vallejo chocolate Brown and then highlighted this with a quick dry brush of the chocolate brown with some Iraqi sand added to lighten the top colour.
Green scatter added to the bases
The next stage is to add some green scatter, in this case I have used Woodlands Scenics Green blended turf. I use watered down PVA and apply with a small brush. Then just dunk the base into the scatter, tapping off the excess.
Grenadier Company based
The picture above shows the Grenadier company based but there is one final touch. I like to add some grass tufts to give another layer of detail on the base. I’ve used Gamers grass Dry green tufts and attached them with a dot of super glue.
Rear of Grenadier Company – tufts added
The Command Stands
You will have noticed that the Officers & ensigns have also been painted and added to the unit. The procedure that I use is exactly the same as for the troops but I paint the Drummer & Sapper separately, rather than as part of a batch. The ensigns are carrying flags supplied by GMB, my favourite flag supplier. With the flags and tufts added, the Battalion is now ready to take to the table.
Full battalion in line ready for action!
The Light Company will skirmish!
So another unit is completed and it’s on to the next project. I tend to have a break between Napoleonics so I’ll be painting something a bit different. However, next week, I’ll just explain how I use movement trays and how to split the battalion into two to facilitate a black powder game on a smaller table.
If you would like to have a go at painting your own unit, as I write, we have an offer in the shop. Buy the black powder rules set and get a box of Warlord figures for free. This also includes free postage. For more details Click here:
Having painted the shakos black, it is a straight forward job to paint the plumes in white – I use Vallejo off white 70820. The shako plates are painted with 70801 Brass. Notice that I will have to use these colours again, but the point about the batch paint process is that small progress is better than no progress. It is easy for me to find 10 or 20 minutes to paint the plumes and shako plates rather than block out a whole evening or part of my weekend trying to complete a whole figure or batch of figures. This is why the process works so well for me. Any spare time that I have, I use to paint a couple or more figures in one colour and the Battalion gradually takes shape. I do admire those painters that can sit and gallop through 24 figures in one sitting. However, first of all my back would seize up after a couple of hours, then my eyes will get tired, until finally, I start to make mistakes. So short sharp bursts work for me! It’s not so daunting to work through a battalion in this way, over the course of a week, you will find that the unit moves to completion.
Back to the painting. The next colour is Red 70957 for the jackets and the bottom of the shako plumes. There is a fair degree of discourse that takes place on forums as to what colour or shade British redcoats really were. Without repeating the general thread of this conversation, my view is simply to take a pragmatic approach, they were red. To be fair, the quick shade will darken and dirty this colour to a less garish red, so the effect is about right for my eyes. The other colour the I have used is Iraqi Sand 70819 for the food haversacks. These were usually made from canvass or a strong linen and although they started out as perhaps a paler shade than this, they would have been discoloured from use. If you prefer, you can use off white for these as well.
White lace and yellow facings added
The picture above shows the next stage. When it comes to painting yellow, I always find it very difficult to get a decent coverage and colour. To help overcome this, I first painted the collars and cuffs ( facings) in sand yellow 70916 and then when dry, over painted this with flat yellow 70953, although the vallejo 70915 deep yellow may have been more effective. Next up, the laborious job of painting the belts, lace, collar edging and rifle strap in off white 70820. I prefer the off white as it is a softer white, but if you prefer, you can use 70951 white or the Foundation white 70919 for a brighter finish. The next colour is Natural steel 70864 for the buttons, musket barrel and bayonet. I’ve also added some detail to the muskets and at the same time painted the main buckle plate using Brass. Finally, I’ve painted the water bottle strap in Leather brown 70871. The figures are nearly complete.
Rear view & Flank Company
The picture above shows the rear view of the figures with the brass painted onto Musket sling, bayonet scabbard and rear shako plate. (which keeps looking bigger…see last blog entry!) Note also that the Light Company figures have green plumes and the Grenadiers, which are not pictured, will have all white plumes. If at this stage you think that the painting is a bit messy, bear in mind that the quick shade will cover some of the errors, I will tidy anything too obvious and of course, the pictures tend to magnify errors. On to the backpacks!
Back packs primed in black
As you can see, I have primed the back packs with army painter black spray to save some time. I have also painted the water bottles with Vallejo 70901 Pastel blue, which I think is about right. If it looks too light here, it will darken down with the quickshade.
Back packs completed
To finish the back packs, I used Neutral Grey 70992 for the blankets ( I also used this to tidy any overruns onto the troops trousers), off white for the straps, leather brown for the water bottle straps and miscellaneous pouches and steel for the pan. I suspect that the mess pan is far too clean for being on campaign and should be a smoky black, but it looks nice! You will notice the tidying up that I have done around the white strapping. Once again the quick shade will cover this up.
Ready for action – well quick shading…
I’ve now attached the back packs to the troops using super glue. As we are gluing two painted surfaces together, super glue will be more effective than polystyrene cement. The main painting is now complete. The next stage is to use the army painter quick shade to add depth and definition to the models. Now you could use, either an Army painter ink or another brand – I’ve used the Windsor & Newton Ink in the past to good effect. However, I do like the finish that you get with the Army painter quick shade. I do not ‘dip’ the models as army painter advise, simply paint the model with the quick shade. I prefer the Dark tone, which is a black shade, rather than the dark brown strong tone, although some prefer to use strong tone over red. I know that there are reservations about using this stuff and to be fair I agree with many. The quick shade is too expensive, more because I have yet to completely finish a tin before it starts to ‘skin’ over. This isn’t to do with the seal on the lid but the air that gets trapped as the level in the tin goes down. The tins are simply too big. I have passed my concerns on to Army painter but I cant see them designing a new tin just for me! Having got my gripe out of the way, I have to say that otherwise the product is excellent and does do what it says on the (oversized) tin!
Three stages of quick shade
The picture above shows the effect of quick shade. The first figure is just block painted, the second has been painted with quick shade and the third has had a coat of army painter matt varnish or as they call it anti shine. You can see that the shaded figures look as though there is more depth to them. The Quickshade does ‘dirty down’ the colours and close up this looks messy but in ‘real life’ the effect is quite acceptable.
So to recap, once the figures have been coated with quick shade, leave them to dry for at least 24 hours to harden off properly. Then spray with a good matt varnish. Matt varnish can be very temperamental and I could write a blog just on this subject – just carefully follow the instructions.
Ready to base!
The final part of the painting process is to retouch some of the lighter colours. You can ignore this stage but you will find that if you carefully retouch the most prominent parts of the figure, the effect is well worth the extra effort. For these figures, I have repainted the white cross belts, tip of the shako plume, shoulder tufts and lacing on the cuffs. I have also retouched the yellow facings and finally, painted the bayonets in silver 70997, to make them shine!
The figures are now ready to be based. I will cover this in detail in my next blog. I’ll also show you the Grenadiers with their French backpacks and the completed Battalion.
If you are new to Napoleonics and would like to give it a try, at the time of writing, we have an offer running in the shop. If you buy the set of Black Powder rules, we will add in a free box of figures. we also send post free to most worldwide locatios. Click here for details:
On the off chance that you have followed the link from Facebook, either because you were simply curious or that you couldn’t believe that a joke could be so bad, I’d better confirm that this was an April Fools joke. I do have to thank Nick Buxey, as it was indeed him that originally told me this tale whilst we were sat having a coffee at the Hammerhead Show at Newark. To be fair, Nick had me fooled right up to the punchline. I really did think that he had uncovered some new research and that I would have a new product for Saga.
If you have just stumbled on this by accident, here’s the story:
‘Thanks to some excellent research by Nick Buxey, Arcane Scenery is pleased to announce a new weapons option for Saga Warbands. The new rules allow Normans and Bretons to be armed with Thrusting Spears. Using these new spears will allow you to attack in close combat and should you fail to hit, you can repeat the attack. The new weapons are known as Brittany Spears.’
Ah well, as you are here you might as well watch the real thing….
With the last two blogs explaining the rules choice and the research that I had done, it was time to start work on the unit itself. The figures that I had ready to paint were Warlord Games British Peninsular Infantry. As you can see, they have the stove pipe shakos that the 28th continued to wear at Waterloo. The only slight problem being that the shako plate on the front is incorrect for the 28th. I had two choices, either sand the incorrect plate off and replace it with the correct style plate or ignore the minor difference. I chose the latter. Even as I type this, my OCD reflex is twitching, but to replace all the shako plates was too much work for this project. I would either have to paint on the correct style three piece plate, model it with, say, green stuff, or track down a decal set of some sort. There may even be replacement heads available out there. On this occasion, the simple, albeit incorrect solution won the argument.
When it came to the additional rear shako plate, it was a fairly straight forward job to make these diamond shaped plates by cutting an evergreen strip of 10/000 plasticard into diamonds by simply cutting the strip into small pieces at an angle. With hindsight, I have made these too large and should have used a thinner strip. Once again, my OCD reflex is twitching and I am considering cutting these off and replacing them, even though I have nearly finished painting them! At the moment, I have decided to leave them as they are but it wasn’t until I checked the photos that I realised how big they were. Now, I wanted to be able to see the badges when the figures were on the table and making them oversize would help to show the difference in regiments but maybe I have gone too far….
I could have simply painted the plates on but modelling them gave a crisper edge to the plates than I could have achieved by painting.
28th Assembled and primed
The picture above shows the unit assembled and primed ready for painting. At this stage, I had also modelled the ensigns with Peninsular style Bicorn. However, after some thought, I did revisit the figures and I have now changed these to Stovepipe heads to match the Mont St Jean reference picture. The officer kept his Bicorn – a bit more artistic licence but officers did tend to make their own choices when it came to uniforms. As far as numbers go, I have made the unit 24 figures strong, the standard number for a Black Powder unit. The unit that I am making is a representation of the 28th, not an accurate ‘scaled down’ man to man depiction. As far as the research goes, there were 557 men in the 28th at Waterloo, a somewhat reduced battalion due to the casualties lost fighting at Quatre Bras on the 16th June. Compare this to the 862 men present in the 1/40th and you can see why it becomes impractical in wargaming to start fussing about the numbers. The battalions fought as units, regardless of numbers.
I will use two figures only for the light company on one flank and another two for the Grenadiers in the other flank company. I occasionally use 28 figures for a battalion. 24 for the main body of troops, upgrading the Grenadier company to 3 or 4 figures and a further 4 ‘detached’ figures from the light company are then used as skirmishers out in front of the battalion. So, although 24 figures are currently on the workbench, don’t be surprised if a further 4 appear in the course of these blog articles!
The figures were all assembled using polystyrene glue for the plastics. Polystyrene glue gives a much better bond when gluing plastic to plastic. I only use super glue on the metal officers and command figures – usually the thick expo super glue which has a bit of ‘fill’ to it and again, will give a better bond. I left the back packs off to make painting easier. It also means that I can prime the figures in grey and the back packs in black to save a bit of time when painting. With a grey primer, I wont bother to paint the trousers, just retouch any overruns. I also find it easier to paint over grey than, say, black.
First batch primed and first colours applied
After a quick clean up to remove any obvious flash missed during assembly, I fix the figures to temporary MDF painting bases using blutack and start applying the paint. I use Vallejo paint almost exclusively to paint my models. Vallejo have a huge range of colours, the quality is generally excellent and value for money is about the best you can get. When it comes to the sequence of painting I tend to work from the ‘inside’ of the figure to the ‘outside’. This means that you can save a bit of time – as you paint the figure, you can tidy up any overruns as you go.
I should also declare at this stage that I will be using Army Painter quick shade to finish the figures. So all that I need to do, is to carefully block paint the correct colours. I know that this is not to everyone’s taste and I will cover the use of ‘Quick shade’ and it’s merits in next weeks entry. So the figures above were first painted with Vallejo 70815 flat flesh for the face and hands. Next up, 70950 flat Black, for the shakos, boots and bayonet scabbards and finally, 70872 Chocolate brown for the muskets and Hair. If you are feeling so inclined, you can of course vary the hair colour! However, I tend to paint the lower ranks all the same and just vary the hair colour when it comes to the Officers, Ensigns & drummers for a bit of a change. Until I get a sponsorship deal from L’Oréal, I don’t think that I will worry too much about it….
On with the next colours…those rear plates do look big…
The final picture shows the next step in the batch paint process but I’ll pause there and come back next week to explain what colours I have used and the sequence. I’ll also give my thoughts on why the batch painting process works for me – it might help newcomers to Napoleonics start to climb that painting mountain!
If you would like to purchase any of the products used in this article, they are available from my shop and the links are as follows:
We are running a special offer until the end of April2017. Buy a copy of Black powder and get a free box of Peninsular British Line Infantry just click here:
I mentioned in last weeks blog that as well as deciding on a rules set to work to, it helps to have a theme running through your figure collection. In my case the theme is the British Army at Waterloo. I do not intend to paint every Battalion that was present but I am working towards a decent representation of the units that took part. This means that I have some discipline when it comes to buying and painting units and ensures that I do not go off at a tangent. Well not much…
One of the interesting body of troops that were present at the Battle is the 8th British Brigade of Infantry led by Sir James Kempt. It was part of Pictons 5th Infantry Division and was not only in the thick of the fighting at Waterloo but was heavily engaged at Quatre Bras, two days earlier.
Lady Butlers painting of the 28th at Quatre Bras.
The Brigade is interesting to me because of the mix and variety of troops. It consisted of:
The 28th North Gloucestershire’s; a standard infantry battalion but equipped with stovepipe shakos and with yellow facings.
The 32nd Cornwall Regiment; a standard infantry battalion, Belgic shakos and white facings.
The 79th Cameron Highlanders; a Scottish regiment, green facings and of course, tartan kilts.
Six company’s of the 95th Rifles, the famous Light infantry regiment.
They were supported by the Divisional artillery, including Major Roberts Foot artillery battery of six guns.
I don’t think that you could do much better when choosing a ‘starter’ force for a Black powder army. I have already painted the 32nd Cornwalls – you can read how in these blog entries:
So the next task was to batch paint the 28th North Gloucestershires. As usual, I consulted my favourite research sources, The Waterloo Companion by Mark Adkin, British Napoleonic Uniforms by C.E. Franklin, Ospreys Wellingtons Infantry by Brian Fosten and the most useful Mont St Jeans Website.
The Pictures on the Mont St Jean site are simply excellent to use as a painting guide:
28th North Gloucestershire Regiment Centre Companys
Now the sharp eyed amongst you will have already spotted a discrepancy. Lady Butler has the 28th in Belgiac Shakos, whereas Mont St Jean shows them in Stovepipes – they both couldn’t be correct, could they? My first thought was that perhaps they were light infantry but I was further puzzled by the red and white standard plumes ( I thought that ‘lights’ had all had green plumes) and Shako plates – no bugle to indicate that they were light infantry. That said, the Shako plates were different to most regiments standard one piece large plate. The plot thickened….
It was time to consult the internet once again and to risk diving into the murky world of forums and social media. Those dangerous habitats of armchair painters and armchair generals, button counters and lace pendants, crusty old buggers of immoveable opinions – you get the picture. In fact even as I typed this blog, I thought that I could hear the sound of caps locks on keyboards clicking on like a chorus of safety catches on AK47s….
They were wearing STOVEPIPES!!!!!
Of course I jest… just a bit. I am actually in awe of the expertise found on the forums and generally this expertise is passed on with good grace and even better, with links back to the primary references. My usual port of call is the TMP, The Miniatures page, and the search facility can reveal some fascinating information from some very knowledgeable people. So what did I find out? Well, it seems as though the 28th had a number of differences from the ‘standard’ infantry battalion. The Shako plate was indeed as shown above and not a one piece item. In addition, there was a small plate on the rear of the Shako, awarded after the battle of Alexandria in Egypt 1801, when the front and rear ranks of the 28th were simultaneously engaged, whereby the soldiers received the order “Front rank stay as you are, rear rank about turn”. The conduct of the regiment won for it the distinction of wearing badges both at the front and at the back of their head-dress.
Bottom picture shows rear cap badge and French style Knapsack
And so to the head dress. It seems that the 28th were still in possession of their Stovepipe shakos at Waterloo, although this is by no means a sure thing. Lady Butler seems to think that they wore belgiac shakos and there is at least one contemporary account that confirms this. However, there are other accounts and sketches that indicate that they definitely had stovepipes and that these were also worn by the Officers. Who knows what is really correct? I tend to go with the idea that the shakos were stovepipes based on what I have read but I am acutely aware that what I am reading is someone else’s edited research. After all said and done though, I am painting a unit to be used on the wargames table not an exhibit in a museum, so I am happy to go with the more interesting option.
28th with Trotter Knapsack….
The other piece of information that I turned up was that the 28th used French Knapsacks rather than the standard British Trotter knapsack. Once again, I have read conflicting evidence. One account claimed that all men in the Battalion had the French version. Another, claimed that it was just the Grenadier company. Both stories seem to come from an account stemming yet again from the Egyptian Campaign. It is said that the 28th ‘liberated’ a French supply depot containing the superior French Knapsacks which they then adopted as their own. It strikes me that the chances of these knapsacks lasting for nearly 15 years in service, with men coming and going, are remote but I have no knowledge of how long a knapsack would last… Finally, just to add to the controversy, I have read that the whole ‘knapsack story’ was made up by a Victorian writer.
What is for sure is that the Battalion is an interesting subject with some good opportunities for some artistic licence in both modelling and painting. I’m happy to incorporate some of these idiosyncrasies into my battalion and I’ll show you my interpretation in my next blog.
I had intended to write an updated guide to batch painting British Napoleonic figures based around my latest project, the 28th North Gloucestershire Regiment. I’ve even gone so far as to make some step by step videos that I hope to post. However, rather than jump right in to the painting, I thought that I would first give some context and background to my project. I’ve been prompted by the number of questions that constantly appear on the social media feeds and forums that I subscribe to, as much as anything else and I hope that the series of posts will be useful to newcomers to the hobby.
I think that veterans in the hobby forget just how difficult and daunting it is for newcomers to get into this strange hobby of collecting and painting Napoleonic figures, or for that matter, any period of history. There is so much material out there and whilst the internet makes it easier to access this material, there is a lot of conflicting advice and some very forthright views that can be counter productive. I hope that the following helps although I am conscious that I am just adding my own forthright views to the mix!
To be clear, I have decided that I am painting and collecting 28mm war games figures to be used primarily to ‘play’ wargames with my friends using Black Powder rules. So before you even buy a pack of figures you need to decide what scale figures you are going to use and what rules set you will use. A good place to start would be to talk to the people that you intend to wargame with and see what rules sets they are using.
Why Black Powder?
When I first came back to the historical side of the hobby, following a long period spent playing Sci Fi games, I was looking for a rules set that I could easily learn and play. I actually started with Sharp Practice version one. This had two attractions. First of all you don’t need that many figures to start gaming. Indeed, I started with just 24 Victrix figures. Most importantly, there were a couple of guys at the local club who were playing Sharp practice and they helped to explain the rules and provide some extra figures when I needed them. Additionally, the rules had a certain charm, humour and playability about them that resulted in a great game, time after time.
Stand fast the 27th
However, as my army grew, I was looking for something that would allow me to field a brigade or division. Black powder happened to be published at that time. It was and still is, one of the best looking rules sets out there. It was also easily readable and obviously designed for the joy of playing rather than simply trying to recreate every drill tactic and nuance of the Napoleonic era. In fact, it’s not even a rule set specifically set in the Napoleonic era, more of a general guide to playing war games in the whole of the ‘Black powder’ era. Brilliant! I would only need to learn one basic set of rules and I could be gaming the AWI or fighting Zulus a hundred or so years later. Even better, it was co written by Rick Priestly and Jervis Johnson and those two know more than a thing or two about not only how to write a rules set but also how to set the right tone.
We are playing a game!
In a recent blog I mentioned that I was part of a demonstration game at a Napoleonic Day in, of all places, Bingham. Most of the people that visited were ‘non wargamers’ and were fascinated by the spectacle of so many model soldiers on the table. The game was very loosely based on the Battle of Quatre Bras and most of the figures were representative of the combatants present during the battle. That is about as close as I have come to refighting a historical battle. Most of the games that I play are at the White Hart pub on a reasonably sized table, covered in a battlemat with a few bits of scenery placed around. Occasionally, we set up a scenario, a river crossing or delayed deployment of troops being the two easiest but rarely is the game based on a real battle.
The Quatre Bras Demo game
Back to the Demo game. The visitors were intrigued to know just what we were doing. We replied ‘we’re playing a game with Napoleonic soldiers representing the playing pieces’. I don’t think that they believed us. They wanted it to be more serious than that. Some of them eventually got it. This was a group of friends enjoying each others company whilst playing with toy soldiers set in an historical context. That’s all it needs to be. If you want a competitive tournament game, there are much better rules sets out there. If you are looking to recreate the minutiae of detail of what may have actually happened in a battle, you may be better off joining a re enactment group. That way you get to trudge around the fields & mud for real. The good news is that you wont get shot…
However, the Black Powder rules provide you with a great introduction to Historical wargaming with simple rules to learn and an emphasis on enjoying the game.
Table top General directs his troops!
Next Question…
Once you have decided on a rules set, some of the decisions are then made for you. What scale of figures do I use? Black powder is designed for 28mm but will work with most scales including 1/72nd scale or 15mm. I like 28mm scale. There’s a fantastic range and choice of figures out there in 28mm, both in plastic and metal. If you prefer something else, go for it. Again, I suspect that you will need to consult with your existing or prospective gaming buddies. If they are already using 20mm figures it makes sense to join them. But, I don’t think that you will go far wrong with 28mm.
Basing is a thorny subject – but guidance appears in the rules and I’ll pass on my advice in this series of articles later.
So, how many figures do you need in a unit? Again, the answer is in the rules set. A normal unit is 24 figures but this isn’t as rigid as you may think. We often use half sized units to play big games on smaller tables. The only important issue is that there should be some parity with your opponent. I’ll pass on my thoughts on this in a later blog when I cover basing.
Load Canister!
The really BIG question!
What army are you going to build? To a certain extent this is the most difficult decision that you may have to make. Are you going to be collecting British, French, Austrian, Russian, Prussian, or one of the myriad of other Napoleonic states that were involved in the conflict. This decision is further complicated by having then to choose a campaign period. In my opinion, as far as the wargaming goes, it doesn’t matter. We happily play games where Pennisular British fight Waterloo Prussians. We have even had a Mexican unit on the table!
It’s a difficult decision, because once you have committed, you will be painting an army and that will be a long term project. To be fair, there’s no reason why you cant have a pick & mix army with a unit from every nation. However, when it comes to research and collecting an army, I think that it will help if you have a common thread running through it. You don’t have to pick the ‘best’ army either. For many years of the Napoleonic period, the French were in the ascendancy and could beat all comers. At the other end of the scale, the Spanish Army, although potent on their day, don’t enjoy the same reputation in battle – they do have some lovely uniforms though! The beauty of Black powder is that the rules aren’t precious about this. There are some optional rules that you can give certain qualities one to army over another but there is nothing to stop you playing a ‘vanilla’ rules game where Spanish troops happily face, say, Russians on equal terms. Not realistic? It doesn’t bother me. As I keep repeating, the wargame is the social side of the hobby. It’s the chance to get those lovingly painted troops onto the table and see if the dice are kind enough to let you win a battle.
Charge!
In conclusion
If you are looking to start collecting and painting troops to wargame in the Napoleonic period, my advice is to start with the Black powder rules set. That is what my wargaming army is based on and whenever I start to paint a new unit, it is with these rules in mind. It means that I am clear about how many figures I need to make a unit, how to base them and what they will do in the game. Next week, I’ll explain how I research how to paint my figures. Regardless of which rules set that you do choose, I hope that you enjoy your gaming with your buddies as much as I do!
Incidentally, the pictures used in this blog were supplied by Wargames Illustrated. The figures are from my own collection and they will feature in issue 345, the theme being Wellington and the Napoleonic period. Which leads me to an after thought. I’m a great fan of Wargames Illustrated (and was long before they accepted my article) – if you are thinking of entering the hobby, go and get yourself a copy of the magazine! it’s a great way to get an overview of what is happening in the hobby and I still think that the physical magazine is better than flicking through the interweb!
Just a brief report on the latest Hammerhead show held at the Newark showground on Saturday 4th of March. Hammerhead is just one of three shows that are held in Newark, the other two being Partizan 1 and 2. So why a third show? Originally, I think that the idea was to have a show that was dedicated to the Fantasy and Sci-Fi elements of the hobby. Over the years, this emphasis has diminished and as you will see, there is plenty to occupy war gamers what ever their taste. What distinguishes Hammerhead from other shows is the games are all participation games so if you so wish you can join in with the fun and try out some of the superb games on offer.
The event has expanded this year and now occupied both the large George Stephenson exhibition hall as well as the Cedric Ford Pavilion. The two locations are just a short walk away from each other and this was certainly no hardship on the day. The weather was kind and it was nice to grab a breath of fresh air and take a break from looking at all the goodies on offer. Both locations had catering facilities, which meant that queuing for refreshments was in my experience, non existent. Even better, the food on offer was better than many shows that I’ve attended and not too expensive.
The Bunker game close up.
I wont cover the traders that were at the show – the usual suspects were in attendance, so there was plenty to tempt you to part with your money! I gamely resisted opening my wallet but eventually was tempted into buying some flags and a set of ladders – they will appear in a future blog project no doubt. The real stars of the show were the games on offer and here are just some that caught my eye. Perhaps the biggest, with the most figures on a table was the display from Shaun and Terry of the Bunker fame. Shaun is a master at creating scenery and always manages to pack the table with figures so there was plenty to look at!
Just one of the castles on the table!
Just as impressive, was the game by Reveille, the battle of Pellenor Fields. How many Oliphaunts were there?
Attack of the Oliphaunts
Another ‘wow!’ moment for me was the Bolt Action game. I’m afraid that I would fail as a reporter. I was too busy admiring the 1/56th (?) scale U boat that formed just part of the action to write down who was running the game…
Plenty going on here! Look at that U Boat!
I also liked the V1 that was incidental to the game.
It’s a V1!
And so, senses overloaded with the gaming goodness on display, I ventured across to the other pavilion where I joined Andy Callan, Ian Callan and Peter Dennis to play the latest ‘Paper Soldiers’ game ‘The Spanish Armada’. Ian and I were the British. Peter Dennis the dastardly Spanish. As with all Andy Callans rules, they are straight forward and simple to pick up, so within a turn I was immersed in the Game. Although Andy was giving his brother Ian a bit of stick for losing the Admiral and his flag ship, Ian and I continued to chip away at the Armada, reducing many of the Spanish transports to drifting hulks. It was all part of a cunning plan, as with the Admiral out of the way, the British would have more prize money!
As you can see, the game looks great and the book, which contains all you need, other than a pair of scissors, some PVA and access to a photocopier, retails at just £12.50 – amazing value and great fun. Having seen off the Spanish, it was back to the main hall for another look at the games.
Sands of the Sudan
Sands of the Sudan caught my eye, again, plenty of figures on the table and great scenery. Perhaps I will have a go at this period.
Beautifully painted Naval detachment.
By now, it was a case of sensory overload and constantly being distracted. Ooh look Daleks!!
and then Wow! Tripods!! With A10’s!!!
You get the idea, there was plenty to admire and my short blog post has barely scratched the surface. In fact I have missed many of the super games that were on offer. I’ll leave you with a look at another very well designed game. Who built it escapes me (bad reporter!) but what a temptation to start gaming this period.
Aces High!
So, plenty to see. Plenty to inspire. Plenty to motivate. All in all, a very good show , very well executed. I look forward to next years show. In the meantime, if you do fancy going to Partizan in May, I will be there with Arcane Scenery, so come along and say hello.
British Napoleonic uniform on display at the show.
I’ve mentioned before that I believe that some of the smaller shows for wargamers can be more enjoyable than some of the traditional war games shows that we all know. The latest example being the Napoleonic Day held in my home town of Bingham in Nottinghamshire. It was organised by the writer, Peter Youlds, and was focused on the Napoleonic period. To be fair, it wasn’t the usual wargames show, packed full of demonstration games and Traders but a small scale celebration of the Napoleonic period by like minded individuals. In fact, the only real pressure to buy anything was from the ‘Corsican Cafe’ that had been set up for the day. The home cooked bacon cobs and homemade cakes were just too tempting to avoid.
Belgic and Stovepipe shakos
The other goodies on offer were a selection of books (most of them signed copies) from the attending authors, Peter Youlds, Andrew Bamford, Carole Divall, and Micheal Kirby and some very nice original prints and paintings from the Napoleonic artist Chris Draper. In addition, a contingent from the 21st Regiment de Ligne re-enactors were on duty, as well as regency dress expert Laura Short. To round things off, Myself, Andy Callan ( of Paper Soldiers fame) and Pete Harris were running a demonstration war game, using Black powder Rules, loosely based on the Battle of Quatre Bras. There was also a series of talks throughout the day, from the various experts and authors, focusing on the Napoleonic era. The cost of entrance to this event – nothing! Yes, the whole day, including attendance of any of the lectures and access to all of that expertise was free.
A fine example of Regency costume
Belgium 1815: The Battle for the Crossroads
The demonstration game was based loosely on the battle of Quatre Bras. The scenario involved a combined force of Dutch -Belgian and Brunswick troops holding a crossroads against a French advance force. The French and Allied forces would both receive reinforcements as the battle progressed. The game spanned most of the day but the slow pace was mainly due to the number of questions that we were answering from the public, many of whom had never seen a wargame before. I’ll perhaps revisit some of the comments and reflect on the nature of our hobby in another blog, as it was fascinating to hear how the ‘public’ perceived this strange past time of ours. In the meantime, here is a brief account of the battle. The report is somewhat picture heavy. As usual, as I was playing, it was difficult to make notes and take pictures at the key times. You should get a general idea of the battle though.
The deployment before the battle
The initial turns saw a French steady advance towards the centre, held by the Brunswickers and Dutch brigades. A French Cavalry probe on the left was easily seen off by the Brunswick Lancers, although in truth, both sides were somewhat mauled. On the right, the French advanced cautiously along the main Brussels – Charleroi road between the farm house and the woods. They were harassed by the fire from a small contingent of Jager who had taken cover in the farm house.
The Brunswick Brigade prepare for battle
The British encampment at the edge of the Bossu wood
Initially, it was the French reinforcements that arrived on the Battlefield, adding to the pressure in the Centre and again threatening the Left with their Calvary. Perhaps somewhat disheartened by the previous skirmish, the French cavalry refused to move and any threat to the Brunswick infantry was averted for the time being. More of a puzzle was the French cavalry’s’ reluctance to cross the stream and try to take the longer route around the pond… They clearly didn’t want to get their boots wet! On the right, The Belgians were more than holding their position and actually saw off a Battalion of French infantry with superior musketry. The Allies were gaining the upper hand.
Belgians Advance!
Brunswickers hold steady, whilst the French Cavalry are waiting to pounce!
French pressure in the centre continued to grow as more reinforcements made their way to the front. Despite this, the Allied line appeared to be holding well and the first British reinforcements were appearing from Brussels along the main road. Even better, the French on the right crumbled under fire and the whole brigade broke, leaving the right wing free for an Allied advance. The battle was going well for the Allies, victory was in sight!
The Belgians clash with the French!
British Reinforcements are arriving from Brussels.
The French are pushed back on the Charloi road but the first hint of trouble – the farm house has fallen!
Now at this point, The Allied General (me) appeared to have lost the plot. Somewhat distracted by questions from the public and the thought of what cake to eat next, I failed to exploit the advantage gained on the right flank and actually helped to shore up the French position by forcing the retreating infantry into square, thereby anchoring them on the battlefield. At the same time, the French Generals’ (Pete Harris) persistence and greater tactical awareness paid off. Spotting a weakness in the Allied line, the French bravely charged a Brunswick Artillery battery, routing it from the table and breaking the Allied line.
French pressure has forced the Dutch & brunswickers back from the stream.
Congestion on the Brussels – Charleroi road as more British reinforcements arrive.
Continued French pressure forces the Allies back.
As if this wasn’t enough, The French Cavalry on the left charged en mass, breaking the allied cavalry and pushing them off of the battlefield. The Allied advantage on the right was further diminished as the French had forced the Jagers out of the farm house and had occupied it themselves with a full battalion! Suddenly the Allies were on the back foot. The saving grace was that a steady stream of British reinforcements were now arriving from Brussels. There was now a major traffic jam at the crossroads as the British tried to deploy. Fortunately, the remains of the Brunswick and Dutch contingent, bolstered by a Hanoverian Brigade were able to delay the French long enough for the British Infantry to begin to get into position along the road and form a new defensive line.
The Hanoverians halt the French advance on the crossroads buying time for the Allies.
French Cavalry now dominate the left wing!
The British form a new defensive line along the Nivelles-Namur Road
As nightfall approached, the British had managed to secure the crossroads and despite being pushed back they had inflicted sufficient casualties on the French to stem their advance. However, it was the French that had had the better day. They had severely mauled the Allied army and pushed them back to the crossroads. They now held the majority of the field and could further harass the Allies withdrawal to Waterloo!
The French hold the battlefield but are exhausted after beating back the Allies.
All in all, thoroughly enjoyable battle where the French gained boasting rights and Pete Harris proved to be a better General than Ney. Unfortunateky, I didn’t quite manage to live up to Wellingtons standards! Of course, the unsung hero of the day was Andy Callan, who put so much into organising and running the battle whilst keeping our visitors so well informed. I hope that the guests had as much fun as we did.
Once again, our thanks to Peter Youlds who organised the day and I look forward to the next one.
I believe the technical term in wargames circles for unbridled enthusiasm on the release of a new game or product is ‘frothing’. With all the product that crosses my desk, you would think that I am immune from such a condition but I’m afraid I am just as likely to get excited about new releases as ever. Of course, we are entering the peak ‘New Release Season’ as manufacturers and designers get ready to launch their new products at Salute down in London, so there is plenty to froth about.
Three forthcoming releases have caught my attention. Unfortunately for me, none of them are from periods that I already have troops for and so whether I actually get to play the games will be another matter. That said, for now I’m happy to dream about painting the miniatures that I may never actually own…
New from Warlord Games, Test of Honour
First up is the new game from Warlord, Test of Honour, a skirmish game involving Samurai Warriors and their retinue. Warlord have been very clever in marketing this game in that it involves repackaging the Wargames Factory plastics that they have recently acquired. If you would just like to have a look at the rules, they are available as a free, yes, free download from the warlord games web store. Just click this link to go there:
The game isn’t actually released until late March and of course, Arcane Scenery will be stocking it – watch out for our special offers around launch time! Having the rules will give you some idea of whether the game is for you.
I mentioned that the miniatures are the repackaged Wargames Factory figures but it being a Warlord release they have supplemented the plastics with some very nice metal sculpts, an example of which is shown above. I know that plastics in general and the Wargames Factory figures in particular are not to everyone’s cup of (green) tea but once assembled and painted, the models do look very nice. I am particularly taken by the Archers and the Cavalry.
Test Of Honour Mounted Samurai
Of course, Samurai are a bit of a speciality subject and not everyone is going to want to refight the sort of skirmishes that you see on the big screen where the Samurai warrior can take out a group of enemy in three moves whilst barely twitching an eyebrow. You either like this stylised ritual approach to combat or not. I suspect it is a bit of a marmite subject for wargamers. That said, I find myself drawn in two directions. I really admire the discipline, tradition and self sacrifice shown by the Samurai whilst acknowledging that such a regime would drive me mad! I reckon that a group of English Longbow men would have sorted out the Samurai as effectively as they dealt with the French without all that messing around – now there’s a sentence to start an argument…
Samurai Armour is just beautiful!
Of course, the other attraction is the beautiful arms and armour of the figures and the colours and designs used on the armour and clothing. I suspect that in attempting to paint these figures I will be stretching both my eyesight and painting skills but the thought of having a small Samurai band in my show case is too much of a temptation. Just to prove the point, once I had seen the release details of Test of Honour, I was inspired to dig out the only Japanese figures in my lead mountain and get painting! I have three ninja figures that I acquired sometime ago from Northstar games and so I thought that I would give these a lick of paint.
Northstar Ninja!
Ninja aren’t exactly representative of the Samurai that I have been frothing over but they are close enough. I decided to paint one in traditional blacks and greys, the other in Reds. The third I am still thinking about! It’s got me in the mood to paint more Japanese warriors, whether Samurai, ninja or the humble foot soldiers of various types. It will be a nice change from my Napoleonics for sure! The fact that I need only paint 6 to 20 models to be playing Test Of Honour is a big draw. If it grabs me the way that I think it might I can gradually add to my Samurai entourage!
Now what colour should I paint the third one?
There are of course other Japanese rules sets out there if you fancy a change yourself, and of course plenty of figures for sale. Two recent releases spring to mind,
Is part of the Osprey series of Skirmish rules and is supported by some beautifully sculpted figures produced by Northstar.
Of course, if you are going to jump into this period, you will need some scenery and I would suggest you look no further than the Sarissa Precision range of
I think though ,the attraction of getting everything in a box, rules, dice, figures, cards, scenarios is too attractive a proposition to miss out on so I will be adding Test of Honour to my repertoire of games – I’ve just got to persuade a couple of my gaming buddies to join in!
I did mention three games that had caught my eye. The other two? Well I’ll cover those in a future blog but here’s a clue, one involves Africa and the other, some spooky goings on out West…
This website uses cookies to improve your experience. We'll assume you're ok with this, but you can opt-out if you wish.AcceptRead More
Privacy & Cookies Policy
Privacy Overview
This website uses cookies to improve your experience while you navigate through the website. Out of these cookies, the cookies that are categorized as necessary are stored on your browser as they are as essential for the working of basic functionalities of the website. We also use third-party cookies that help us analyze and understand how you use this website. These cookies will be stored in your browser only with your consent. You also have the option to opt-out of these cookies. But opting out of some of these cookies may have an effect on your browsing experience.
Necessary cookies are absolutely essential for the website to function properly. This category only includes cookies that ensures basic functionalities and security features of the website. These cookies do not store any personal information.


 Made from Laser cut MDF, assembly is very simple using PVA glue. Painting is just as straight forward. There seem to be a lot of questions as to how easy is it to paint MDF. The answer is very easy. I just use the same paints (Vallejo) that I use on my miniatures, unless I am painting a large area. In which case, match pots of emulsion from B&Q (other DIY superstores are available) also work very well.


 With the last two blogs explaining the rules choice and the research that I had done, it was time to start work on the unit itself. The figures that I had ready to paint were Warlord Games British Peninsular Infantry. As you can see, they have the stove pipe shakos that the 28th continued to wear at Waterloo. The only slight problem being that the shako plate on the front is incorrect for the 28th. I had two choices, either sand the incorrect plate off and replace it with the correct style plate or ignore the minor difference. I chose the latter. Even as I type this, my OCD reflex is twitching, but to replace all the shako plates was too much work for this project. I would either have to paint on the correct style three piece plate, model it with, say, green stuff, or track down a decal set of some sort. There may even be replacement heads available out there. On this occasion, the simple, albeit incorrect solution won the argument.