

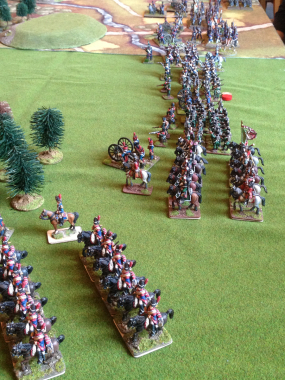
The Guards line up ready for battle!
In an ideal world, where we all have plenty of time and unlimited resources for our hobby, we could spend hours re -enacting all the battles of the Napoleonic era, exploring the ‘what if’s’ and ‘if onlys’ of history on accurate terrain boards, with all the right troops in all the right uniforms! It would be the ‘Carlesberg wargaming club’. However, for me the reality is that I get to the club once a week on a Thursday evening and we fight a battle that lasts for about 2 hours using the troops that I have to hand with a rules system ( Black Powder) that allows an easy flow to the game on a gaming cloth with a few pieces of terrain to make it look pretty. Sure, once in a while we get to play the ‘mega’ battle on a posh table with special scenario rules and the correct force but that this is a rare exception in my gaming calender.
The real problem is that there is a tendency to just line our armies up on the table and try and win the game by breaking more of the enemies units than he breaks of yours. OK, it’s still good fun but it can get a bit repetitive. So we were looking for a quick fix to make our games a little bit different and to start to introduce a bit of narrative into the games – this is the ‘back of a fag packet’ ( in our case more likely to be the back of a crisp packet….) solution.
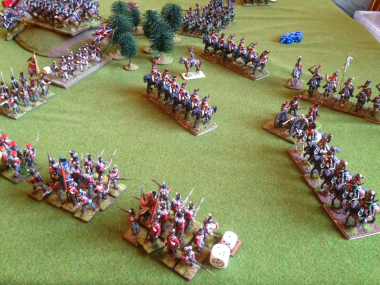
The Line Advances!
We quickly came up with a list of 6 simple scenarios and before our game we roll a dice to decide which scenario we will play. The exception being of course, when the same one has come up and every one groans ‘we played that last time’ – just roll again and let the dice decide. Here is the list that we are using at the moment. The intention of course is to add to them, rolling a D10 or D20 would be even more interesting!
Scenario 1 – The River
The battle is fought on a table with a river running across it. We use strips of painted paper to represent the river. It’s not the quality of scenery that you would find in Wargames Illustrated but quite adequate for a club battle. The river sections are about 12 inches long and we place a dice on each section. As a unit attempts to cross the section of river, roll the dice. On a 1 to 3 the unit will become disordered as it crosses. A roll of 4 to 6 means that the unit crosses safely. These are just our basic river rules – we have quite a few variations but these simple rules add another dimension to the game and will give commanders something else to think about when planning their battle.
Scenario 2 – One of your brigades is late!
Just pick a brigade on each side and roll a dice. The dice roll indicates on which turn ( 1 to 6 ) it arrives in your deployment zone. A variation on this scenario is to test each brigade in the army. Roll for each brigade, on a 1 or 2 ( or whatever you deem appropriate) the brigade is late. Then roll to see when the late brigades arrive. Great for players with Prussian armies…..
Scenario 3 – Flank March
The two opponents roll a dice. The winner will get the flank march option and can choose a brigade that will deploy on one of the side table edges. Roll a dice to decide which on turn ( if it’s turn 6 it can be tricky…) your brigade will arrive. When the turn arrives for deployment, roll a dice. On a 1-3 you can deploy on your left flank, 4 -6 it’s your right flank. We allow deployment anywhere on the side of the table so beware – you may have an enemy brigade that is effectively deploying in your rear!
Scenario 4 – Off Table Deployment
Both armies start off the table. Before any orders are given to a unit, roll a dice. In the first turn, on a roll of 5 or 6 you may place the unit in your deployment zone on the table and issue it with an order as usual. On this first move, movement is reduce by one order. In other words the maximum that you can move is two ‘orders worth’ of movement. You can apply the rule to individual units or brigades or a mixture of both. After that, movement is as per normal Black powder rules. On turn two, the dice required to deploy is reduced to 4,5 or 6. Turn three, you need 3 to 6, turn 4 you will need 2 to 6 and this stays in place so if you throw a one in turn 5 your brigade still will not arrive! It happens and can be quite frustrating. We rename those units as the Grouchy Brigades…
Scenario 5 – Capture the Flag!
A simple objective is placed in each half of the table. The objective is to capture the opponents objective whilst protecting your own.
Senario 6 -Pitched battle
Straight forward enough – back to the usual set up in deployment zones and beat the enemy. You can give this a bit more flavour by altering deployment zones rather than just lining up along the back of the table.
The other interesting variation is how to place the scenery. Rolling a dice for this is a good idea but we just tend to take it in turns to set the table out each week. We have had some interesting results when we have asked a non participant player from the club to set out the scenery though!
Stopped by the Cavalry!
The scenarios have certainly thrown out some interesting games. The pictures that I have used for this blog article are from our game last week where I had the Flank March. I thought that I would easily pin my opponent and out flank him with an extra brigade of three battalions of Infantry. As it turned out he held those battalions in check with his cavalry and after forcing them into square, proceeded to pound them with his artillery. I was then forced into trying to rescue my flank and more Battalions were drawn out of position and the army was eventually broken as they were pushed into square as well and shaken by artillery fire. It was the most effective use of cavalry in a Black powder game that I have seen and despite the musket fire that the cavalry were facing, by clever use of rotating the cavalry and rallying them it was the infantry that broke first!
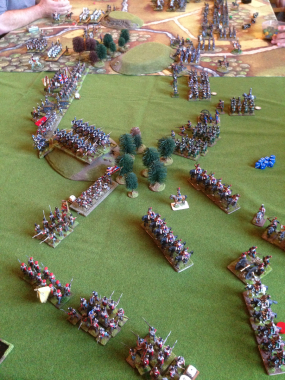
The Flank is in Trouble!