What Constitutes An Elite Unit?

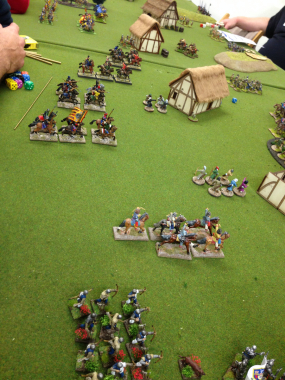
Actually the title was just an intro to another round up on the progress with my  Hanoverians. But, before we get to that, a couple of things have set my mind working. The first was a throw away comment at our regular Black Powder game last week. My opponent, Pete, was explaining our game to his new ally and they were going through the troop types. He pointed out my Hanoverian Landwehr Battalion and said that ‘Steve uses them as British, so they still get first fire (Black Powder rules)’. Now, nothing derogatory was meant by this comment, Pete was just pointing out why one battalion looked different to another, on my side of the table. But it set me thinking about how should I differentiate between my various troops.

The other thing that was on my mind was that I had just finished reading my sixth book on Waterloo. Since my visit to the actual battlefield, last May, my fascination has intensified and I cant help but keep reading about it! The book that I had just finished was an account of the defence of Hougomont by Julian Paget & Derek Saunders, a nice little book that looked specifically at the attacks on Hougomont and the brave defence by the British Guards. Except that it wasn’t just the British Guards. There were Hanoverians and Nassauers there as well. Now before you think I am going down the Peter Hofschroer route of  ‘it was the Germans wot won the Battle really’, I’m not, that debate can wait for another day. What I’m interested in is the perceived quality of the troops involved in the battle and how wargamers portray them on the table.

Barry Hilton has touched on this subject in a very good article in Wargames Illustrated and I think he’s got a point. Should we really judge how good troops are and give them extra advantages over opponents based on reputation or should we let the dice decide as the game goes on. In other words, should all troops should be equal at the start of the game and only broad National traits based on operational factors  built into the rules. The latter is  certainly my preference, when it comes to general wargaming.

Back to Waterloo,  Wellington himself was concerned about the quality of his allied troops, partly due to their inexperience, I think and perhaps because some of them had been fighting with the French not so long ago. Reading accounts of the battle though, very few of these troops appeared to have under performed, ie. run away! Its been argued that this was because Wellington had cleverly bolstered the morale of these troops by mixing them with seasoned British battalions. Certainly at a Divisional level this was true, but not so much at brigade level and rarely at Battalion level. It looks to me as though the Allied troops performed every bit as well as the British regardless as to whether they were Landwehr or line battalions.

Being Devils advocate (why not, it’s my blog!), there were three notable instances of troops that ran under fire or refused to attack and ran away. The most serious example were the Duke of Cumberlands Hussars, who simply refused to engage and ran away. They were in effect an amateur regiment of dandy soldiers with fancy uniforms that didn’t want to risk injury….They had very little impact, if any, on either the battle or the troops around them.

The other notable incident, often referred to, is the retreat of the Dutch Brigade under the command of Bijlandt. This incident is still a matter of debate amongst armchair generals and historians (usually the same thing…) but to be fair, the general impression that I have, was that the Brigade had conducted itself well at Quatre Bras, losing a fair few casualties, only to find itself at Waterloo on the front line facing the full force of D’Erlons advance after being softened up by the French Grand battery. They appeared to have cracked and retreated under the sustained pressure.

So to the last of my three instances of Troops that cracked under fire – I bring you the French Imperial Guard! These boys had been loafing around for most of the battle until being led by their beloved leader, Napoleon, across the battlefield to engage an enemy that had been under fire all day, charged repeatedly by the French Cavalry and were now facing yet another massive attack. So who was that broke and ran away? Why, the French Elite Infantry, taking with them the rest of the French Army. Confronted with an enemy that stood and fought, the Imperial Guard broke and ran. Well to be fair, they retreated in reasonably good order but retreat they did!

So the next time someone suggests that my Hanoverian Landwehr should be down graded as they are inferior troops, I’ll be happy to oblige if he’ll accept that The Imperial Guard will take a massive minus on their morale if they should come under fire, as history shows that they wont stand…

2015-02-22 11.08.01

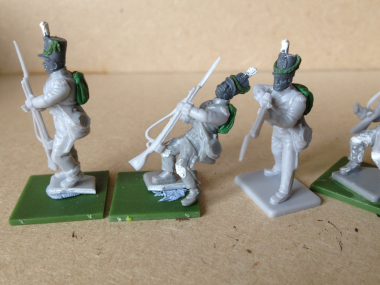
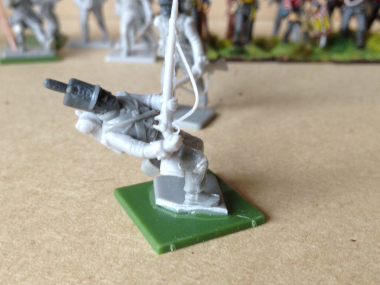
Right, tongue out of cheek now! Here’s some pictures of my Hanoverians. You can see that I have modelled the cords on the shako’s using green stuff and thickened up the plumes using Vallejo filler which was much more suitable for that job. Painting is now underway, and the first four are nearly finished. Just the highlighting and basing required.Hanoverian Landwehr

Hanoverian Landweher

Slow Progress with the conversions…..

Hanoverians work in progress
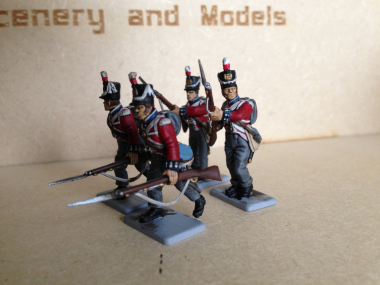
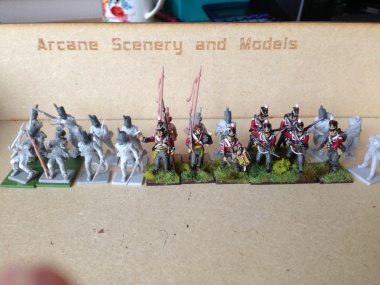
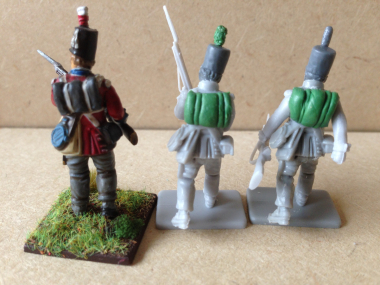
The title of this weeks blog says it all! Progress has indeed been slow and I am stretching my  ‘sculpting’ ability and patience to their limit. The Hanoverians are the problem. I’m trying to match the conversions that I have done to the original Victrix models that I had painted. The first task was to make some blanket rolls to go on their backs in the place of packs. I have actually cheated with a couple of the models and despite saying that I would cut the british packs off of the ones that I had put on in error, I decided to leave a few on. May be those guys had picked a few spare packs up from Quatre Bras! Anyway, modelling the blanket rolls was not too difficult, although a bit time consuming, as I am not used to working with green stuff. You can see the result in the picture above – I think that once they are painted they will be fine.

The real problems came when I tried to modify the shako’s. The first thing that I changed was the plumes which are a bit long and thin. I simply trimmed these down and then used a tiny amount of green stuff to thicken them up. Well, that took forever, partly because I managed to get the green stuff to stick to my scalpel more effectively than the model! Again, if you look carefully at the picture above, you can see the difference it makes. The model to the left has the original plume, the centre model has the the modified one and the right hand model the thin tall plume that I want to replace. After a while of fiddling around I thought that I might just either cut the plumes from some other Shakos & replace them or perhaps just try some filler.

While I had the green stuff mixed though, I thought that I might try and make the cords for the shakos. To do this, I carefully rolled out a very fine ‘sausage’ of green stuff, cut it to the correct length and then attached it to the first shako. Or rather I tried and tried and tried and failed!!! I just could not get it to stick to the model. It stuck to my scalpel, it stuck to my needle. I tried using water to dampen the tools but it still would not stick to the model. After 20 minutes of this I gave up and I think it is back to plan B – using cotton. It may be that the green stuff that I am using has gone off a bit – it has been kicking around in my model box for sometime now. So I may have another go with a fresh batch. At this rate though, it will take me a fortnight to get to the priming stage with these models!

As if that wasn’t frustrating enough, the other project on my work bench hasn’t gone too well either. Having painted Lucid Eye’s Ke-Zhor, I thought that I would paint his mate, Harranah. I think that this was a case of trying too hard as I just could not get the finish and flesh tones that I wanted. Nevermind, I guess you learn more from your mistakes and maybe I’ll give the model another go later. In the meantime, She’s done and going in the cabinet once the basing is finished! Checkout Facebook later for some more scenic pictures of her in perhaps a more sympathetic setting!

2015-02-15 17.27.15

Whats on the Workbench – More Hanoverians!

Hanoverian LandwehrHaving finished the Lion Rampant Campaign, it’s back to painting my Napoleonic Army. I’m still working on the British 6th Division at Waterloo and having completed the English Regiments, I’m back on the Hanoverian contingent. There were four Hanoverian Landwehr units in the Division, Verden, Lunberg, Munden & Osterode and so far I have painted two of them. So on with the third unit now. First of all a disclaimer! I have decided to model two of the units wearing Stove pipe shakos and two wearing the flat field hats for no other reason than they will look nice on the wargames table. Actually finding accurate descriptions of exactly what the Hanoverian Landwehr really wore is difficult to say the least, with the usual conflicting advice from various sources and experts.

Broadly speaking, the Hanoverian Landwehr were dressed as British Redcoats but with stovepipe shakos rather than the new Belgiac shakos and with a blanket rather than the usual haversack & kit. The stove pipe shakos also seem to have the cords that weren’t present on the original ‘Peninsular’ Stovepipe shakos. Just to add to the confusion, the Hanoverian Field Battalions, or regulars were dressed more or less as British regulars and did have Belgiac shakos & all the kit! As for the officers, they were drafted in from the KGL or other British regular units so could be wearing any Regts uniform although they probably adopted the yellow sash of the Hanoverian Army.

I suspect that the general principle was that the regular field units were kitted out in the ‘latest’ British uniforms whilst the Landwehr had the cast off’s from the Peninsular campaign and anything else that was kicking around the quartermasters stores when they were called up!

To add to my modelling woes, whilst Victrix used to do a nice set of conversion heads that I used for my first unit, they have now been discontinued, so some conversion work will be required! I already had 8 extra figures left over from my first go at painting Hanoverians so I would incorporate these into the new unit. The picture at the top shows how the new Battalion will look when finished. I decided to use the running figures from the Vitrix set as I had some of these left over from previous projects. Rather than have a lot figures in the same pose, I thought that Iwould convert them to look as though the unit was taking casualties. I like to have different poses in my units and try to have a bit of a story going on. I know that some wargamers prefer a uniform look and like to see all of the figuresin a unit in the same pose. Whilst it does make life easier, I find it tiresome painting the same pose over & over again. Besides, I like to do a bit of modelling for a change!

Landwehr Conversions

The close up above shows the original running figure on the right and the conversion on the left. To get the figure to look as though it is falling it was simply a matter of cutting through the back of each leg and bending them backwards. Once the glue had set, I put some filler into the gap on the front of the knees and I had my falling casualty. I then used a couple of standard arms from the set and the head is a spare peninsular head from the Perry boxed set. I’ve actually made an error by adding the back packs, so these will come off and be replaced by a simple blanket made using green stuff. The shako’s aren’t correct either, as they are missing the cords. So the plan is to carefully shave down the badge plate and either use cotton thread, thin wire or green stuff to make the cords.  I suspect that modelling the shakos will be the biggest challenge & somewhat time consuming but it will mean that the models in the unit will look about right. When they are painted , I’m sure that they will all blend in.

2015-02-12 11.47.24

As you can see, for a few small cuts, you can get a very different and dynamic pose!

So there is my next project under way, a total of 14 more Hanoverians to finish modelling & painting. Meanwhile, I’ve been busy with the paint brush as well. I finished off the DeeZee standing Lion:

2015-02-12 11.49.58

and I couldn’t resist painting Ze-Khor, Lord of the Jungle, from the Lucid Eye range. These are just quick pictures. I’ll get some better ones up on face book later!

Ze-Khor, Lord of the Jungle

How to win the battles and lose the war…

So the big day arrived on Saturday, the Lion Rampant event at Wargames Illustrated HQ. As with past events, the day was very well organised, with plenty of refreshments on hand and after the briefing and the mandatory mug of coffee we were off to fight the first battle! The day would consist of three scenarios, the first a pitched battle, the second, a random scenario chosen from the rule book and the third, a final battle with set objectives. In the first battle, we could support an ally by donating a unit to him at any point in the game. The second battle was as per the scenario and the third Battle was an eight player (four a side) grand battle with objectives. We had been split into two groups, Rebels & loyalists and with each scenario, it was possible to score ‘advantage points’ for our team as well as accumulating kill points which would boost our individual retinues.

The question was how would my retinue perform?

Scenario 1 – Pitched Battle

AtlLast the Retinue advances!

At last! The Retinue advances!

I had drawn Karl as my opponent, a familiar enemy from the club, so no surprises as far as his retinue went. He had a mixture of  Crossbowmen, Archers, Bidowers, Mounted Sergeants and his command group of foot knights. The big problem was my command rolls – I just could not roll to get my retinue to move! The one time I managed to advance, Karl retreated and the frustration was building! After a brief arrow fight, I goaded Karl into advancing, although by now I think that he had seen me fail so many command rolls that it looked as though he would run me down with his mounted sergeants. At last, my archers decided to loose! The ensuing carnage saw Karl’s mounted units wiped out and his missile troops retreating as they failed their rally attempts. However, both of our command units proceeded to commit mutual destruction and in all the excitement,  I forgot to use my special ability to automatically pass rally tests, meaning that my leader also fled the field.

I had killed or routed the majority of the opposition when the game ended, losing ‘only’ my foot knights & bidowers but alas, my victory was tarnished by losing the boss unnecessarily.

Scenario 2 – Meet The Neighbours

Loose!

Loose!

After a very relaxed lunch break (more on this later), it was on to the second scenario. The scenario involved getting your retinue across the table to exit from the opponents deployment zone whilst stopping your opponent from doing the same to you. My opponent was Wayne, no less a personage than the Wargames Illustrated Sub Editor! His retinue was very similar to Karls with a good mix of mounted & missile troops. The game started for me where I had left off previously. I could not pass two command rolls in succession! I was beginning to become more frustrated with my dice rolling rather than focusing on the scenario. In my eagerness to at least do something, I moved one unit of archers straight down the board, unsupported,  to engage the enemy. Well they moved and inflicted a few casualties but they did very little else until they were ridden down by the enemy…

Fortunately, those few casualties were enough to slow Wayne down and at last the other unit of archers joined the fight. My other success was that my defensive dice rolling with the foot sergeants in Schiltron meant that Wayne’ s attacks had ‘bounced’ leaving him vulnerable to failing his rally rolls. With a few hits from my archers, his mounted troops routed or were wiped out, along with most of his retinue. However, by now he had moved one of his units off of the table, his foot Knights, leaving just one unit of archers in my way.  At last  my retinue started to move and with two units just one move away from the edge of the table and two other units close behind, all I needed to do was to keep his archers out of the way.

I couldn’t resist a final shot at them though…. I passed the command, rolled for hits. I rolled 8 fives & sixes out of 12 dice, my best roll of the day so far. Four casualties inflicted in one go. Brilliant! Except it wasn’t. Wayne, of course, failed his rally test and the unit routed off the table, immediately ending the game. He had won the scenario as he had moved more of his units off of the table, one unit to my nil! Doh!

Well, my kill points were accumulating nicely, but that was about it.

Scenario 3 – Final encounter – capture the buildings

The last battle.

The last battle.

My Final opponent, Duncan had a Caliphate Army with a 50-50 split between mounted troops & foot troops, supported by 2 units of bidowers. Where he could, he had upgraded all of his units with bows or spears so that all of his army could fire missiles at 12 inch range. As well as capturing the buildings, the scenario was played over an open table so you could target and attack any enemy unit, regardless of who controlled them.

Once again, my command rolls were letting me down. It felt like I had failed 66% of my command rolls during the day, when it should have been closer to 33%. I think the day was summed up when my Foot sergeants took just one casualty from a bidower unit. They needed to pass a courage test of 5+, I rolled 3 and they became battered and moved back. I tried to rally them next go – I still need a 5+, I rolled 4, so they moved back again and lost a man. I tried to rally them again. I now need 6+, I roll 5, so they lose a man and go back. I try once more for a rally, I now need 7+ and yes you’ve guessed it, I roll a 5 again and now they have run out of table, so good bye Foot sergeants…

The rest of my command rolls are about the same, so whilst Duncan outmaneuvers my troops, attacks my ally and generally seems to go where ever he wants to, my army stands to one side, like the Stanleys at Bosworth, occasionally firing and inflicting the odd casualty. However, at last my luck turns and once again, the archers do the business, killing anything in range ( which is pretty much everyone by now!). So once again my kill rate is high and apart from the cowardly Foot sergeants who ran away from the bidowers, my army is intact. As regards the scenario, I captured just one building and two are required to score victory points. Oh dear!

Post match analysis

On the positive side, there’s no doubt that my retinue is a killing machine! Two units of expert archers can inflict deadly casualties when acting together. The down side is that the retinue lacks mobility, even allowing for my poor command rolls. There is no doubt about it though, I let my poor dice rolling cloud my judgement and as a result I lost my leader in the first scenario and the second scenario was lost outright. Had I stayed cool and worked with what I had, I would have won the first two scenarios, which would have given me a much stronger position for the third. On the day, the rebels were vanquished and the King was securely on the throne!

Armour On!

Armour On!

As regards the overall day, it was one of the best that I had attended. Superbly organised with plenty of refreshments and a superb Medieval meal of Beef stew, Ham, Pease pudding & cheese all served in a huge loaf or trencher. We also enjoyed a demonstration of how Medieval Armour was put on and the chance to handle some authentic medieval weapons. I cant wait for the next event!

Helmet on!                                 Ready fo Battle

Ready for Battle

Helmet on!