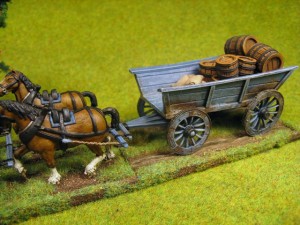
Although some time has passed since my last Blog I have been busy on the hobby front and so I thought that my first post should be to show you my latest modelling project. I’ll get back on stream with new releases and reviews in my subsequent posts!
I have been gradually building my Napoleonic Army and I now have 3 battalions of infantry and an Artillery battery completed along with a few officers. I was looking for my next project when the Trent Plank sided wagon caught my eye. Although a supply wagon isn’t the most glamorous subject, I thought that every army shop should have one! I’d also been tempted by the Renedra barrel set, Again, not the most attractive model subject, but these things just appeal to me, I like to see the mundane equipment represented in my armies!
I did some very basic research and from what I could gather, it seems that the British Army was happy to requisition transport locally, so there was likely to be a big variety of wagons in service in the 1815 campaign. As the Trent Miniatures wagon is based on a Dutch Farm design, I thought that it would be ideal. Again, from the cursory research that I did, there doesn’t seem to be very much information on the colours of such wagons so I decided to make up my own background….
‘the wagon has been requisitioned by the foot artillery to serve as a supply cart for the battery and the officer in charge has decided to repaint it in Artillery colours to ensure that the locals wouldn’t reclaim it so that it looks part of his unit’
Now that might not be historically accurate but it’s my story and I’m sticking to it!
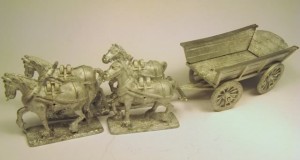
The wagon kit from Trent Miniatures is perhaps a bit on the big size and certainly contains a lot of metal. That said, with a bit of filing to remove the flash lines, it fits together beautifully, even without glue! I also liked that fact that the horses came with their traces to hook up with the wagon. I decided to follow convention when painting the horses and finish them as bays. I had also read that the British usually docked the tails of their horses, so I took a pair of clippers to them and did some docking myself.
Once the models had been cleaned up, and glued using super glue and accelerant, I spray ed the wagon & traces grey and the horses, brown, to give a solid undercoat and make the painting easier. The horses were then gradually highlighted using bestial brown with desert yellow added as the highlights were built up. I used straight Vallejo black for the tails & manes, highlighted with a touch of grey and used dark brown and white for the socks and face flashes. The tack was painted black with steel accessories and the traces, a shade of desert yellow with artillery grey for the wooden bits….
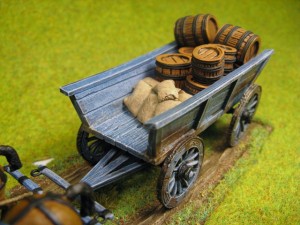
The wagon was painted using Foundry artillery grey blue and highlighted by adding in white. I tend to use a dry brush technique on large surfaces like this, as it brings out the texture of the moulding. The metal attachments were painted black, including the wheel rims and then I used various shades of brown to ‘dirty up’ the areas around the wheels and used bolt gun metal to represent paint chipping off of the metal areas.
The entire model was carefully painted with Army painter Dark tone Quick shade and when dry, varnished with army painter matt varnish. Now using army painter products is a whole blog entry in itself, but for now I confess to being a fan of this product. It’s a great way of adding shading and weathering to your models and of course also protects them. I prefer to paint the stuff onto my models rather than use the dip method as it allows me a degree of control. Not only that, I’m far to ‘careful’ (tight fisted) to be flicking excess paint down the garden! Once you’ve matted down the Quick shade the finish is superb.
The load was made using renedra barrels, assembly being very straight forward, with a bit of a cleanup and then undercoated in brown. I added highlights with lighter shades of brown and the the hoops were picked out in black. Again I finished them with Quick shade to bring out the wood grain and then they were ready for the wagon. The final bit of the load was to make some sacks out of green stuff. Just roll out a sausage of the stuff, cut it into 1cms lengths and gently flatten the bits out to make sacks. I lined the wagon with tin foil and then pressed the sacks into place to make a stack of sacks. Once they were dry, I removed them, carefully peeled off the tin foil and painted then in desert yellow, highlighting with white and then giving them the quick shade treatment.
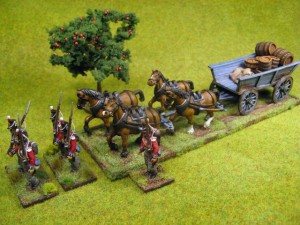
To get the wagon ready for the gaming table, I made a basic movement tray and finished in the style of the rest of my army – that’s another blog entry….
That’s as far as I’ve got with the project and the wagon has already seen action on the wargames table but there’s still a bit more to do. I’m now working on a driver, passenger and escort as well as a few accessories to add so there’s more to follow.
All in all though, it was a most enjoyable project, so much so that I’ll be adding the Trent Miniatures ladder sided wagon to my collection soon!
COMMERCIAL SECTION AKA Shameless plugs!
Most of the items mentioned in the above article are available for either my ebay shop or the Arcane Scenery shop attached to this blog
If you would like to build a Trent Miniatures Wagon, they are available for sale in my shop. I have also put together a special offer where you can buy the wagon and barrels for a reduced price post free! Click here for details.
For the full Trent miniatures range click here
For Army Painter products click here
For Vallejo paints Click here
For green stuff click here
For superglue and accelerant click here


