In the last blog I had completed the painting of the boat and all of it’s crew. The final stage in completing this lovely model was to add the Flags, and make some sort of base. This was how far I had got with the basic model.
I ordered the flags from my favourite flag supplier, GMB. I couldn’t find quite what I was looking for but settled on the Coldstream Guards’ flag from the Peninsular period. I’m not sure whether they were involved in a sea borne landing in this conflict but as usual, I am more interested in making a model that looks OK that I can use for my wargaming rather than a museum piece of a specific event.
Whilst I was waiting for the flags to arrive, I made a start on the base. I am working at the limit of my artistic ability here and I have never attempted to replicate the sea on any base that I had made before! I choose a Sarissa terrain tile as they are reasonably thick and durable, and I like the fact that there is no straight edge. In the unlikely event that I decide to add to the ‘fleet’ the sarissa terrain tiles will lock together. After priming with matt black, I painted the base, first with a Vallejo Dark Sea grey 70898 and then added some Prussian Blue 70965 to slightly lighten it up. The base needed about three coats to get a consistent colour and a smooth finish.
I then placed the boat onto the base and painted around it using Off White 70820 and marked where the oars touched the base.
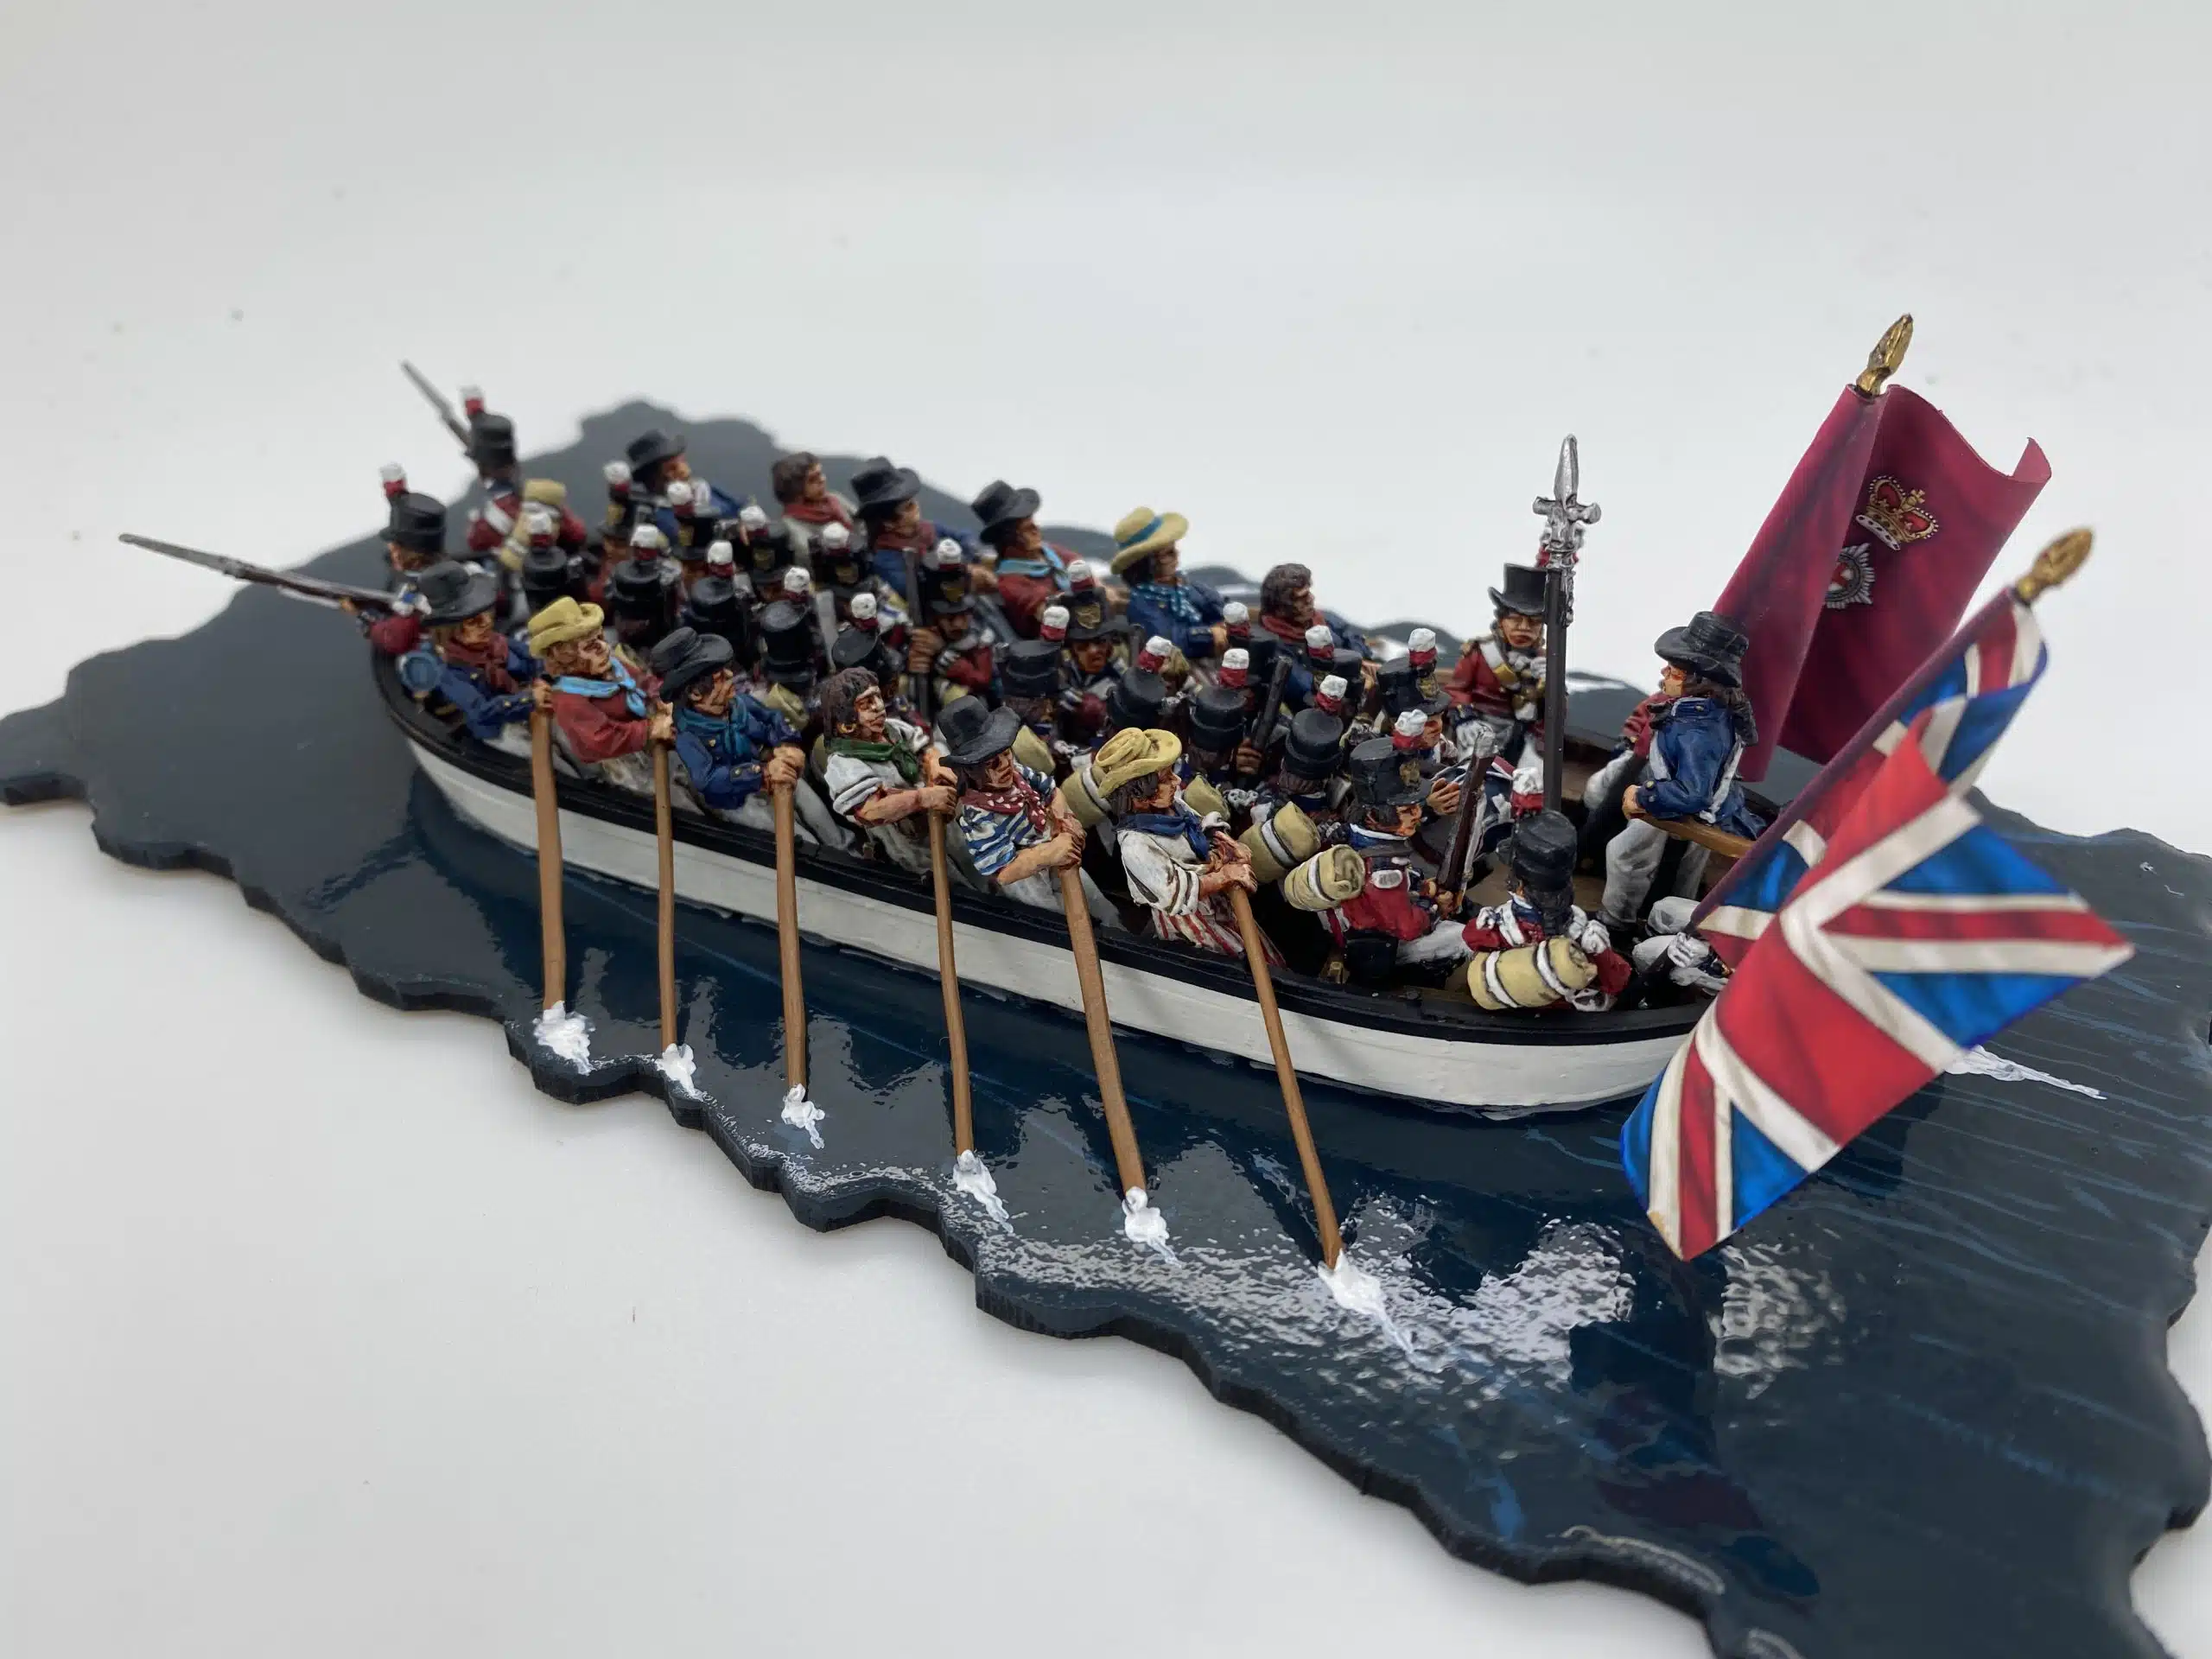
I then added some light blue streaks to give some idea of movement in the water (Again, way out of my artistic abilities here!) and then covered the base in 26230 vallejo still water.
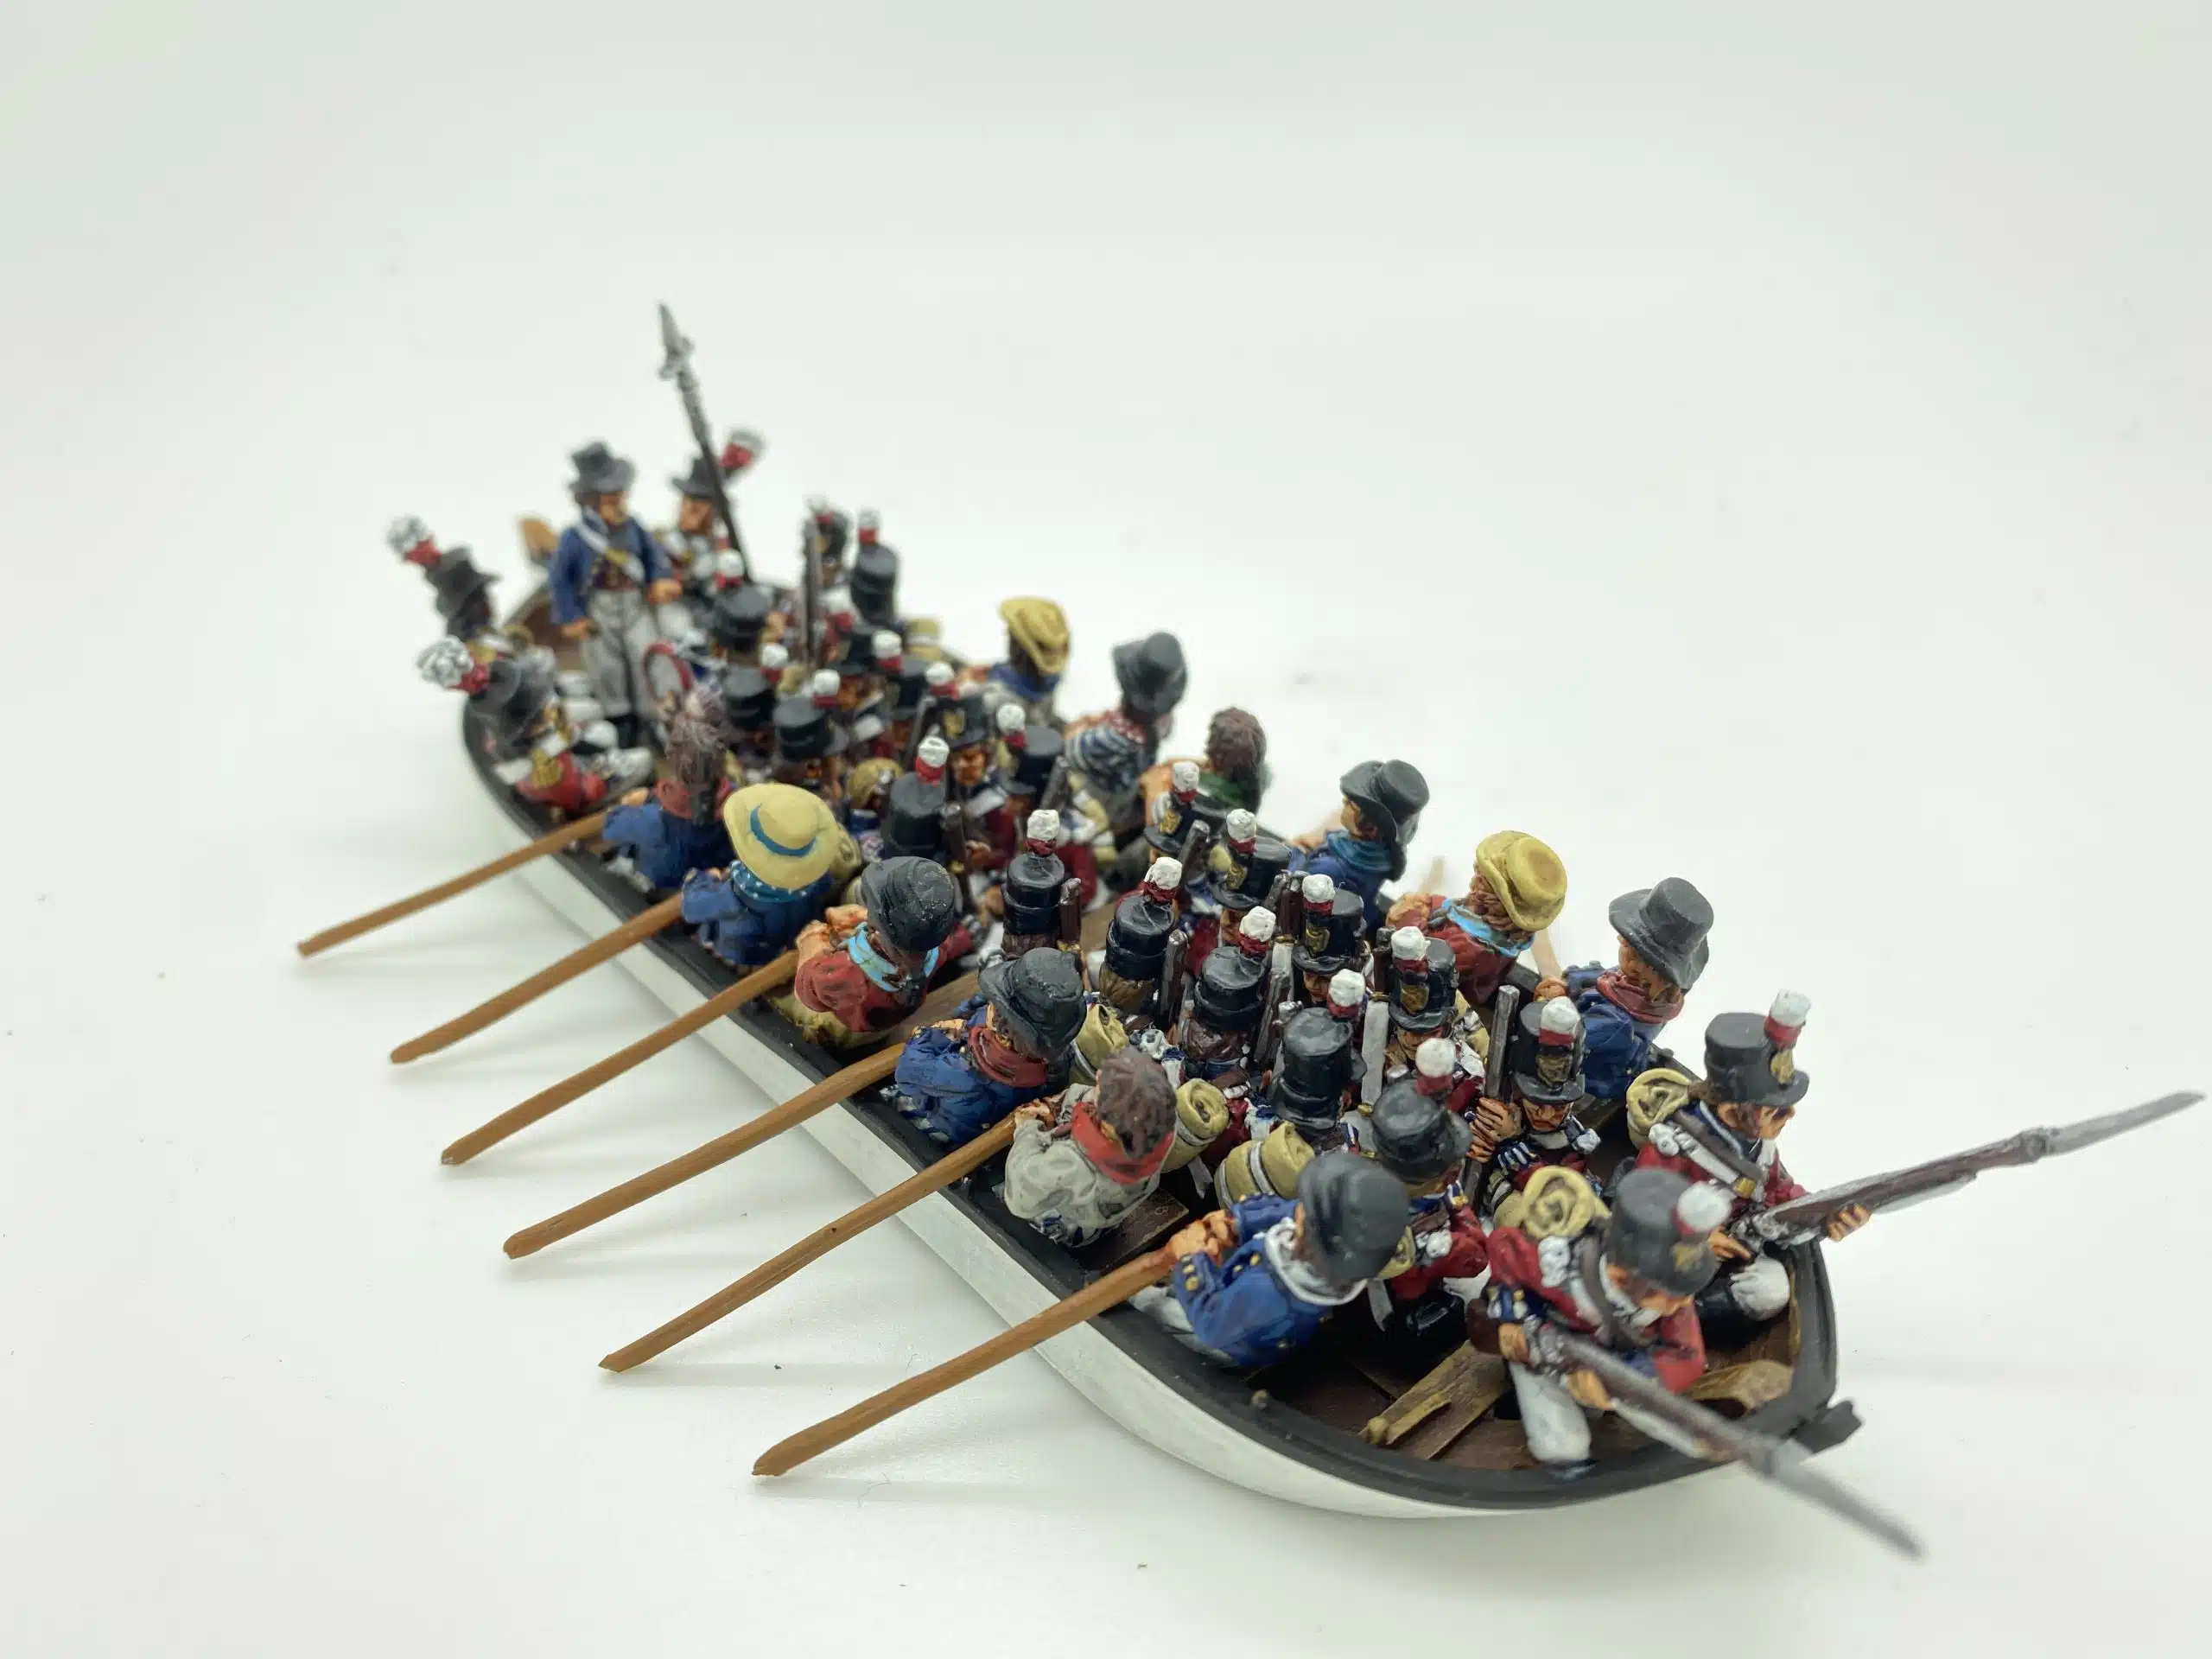
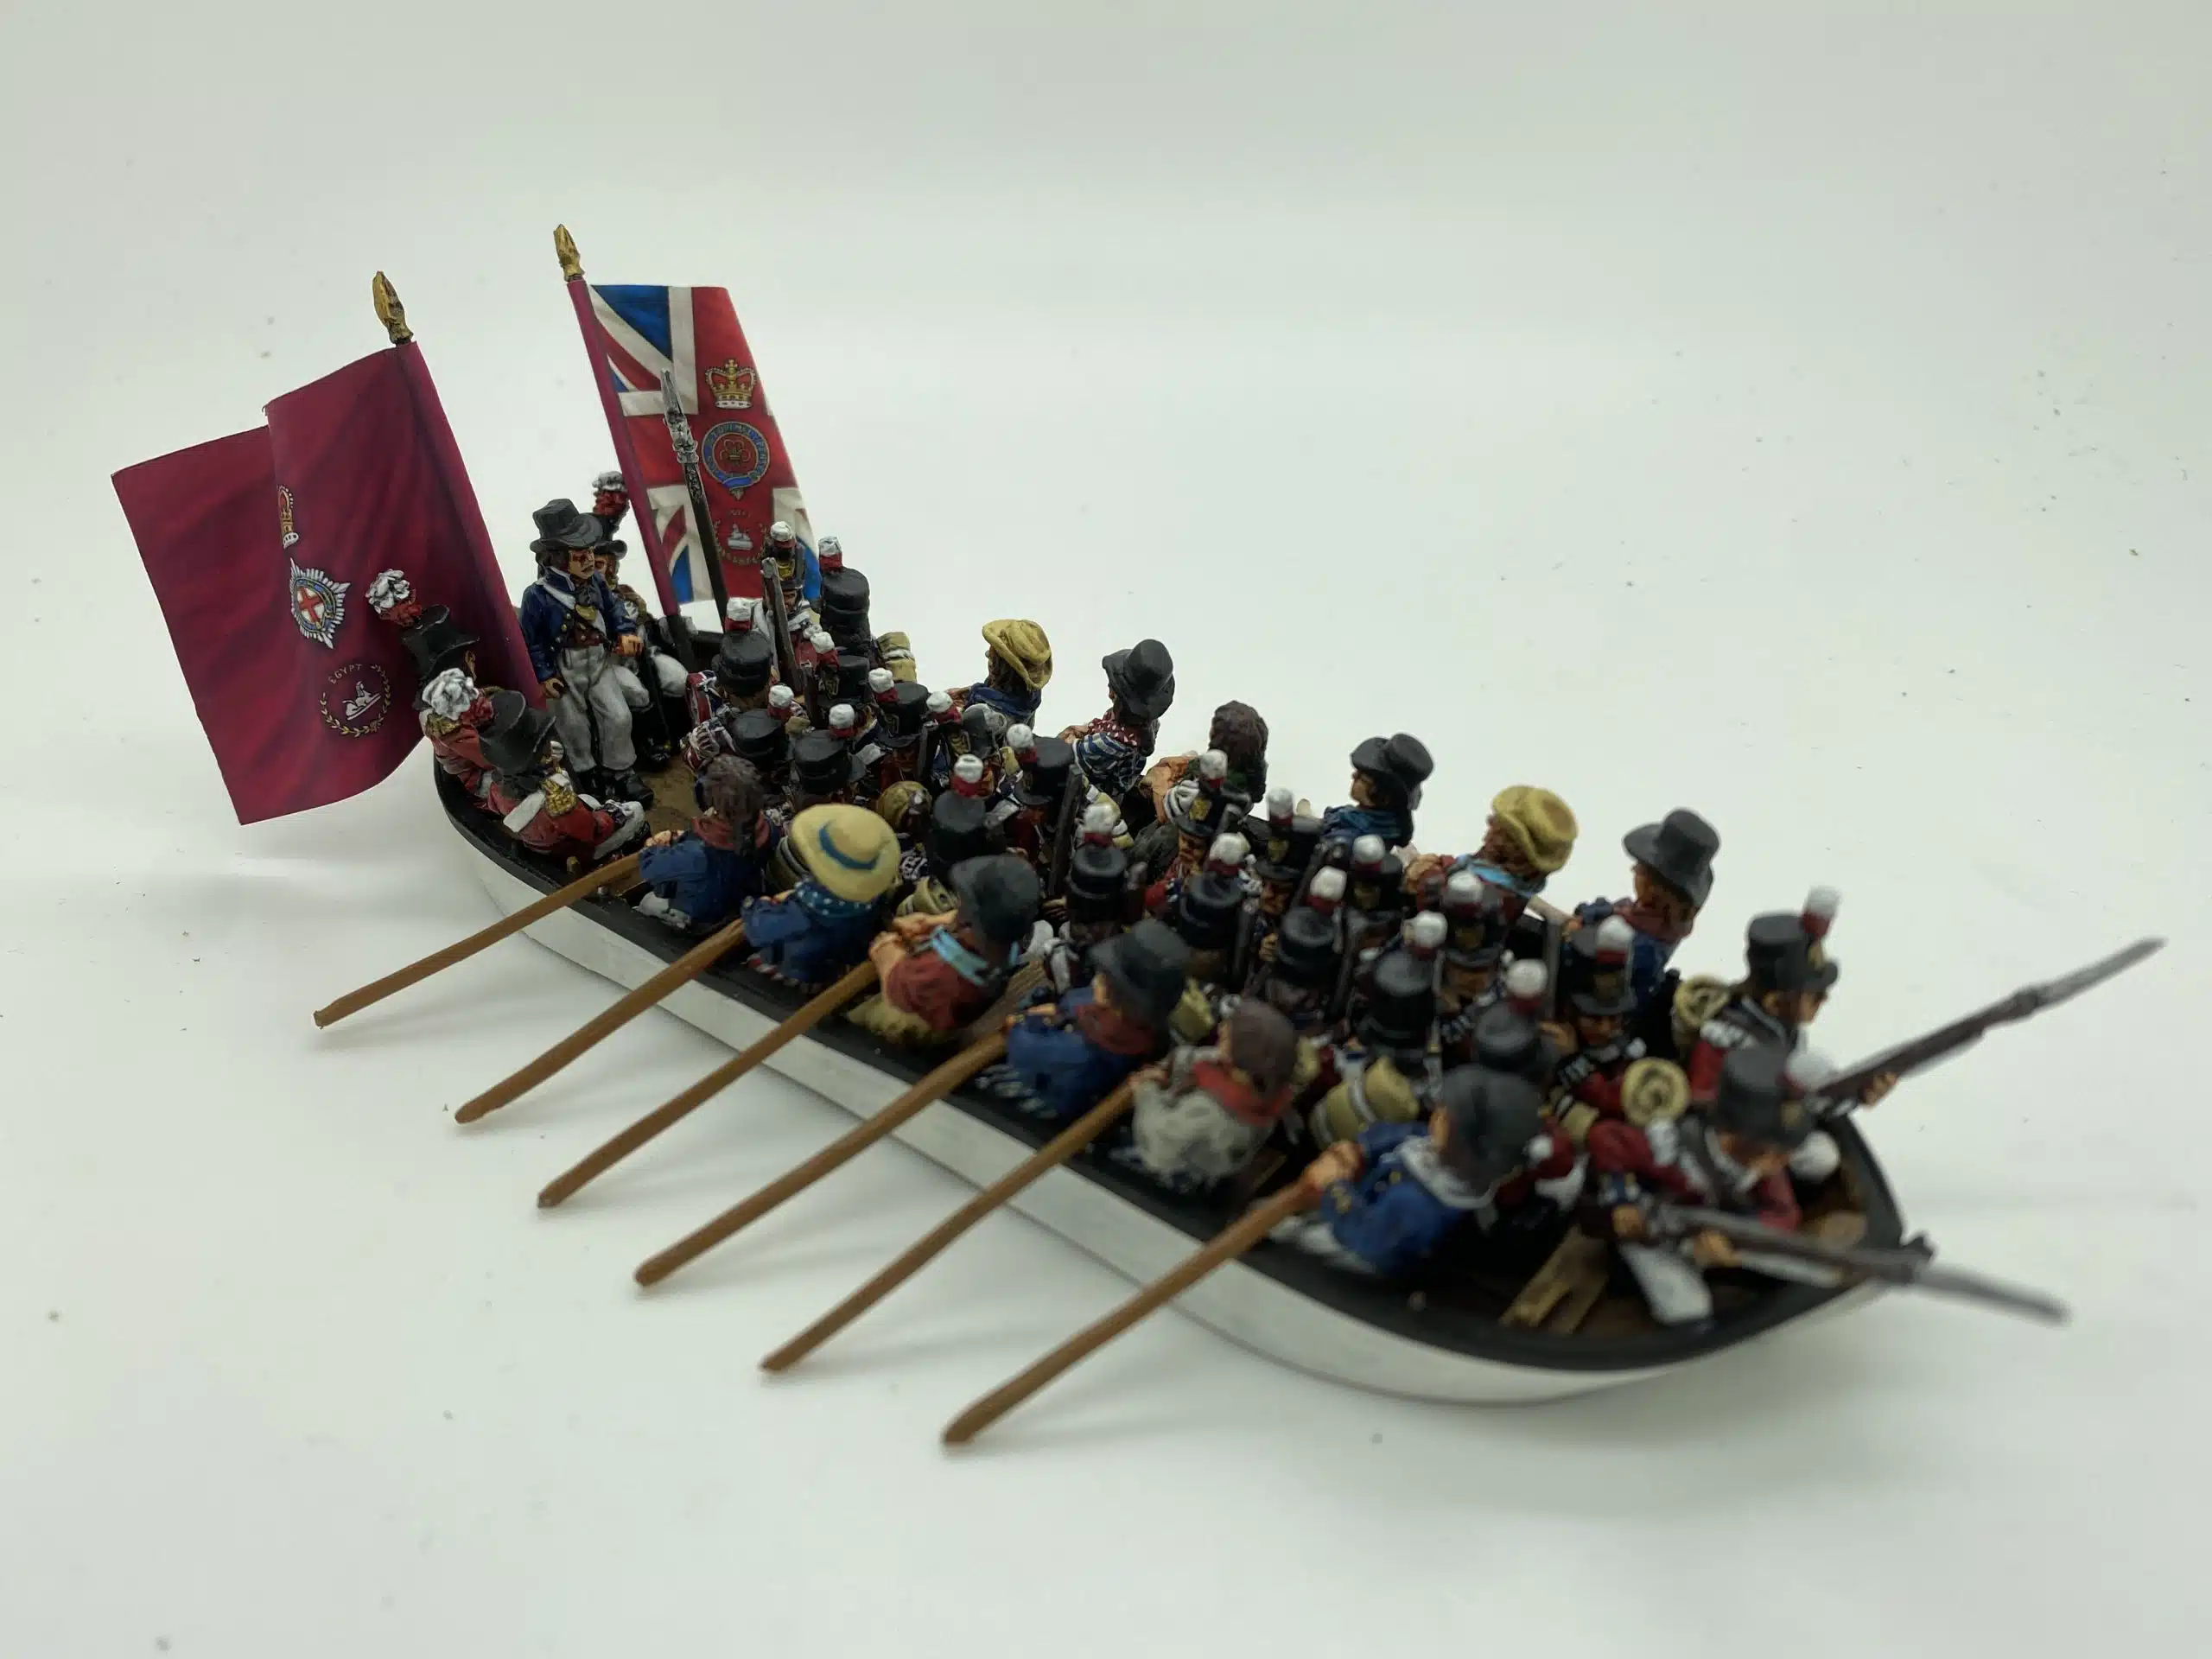
By now the flags had arrived, so I could add them to my Ensigns. The boat was now complete. I added it to the base, that was now dry and to finish off, added some vallejo Foam/snow effects 26231 around the oars and stern of the boat. I may have been a bit heavy handed here but it does give the impression of the oars splashing in the water.
So the model is done and is now in my display cabinet rather than in a box in the lead pile. That’s a result for me!
THE COMMERCIAL BIT
I hope that you all enjoy your hobby as much as I do – our web site will have much of what you need! Click here to see our shop.
The work on this lovely model continues. As I finished each block of figures I placed them into the boat, ready for the final assembly. Once the sailors were completed, it was onto the soldiers.
The officers take their seats!
The next set of figures after the Officer party was the two sentry’s at the front of the boat, and the drummer and trooper to accompany the officer party. I had decided to paint the soldiers with dark blue facings as they will probably have flags from one of the guard regiments.
Sentries, drummer and trooper block painted and inked – they await final highlighting.
You can see from the picture above that the four blocks of sitting troops are primed and ready for painting. I once again tackled these in two small ‘bites’ – the two block of four troops first, then the larger blocks of five troopers afterwards. I found that this was easier and with each of the sub assemblies that I finished, the more encouraged I was to continue.
The two blocks of four awaiting final highlights and matt varnish.The poor chap being seasick in his hat is particularly characterful!
The first batch of troops were then added to the boat.
next, the two batches of five troops were painted
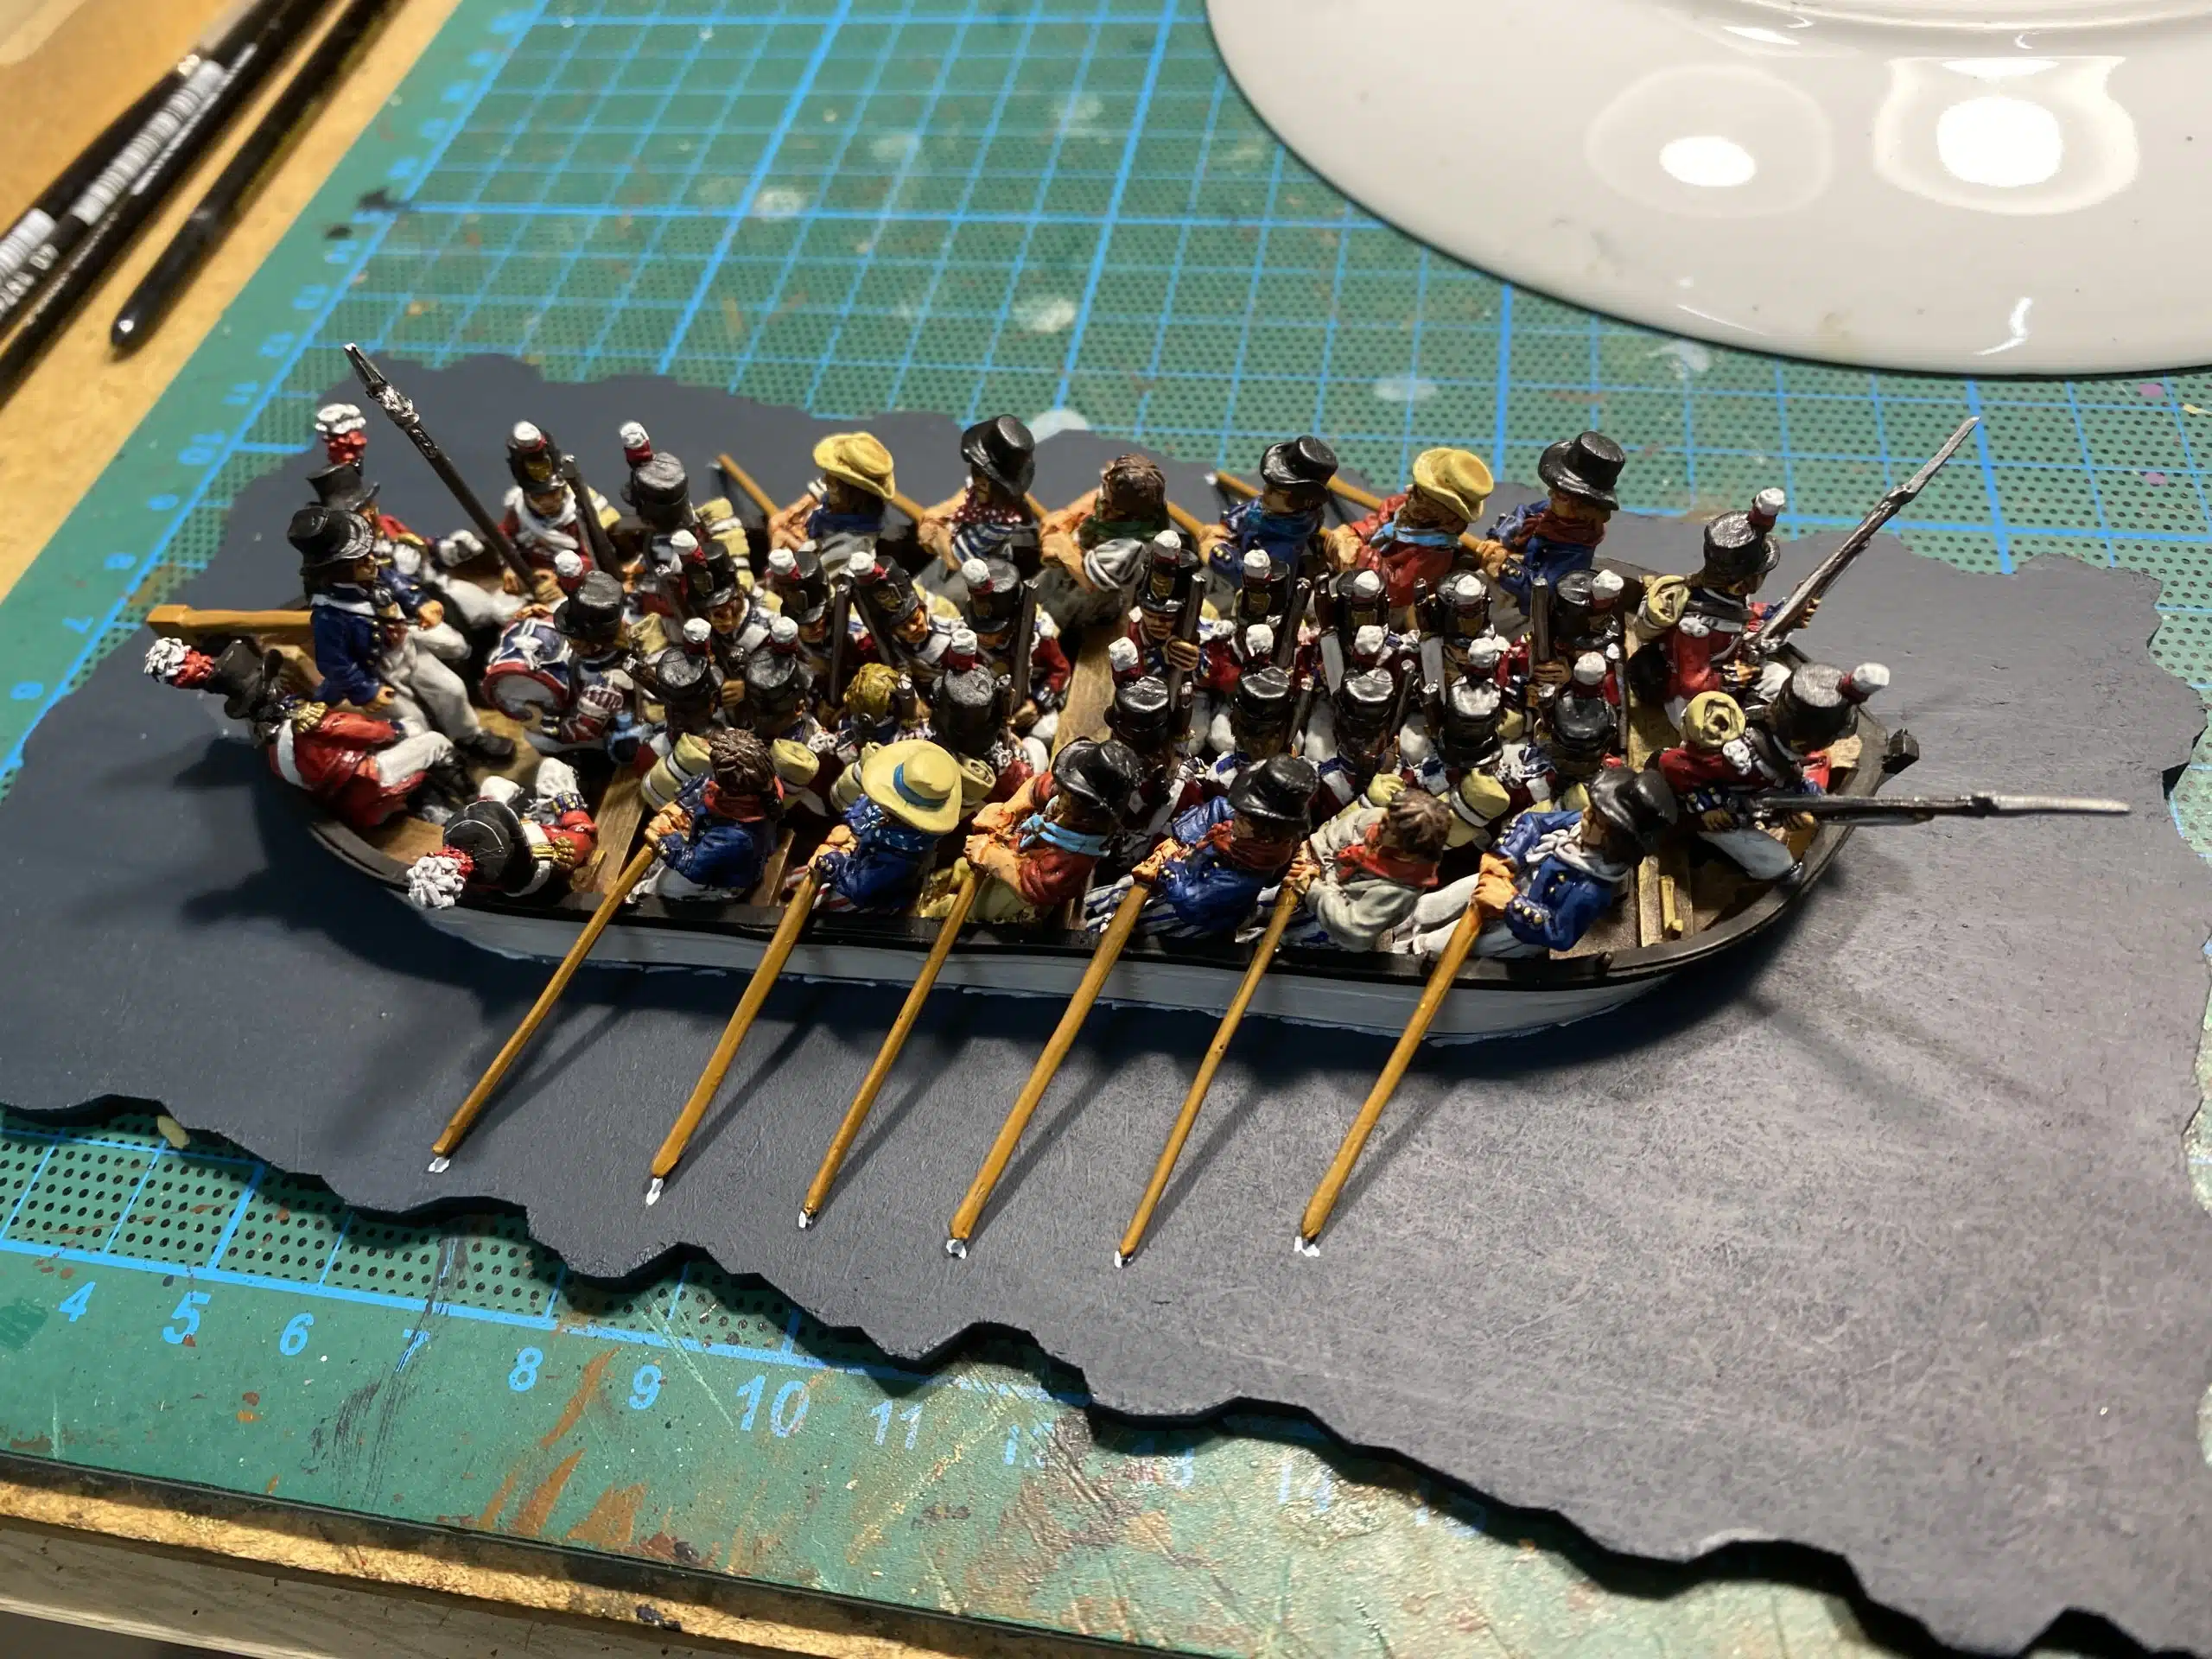
These were then added to the boat. It’s getting a bit crowded!
I also took the time to repaint the boat itself, giving it a black gunwale and repainting the rudder white and black. With all the main pieces now painted, the next step will be to add the missing oars, The sergeants spontoon, flags to the ensigns and make a base. That will come in part three of the blog! I’m currently waiting on the flags but here is a sneak preview of everything else in place.
All aboard!
THE COMMERCIAL BIT
I hope that you all enjoy your hobby as much as I do – our web site will have much of what you need! Click here to see our shop.
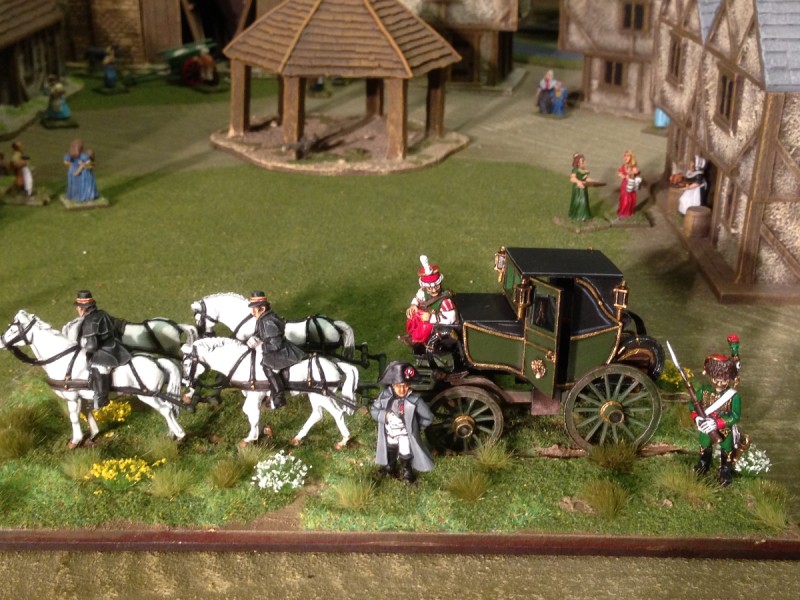
For my 60th birthday present I asked for one of what was then a new release, the Perry Miniatures Napoleonic Flat Boat and full compliment of crew. I thought that it was a lovely model and would look nice in the cabinet as a display piece. As I am now approaching 66, I thought that it was time to get it painted!
The kit comprises of a resin boat with six of the oarsmen molded on board, six metal oarsmen, a midshipman, a party of 3 officers, a sergeant, drummer and three troopers and finally, four blocks of seated infantrymen – 18 in total. I know why I put off painting the model. It is quite an undertaking to paint, in effect, nearly 40 figures and a boat. That’s before you even think about to how to base it.
The metal compliment of crew await clean up!
As usual, the best way to approach such a project is to break it down into stages. Stage one being the clean up and preparation of the pieces. I’ve said before but I’ll say it again, I believe that the Perry’s are the best sculptors in the business. Unfortunately, the casting of their models is not to the same high standard and the clean up of the pieces was quite a job. In the event, I think that you will see from the pictures that I may have missed some mold lines but often removing some of the casting errors results in damage to the sculpts. Better to leave the lines and try to cover them with paint rather than file off the beautiful detail.
The assembled boat painted as detailed below.
That said, on with the project. I washed the resin boat in warm soapy water and when dry, glued the two halves of the boat together. Once primed in Leather brown, I painted the boat using my standard finish for wood. Base coat of Chocolate Brown, Wet coat of Flat Brown, Wet brush of Flat Earth, Dry brush of Orange Brown, highlight of Yellow Ochre. If this sounds a bit OTT, I do like the result, so I tend to stick with this method whenever I am painting wood effects. I’ve written a more detailed article on how the process of painting wood works for me in an earlier blog article. You can see it here:
Once I was happy with the boat I started on the oarsmen. These are a bit tricky to paint as they are fixed into the boat so angling my paint brush was a challenge at times. As regards the colours, I simply copied the pictures on the Perry web site. I noticed that the resin oarsmen are more casually dressed than the metal ones, who are in uniform. I found the stripey trousers and shirts a bit of a challenge but my freehand is gradually improving. The secret ( apart from a steady hand) is to use well thinned paint that flows nicely off of the brush. And of course, a decent brush. Any ‘wobbly bits on the stripes are easily touched up.
Painted crew – just the faces to finish highlighting!
Once the crew were block painted, I gave the flesh an Ink wash with vallejo flesh ink and the rest of the figures a wash with army painter dark tone. When the ink was dry, I then went back over the figures, highlighting with the original colours and tidying up any obvious errors.
The next stage in the process was to tackle the metal oarsmen and midshipman. Again, I followed my usual block paint, ink wash and highlight process. For the uniform, I just used the Perry’s pictures as reference although I also checked out my copy of Stephen Beisty’s Incredible cross sections book of the Victory!
As you will have noticed, the boat has been temporarily mounted on a base for painting and handling as I finish the crew. Talking of which, the Officers and troopers were next up.
Painting in progress!
I also decided that I didn’t like the wooden finish on the outside of the boat, so I’ve given it a white finish with a black gun whale. Here is the progress so far, with the officers taking their seats!
Officers in placeProgress so far
The next stage is to finish the individual figures – the drummers and guards and then it is on to the blocks of sitting troopers.
The next batch inked and awaiting re highlight
I have yet to glue everything in place but I am pleased with the way that the model is gradually taking shape. Hopefully, in my next blog, I will be close to finishing this lovely model!
THE COMMERCIAL BIT
I hope that you all enjoy your hobby as much as I do – our web site will have much of what you need! Click here to see our shop.
If you follow my blog, you will know that I have now occupied my purpose built ‘war room’ or hobby room. In the process of moving my figure collection into it’s new home I came across a number of unfinished projects and some unpainted figures in my cabinet. I thought that it was time to get these figures completed.
First up was the ‘Secure the Colour’ vignette from Perry Miniatures. This set depicted Captain Clarke and Corporal Stiles of the 1st (Royal) Dragoons capturing the 105e eagle at Waterloo. I had already completed the other Vignette that the Perry’s make for the British at Waterloo, ‘A Hard Contest’ with Sgt Ewart capturing the 45e eagle, so it made sense to complete the pair! You can see my attempt at the Sgt Ewart vignette in my earlier blog here:
My version of ‘A Hard Contest’ – I still need to add the flag!
You can see how far I have progressed with the next vignette ‘Secure the Colour’ in the photograph below. It’s still not quite finished as I need to add the long grass and flag. I have ordered both the 45e and the 105e flags from GMB, so once they arrive, I can finish off both vignettes.
Secure the Colour!
The other projects that were nagging at me were the command bases that I had started some time ago for my Black powder army. I have a number of Wellingtons and Pictons in my collection, but I thought that it would be useful to base them on 40mm round bases, along with another suitable figure to make ‘brigade commanders’ for my army. I had a couple of nice figures from Trent Miniatures, given to me by Duncan and it was time that they were painted and added to my collection.
Warlord Picton with Trent Miniature Scotish Fencible officer
There are actually three bases that I have made. One with a Front rank Ensign and the other two with the Scottish figures. The Trent Scots figures are designed for an earlier part of the Napoleonic Wars – one is a Scottish Fencible officer, the other represents Sir John Sinclair who raised the Rothesay and Caithness Fencibles, the first of the Highland Fencible corps. The Caithness Fencibles would go on to serve in Ireland during the rebellion of 1798. I was happy to paint the Officer with the raised sword as an officer of the Black Watch and Sir John Sinclair was given a Cameron Tartan. It seems unlikely that these officers would have been dressed as such for the Waterloo campaign but they make a colourful addition to my army.
Sir John Sinclair and Wellington
You can see from the pictures that I have once again used home made ‘sabot’ bases for the figures. Should I wish to change the setting in the future, it is an easy process to transfer the figures and replace them with something else.
By the way, if you would like to see just how many models of Wellington that I have, I have covered the issue in my blog here:
Just to finish off, here are pictures of my new command bases/vignettes.
The completed Sir John as a Cameron Officer with WellingtonPicton and Friend from the Black Watch!Yet another Wellngton and Front Rank Ensign!All three bases together
STOP PRESS!
I’ve received my flags from GMB, so I was able to complete the ‘secure the flag’ set:
Captain Clarke and Corporal Stiles take the Eagle from the 105eThe view from the rear.Another view with enhanced lighting! It makes my painting look sharp!
THE COMMERCIAL BIT
I hope that you all enjoy your hobby as much as I do – remember that our web site will have much of what you need! Click here to see our shop:
Since lock down has been eased I have been making up for lost time on the gaming front. I was fortunate enough to be invited to my second weekend of gaming this year and joined Andy, Simon and Mark at Mark’s fantastic gaming venue at his house in North Yorkshire. Mark owns Jacklex Miniatures and his obsession is with 20mm classic metal gaming figures, rather than the 28mm armies that I am used to. The gaming group that Mark is part of also prefers umpired ‘old school home brew rules’ for Napoloeonics’, uses figure removal to count casualties and a more rigid command and control system, together with simultaneous orders and movement. All of which is a culture shock to someone who has spent 10 years or more playing the more relaxed ‘Black Powder’
The smaller scale figures still make an impressive sight!
None of the above detracts from the sheer spectacle of the games that we played, nor for that matter, the fun involved. Mind you, I do admit to a certain amount of frustration, particularly when I was unable to detach my rifle companies to subdue a French battery – apparently, that sort of thing might be OK for Bernard Cornwells’ Sharpe but isn’t the done thing in history! Otherwise, I think that I just about managed to keep my toys in the pram in what was a very hard fought battle!
Before the battle – most of the French army is hidden from view.
The game was based on the Battle of Vittoria and followed some of the narrative of the original battle although it had been scaled down slightly. The picture above shows the set up. Players were asked to submit their dispositions and order of march to the Umpire prior to the battle starting, along with any general orders to brigades. I neglected to bring the detailed orders of battle away with me, so I can only report that Andy was playing the French, with Simon and I playing the British and Allied armies.
The French had deployed a division of troops in the centre of the battlefield, with a battalion guarding one of the fords through the forward village. It was all that the Allies were able to see at this stage. It was likely that there would be more troops hidden from view!
The British Cavalry brigade embark on their scouting mission!
The British plan was to send the mixed brigade of Scots, Portuguese and Spanish Infantry straight through the centre to fix the French and to draw the French into supporting their troops at the various bridges and fords across the river in the centre of the battlefield. Three other infantry brigades and a cavalry brigade would deploy on the left flank and attempt to force a passage over the bridge and fords on this side of the battlefield. The Cavalry brigade had been given orders to scout the entire length of the river. We were interested to find out whether there were more French troops hiding in the village next to the bridge and to see if we could spot any further French deployment. The orders also included a request that once scouting had been completed, a full report should be sent back to HQ….
I’ll attempt to tell the tale of the battle using pictures to illustrate the key points.
The Allied Centre advances and immediately find their advance blocked by a strong contingent of skirmishers and artillery.On the left, the Allied cavalry lead the advance, with Pictons infantry division following up.The French deploy their artillery on the heights to defend the bridge on the left flank.In the centre, the Allies pushed on to the bridge, with the Scots leading the way.Scotland the brave!The Scots attempt to push through the centre.
Encouraged by the skirmishers holding the French in check., the Scots attempted to force a passage through the centre by charging the guns. This was not going to end well for somebody…
With the British brigade charging the bridge, the Spanish brigade deploys to the right.
Meanwhile, back on the left flank the French artillery battery engaged the leading cavalry, breaking one regiment and causing disorder in another. Despite this set back, the cavalry were able to press on. With the knowledge that the village and bridge were undefended, the Allied infantry began preparations to force a crossing.
The situation on the left flank.Further scouting by the Allied cavalry revealed a brigade of French Cavalry deployed in defence of the bridge.
With the bridge on the left flank looking strongly defended, the Allied cavalry pushed on and the infantry attempted to storm the guns on the hill over the ford. The final Infantry Brigade of Pictons Division had arrived and so one brigade was ordered to continue around the village to prevent the French from attacking over the bridge.
Keep going! The Allies reinforce the centre after the Scots have been mauled.
Back in the Centre, the Scots had been terribly mauled by the Artillery and had fled the battlefield! Fortunately, the Brigade morale held and yet another assault was attempted, whilst the Spanish brigade moved to flank the woods.
It’s all getting a bit fraught on the left wing!
It looked as though things were going badly for the Allies. The French artillery was inflicting tremendous losses on the allies and withstood all attempts to shift them. However, a glimmer of hope appeared for the allies. The cavalry had successfully scouted the length of the river and found two more crossings that appeared to be undefended. The French seemed oblivious to the existence of these fords and seemed only concerned to shadow the allied cavalry and reinforce the heights.
The British cross the ‘hidden’ fords to engage the French – completely surprising them!
As the French Cavalry pulled back, another trap was sprung as the British Cavalry crossed another hidden ford to catch them in the rear!
Now we have them!
Back in the centre, another assult on the french guns had failed but the Spanish had deployed and were occupying the French, preventing them from re deploying and reinforcing the left flank of the battlefield.
Hold the line!More Spanish move up and the French skirmishers are pushed back.
Back on the left, the British cavalry had beaten their French counter parts and the Infantry had broken the French Battalions that had attempted to defend the hidden ford. Picton had aslo ordered his third brigade to ignore the guns and advance around the hill smashing into the flank of another defending French battalion.
The French are encircled!
With the collapse of the French on the left, the French were in danger of being encircled. Andy, decided that the battle was lost and began the retreat back towards Vittoria. Victory for the Allies….only just though! Without the successful reconnaissance by the Cavalry, the Allies would never have pushed though the other river crossings. The French defence was just too well planned.
Onwards men! Victory is in sight!
A very enjoyable game, where Mark, our host and umpire had to work very hard to keep some of the players in check (sorry Mark!) The game was made all the more enjoyable by the wonderful set up and beautifully painted and organised armies.
After a very nice late lunch we were ready to re-fight Trafalgar….but that will follow in my next battle report!
THE COMMERCIAL BIT
I hope that you all enjoy your hobby as much as I do – remember that our web site will have much of what you need! Click here to see our shop:
It’s been a month since my last blog article. The social distancing and lockdown rules haven’t really influenced the speed of my output. I am fortunate in that we have been able to continue to run the business, albeit under difficult conditions, so if anything, work has increased. I have maintained my slow and steady out put and over the last month and I have completed another Battalion for my Napoleonic army. This one represents the 3/1 Royal Scots Battalion who were present at Waterloo as part of Pictons 5th Division.
Royal Scots Command
Just a note about how I decide what regiments to paint for my army. The idea is to use the order of battle at Waterloo as a base for my collection. I am not trying to recreate each unit as it appeared on the day. Most of the games that I play with my gaming buddies are ‘generic’ games, rather than being based on a particular battle. I suspect that this is increasingly the case for most wargamers these days. This means that I am happy to use a bit of artistic licence when it comes to my battalions.
2/44th advance!
A case in point is one of the battalions, the 2/44 East Essex, that I painted for the 9th Brigade. My battalion has these troops in great coats but I know that it was unlikely that any of the British troops serving at Waterloo were in great coats, despite the bad weather. However, I saw these models as part of a Kickstarter from Michael Percy’s Three Armies range and I liked the look of them, so they were painted and added to my collection.
3/1 Royal Scots Battalion
Along with the great coated troops, I bought two other battalions. As they had been languishing in my lead pile for some time, I thought it was a good idea to get these troops painted and thought that they could be the 3/1 Royal Scots, completing the British 9th Brigade, commanded by Sir Dennis Pack, and in turn, completing the British contingent of the 5th Infantry Division. To finish the division, I really need to paint the four battalions of Hanoverian Landwehr under Colonel Von Vincke. It is unlikely that this will happen anytime soon. There are far more interesting troops that were at Waterloo before I start another 96 red coats!
Batch Paint in progress
I painted the figures following my usual block paint and dip process. I made the mistake of painting them in one big batch. The problem with this method is that it takes a long time to get to a finished result when painting 24 figures in one go and I got a bit bogged down in the process. I usually paint in batches of 8 or 12 and I think that in future, I will go back to the smaller quantity. Once the main colours are blocked on, I paint the models with Army Painter Dark Tone quick shade.
Block painting finished.
When the ‘dip’ has dried thoroughly, I spray the figures with matt varnish and then re paint most of the white strapping, which has become ‘dirtied down’ by the shade. You can leave this extra stage but I like the cross belts to stand out – I think that it helps the look of the figure’s on the table.
Figures after quick shade and matting.
Then it’s on to basing and mounting in their movement trays. I base four figures on a 40mm by 40mm base, I tend to use Sarissa MDF bases for metals and Renedra plastic bases for plastics. You can use either for both! I also have designed my own movement trays for Black powder, so that I can name my regiments. It’s always good fun in the game when you can give your orders to a specific unit – ‘the 3rd Battalion of the of the Royal Scots Foot will advance’!
Royal Scots in their movement tray
So another battalion is ready for battle. I now have 17 Battalions of British, KGL and Hanoverian troops in my army – I still haven’t finished with the British Army – I would like to complete a KGL brigade but as I have said before, painting redcoats has become a bit tiresome. I think that some Brunswick troops would look nice…
THE COMMERCIAL BIT
If you are looking for paints, bases or almost anything to help you with your modelling and wargaming, visit my shop below. At the time of writing, we are still offering worldwide free postage!
I’m not sure if the Three Armies range is still commercially available – the link that I did have does not now work. The flags are from my favourite flag supplier:
Anyone that knows me, will know that I am a great admirer of the Duke of Wellington. Based on my interpretation of the Queensbury rules, he is clearly the ‘Champion General’ of the Napoloeonic Age, having beaten all comers and retired as the winner from his last and greatest battle. Before anyone gets too excited, this blog isn’t an attempt to start another one of those endless debates about who was the greatest General and ramble on about who won at Waterloo…It’s a tale of my dive into the lead pile and a realisation that perhaps that I have let sentiment rule when it comes to buying miniatures.
Wellington and Wellington and Picton
The models above are from Warlord Games. I decided to paint them as part of my isolation clear down. I particularly liked the Warlord version of Picton, and the Snoozing model of Wellington that comes as a bonus was rather good as well. Picton is going to be based with a Highland officer figure from Trent Miniatures and will become one of my Brigade commanders for my Black Powder games. Having read somewhere recently that Picton carried a white umbrella at Waterloo, I may update my model.
Picton giving orders!
The painted version of Sir John Sinclair. from Trent miniatures
The Picton base will go with my current Army Commander, Sir Sydney Ruff-Diamond (the Front Rank version of General Rowland Hill).
Sir Sydney Ruff- Diamond watches on as Private James Riddle rebukes the French!
It was when I went to the figure cabinet to get that model that I realised that I also had the Front rank models of General Sir Robert Craufurd and yet another Wellington! Both were painted but neither based. I got on with basing Sir Robert immediately, painting one of the DeeZee small dogs as a Dalmation and basing them together.
Sir Robert Craufurd (‘Black Bob’) and his dog.
Wellington – Front Rank Figures
I left the Front Rank Wellington un-based as I now had two very similar figures and I thought perhaps one could be used for the Peninsular army that I am very slowly building and one for the Waterloo contingent. I will need to paint some nice figures to accompany these versions of Wellington but I am still thinking of what would be appropriate. Is there a model of Maitland?
Foundry Wellington and Picton
Also tucked at the back of the cabinet was yet another model of Wellington and Piction – these are Foundry figures and I painted them about eight or nine years ago – I no longer use them for my army.
Four Wellingtons!
Mounted Wellington by Victrix. On foot by Wargames Illustrated.
So with four versions of Wellington, you would thing that would be enough. But no, as I was going through the lead pile I found that I had two more! I had bought the Victrix Metal one ages ago – I think these are now OOP in the UK but may be available from Brigade Games in the USA. The other model is from Wargames Illustrated and is from the Giants in Miniature series. So I have six versions of the great man, four painted and two unpainted.
Six Wellingtons!
Napoleon is definitely out numbered in this house!
Napoleon visits Little Bingham
Perhaps I wont be quite so quick to buy any more miniatures of Wellington….
THE COMMERCIAL BIT
Almost all of the paints, miniatures, bases, basing materials and anything that you are likely to need for your hobby are available POST FREE from my shop here:
Having more or less finished Sgt Ewart and the wounded (dead?) French Ensign , it was time to move on to paint the other figures in the Vignette. First up was the French infantry man. Now at this point I need to make it clear that my knowledge of French uniforms is about zero. So it was a question of copying other peoples work. As well as the superbly painted models on the Perry’s web page I also found a work of art completed by the painter Sasha Herm. I don’t know Sasha, other than through his work but he is extremely talented and produces the most beautifully painted models. I wont show his work here but if you would like view it, click on the link to my pinterest board here:
I painted the infantry mans coat in Vallejo Stone grey and his hat with Vallejo Buff. The shading was done with Dark tone ink and then high lighted with the original colours with a spot of white added.
French Line Lancer
The final model to complete was the French line Lancer. I again copied the examples that I could find. So once again, I’ve no idea whether the colours are ‘correct’. I used Vallejo Flat Green with German Extra dark Green for shading and for the facings, Vallejo Beige red. This doesn’t match the colour that I found on the Mont St Jean site for French Line Lancers but It was close to the colour on Sasha’s model and I liked it! Again I used various inks to shade the figure and the base colours + white to highlight.
Positioning the models on the base – all four models completed.
With the models all completed, it was time to assemble the vignette. I used a Sarissa Precision Oval MDF base. I do intend to mount this on a nice wooden plinth but for now I just wanted to get the basic model done.
Textured paste on the base.
I covered the base with Vallejo Textured Dark Earth paste and used a sculpting tool ( a cocktail stick would do) to bring the paste over the bases of the figures. As I don’t glue the figures to the MDF base, there is plenty of working time to allow me to position everything. Once the textured paste dries off it is strong enough to hold the figures in place. I also sprinkled the paste with earth and small stones to add extra texture. You might have noticed that at this point I added the ‘stolen’ Eagle to Sgt Ewart as I could now handle the vignette rather than the individual figure.
Base painted and textured
The next stage was top paint the base and add some scatter. I’ve covered my technique for basing elsewhere, so if you would like to know more just check out one of my older blog posts!
Long grass added to the base.
The last task was to add some long grass to the base. I used Woodlands Scenics 12mm light green field grass and just dipped small clumps into PVA glue and added them to the base. The long grass isn’t strictly accurate – they were fighting in amongst the trampled Rye that was growing across the battlefield and according to some records, originally stood at six foot tall. I think that it gives an idea of the ground though. The vignette is about finished and ready for the cabinet but for a few additions. I need to order in a nice flag from GMB designs ( my favourite flag supplier!) and I have the lance and spare discarded sword to add. But for now, I’m calling it done and moving on to the next project! Below are some pictures that I took in a light box with a slightly better camera than the usual i-phone camera that I use for my blog. I hope that you like them!
THE COMMERCIAL BIT
Almost all of the paints, miniatures, bases, basing materials and anything that you are likely to need for your hobby are available POST FREE from my shop here:
No, not a comment on life at the moment but my latest project. Despite having more time, my painting rate has dropped. I have come to a halt with my War Of The Roses project, having run out of subjects to paint, so I turned my attention to the ‘lead pile’. Rather than churning through yet more units, I decided to have a go at some of the more challenging models in my collection. I also deliberately slowed down. There was no need to rush. I am not under any time pressure in terms of getting a unit ready for the next game. So I have deliberately slowed up and decided not to put any artificial pressure on myself to clear my painting backlog or to build a new army.
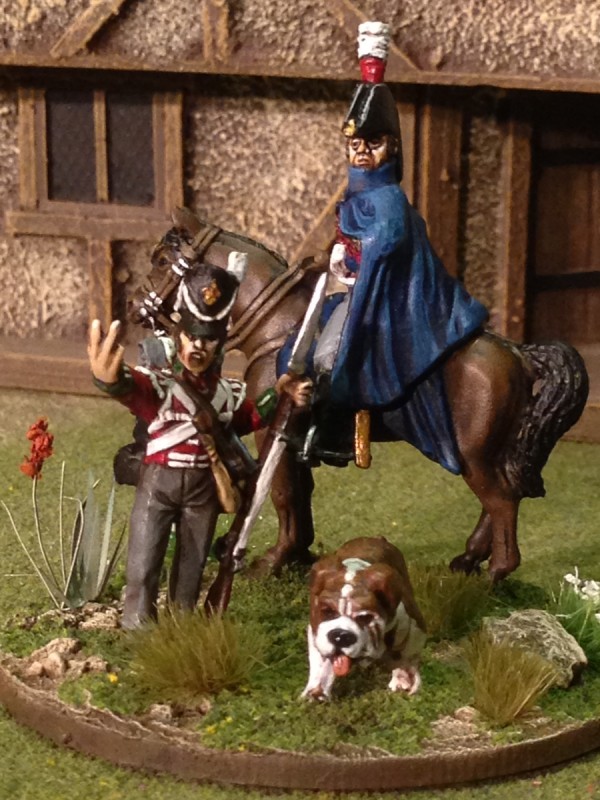
The Perry Miniature version of ‘a Hard Contest’.
I thought that I would have a go at painting a Perry miniatures vignette, ‘A Hard Contest’. Inspired by Sgt Ewarts capture of the 45 Regts. eagle at Waterloo. The set comprises of Sgt Ewart himself and three French defenders. Rather than my usual functional ‘Block Paint and Quick shade’ style, I would try and paint these models using ‘proper’ shading and highlighting. Inspired by the picture above, the first model that I attempted was the Sgt Ewart figure.
Sgt. Ewart in progress – primed and blocking started
I started with the ‘grey’ horse but I wanted my figures to be on a white Horse as I thought that it would stand out when the whole Vignette was completed. I painted the horse with Vallejo London Grey and then worked through Light grey, silver grey and then Off white for the highlights.
Sgt Ewart – main colours blocked on.
I couldn’t break away completely from my usual style of painting and found myself blocking in most of the colours before going back to shade and highlight them. I also used a variety of inks to get the shading done. So red ink on the tunic, Flesh wash on the face, Strong tone on the browns and Dark tone on the black and metals. I think that the Army Painter inks are superb for shading and lining.
Sgt Ewart – a bit more detailing and highlighting
I find this style of painting less of a straight forward process and therefore difficult to describe. I paint a bit here, retouch a bit there, use some colours straight from the bottle, mix some up. If all that sounds a bit like Bob Ross ( My current obsession on TV. If you are not familiar with him, look him up!) then that is sort of how it is. I’ve got an idea as to how I would like things to look and I just fiddle around until I get close! I also use the photographs to help look for where I need to improve things. It’s a bit of an excuse but I am slightly red/green colour blind, so when it comes to highlighting these colours I’m really not sure how well they blend.
Sgt Ewart, nearly complete – I dont like the stripe on his trousers!
When it came to choosing the correct colours for the uniform, I relied on previous research that I did when painting my Scots Greys Cavalry Regiment. That said, I couldn’t work out whether a sergeant had Yellow facings and trim to his Jacket or Gold like the officers. In the end I went half and half as it looked nice…
Sgt Ewart Complete? Whoops! Is that a paint chip on his toe?
After much fiddling and retouching I got to the point where I had had enough of painting the Sgt. There’s always more to be done and even in the last picture I noticed a paint chip that needs repairing, and some lining need around the yellow on the jacket, but it was time to move on to the next figure.
A bad day at the office for this French soldier.
I chose the wounded French ensign to paint next. Again, I confess to doing limited research on his uniform. I copied the models on the Perry’s web site. He was painted in more or less one session, which surprised me but I guess I must be getting used to this new fangled approach to painting…. Once again, I’ll use the photos to revisit the figure and retouch any areas that I’m not happy with. I now have a French lancer and a French Infantry man in a great coat to paint. It’s then just a case of putting them all on a scenic base. It may take a bit of time but now that I’ve taken the pressure off myself to finish the model in a set time, I’m quite enjoying myself!
THE COMMERCIAL BIT
Almost all of the paints, miniatures, bases, basing materials and anything that you are likely to need for your hobby are available POST FREE from my shop here:
This past Saturday I attended the ‘Bingham Napoleonic Days’ event with the NG13 Wargamers. We were putting on a demo game and for this year, Andy Callan had found a nice set of scenarios that had been published in the ‘Wargames, Soldiers and Strategy’ Magazine. The articles, written by Rob Harper, detailed how General Lecourbe was able to conduct a rearguard defence of Eastern France against the invading Austrian Army. As well as giving a nice overview to the campaign, Harper also provided a series of linked scenarios that gamers could use to re-fight the campaign. We chose our favourite rules set ‘Black Powder’ for the battles and for the skirmish scenarios, used ‘Rules for old wargamers with short memories’, a home brew mash up written by Andy.
First Scenario. French defend the Tile factory
As a group, we are happy to use what ever troops that we have available in our collections to fight scenarios. We dont get too hung up on getting exactly the right regiments on the table. Indeed, as I had no Austrians to field, I took a brigade of Prussians to fight alongside their Austrian allies. It added a bit of colour to the Demo game and we were happy to point out the discrepancy to our visitors both verbally and in our briefing handout. We were playing Second Edition Black powder and the only minor rules amendments that we made were to take away the ‘Follow me’ rule from the Austians and to remove the order bonus for Columns. The Austrians had shown a remarkable lack of ambition in the actual campaign and we felt that these amendments would be enough to reflect this Austrian caution in our games.
The Prussians push onto the French Right.
Andy and I took the Austrian/Prussian Alliance and Pete Harris, fought as General Lecourbe, leading the French. As usual, I was playing and trying to take pictures, so although I had plenty of pictures, they weren’t necessarily of the key moments – I was too engrossed in the game!
The French reinforcements arrive and move to the front.
The first battle of the series had The Austrians struggling to deploy their forces against a French force in a good defensive position in a tile factory on a hill in front of the village of Dannemarie. Both sides had reinforcements that they could bring on, the Austrians being hampered initially by the ‘traffic jam’ on the main road. The French had no such problem but they were out numbered – if the Austrians could bring their army onto the table.
General Le Courbe oversees the defence of France!
The initial part of the battle saw the French comfortably holding the Austrians in front of the Tile Factory. The Prussian detachment was able to flank the building and move to threaten the French right. Lecourbe was able to deploy his cavalry and push the Prussians into square whilst moving reinforcements to counter the threat. As the pressure built on the Tile factory the Austrians were presented with a relatively weak French right flank. All they had to do was to deploy their Cavalry brigade and bring on the extra Infantry brigade that was dawdling off the table…
Prussians attempt to by-pass the tile factory, only to be met and contained by the French reinforcements.
The Austrian Cavalry failed in six turns to throw a command roll of 8 or less!!! Clearly, the Austrians thought that they were going to a dance, but didn’t even send the three and four pence!!! With no reinforcements to exploit the weakened flank. The French tied all of the Prussian infantry into squares and began to out-shoot them, bringing them close to breaking point. Although the Austrians did eventually manage both to deploy their cavalry and break the French Brigade defending the Tile factory, the game had reached it’s end in the allotted twelve turns. It was a tactical victory for the French who were then able to fall back in good order ready for the next battle.
Battle Two The defence of Chavvanes-sur-L’etang. The Prussians push on!
After a bit of scenery shifting by Andy, we were ready to fight the next scenario, the defence of Chavannes-sur-L’etang. The Austrians were again partially deployed off table but this time, there was a bit more space for them to deploy and the main bulk of the army was soon threatening the French, who were deployed in and to the rear of the Village. Once again the Prussians moved aggressively forwards onto the right flank of the French. This time they by passed the village, leaving their Artillery and Austrians to deal with this threat. The initial stages of the game were dominated by 5, yes, 5 blunders during the orders phase with 4 for the Austrian/Prussian alliance and one for the French. Although not fatal for either side, the result was that the Austrians were once again slow to deploy and support the Prussian advance. The Austrian cavalry were doing their version of the Hokey Cokey – In Out- In Out of the game!
The Austrians attempt to pound the Village into submission!
Despite these tribulations and the difficulties in encountered in crossing the various streams, some progress was made by the Alliance, with a French battalion being destroyed in the village and the Prussians driving off an artillery battery on the right. Lecourbe kept his cool and was able to steady the line. He sent a replacement batallion into the village, reinforced the right flank with an infantry battalion and sent his cavalry to hold the Austrians to the left.
An aggressive move by the French cavalry holds the Austrians
The Prussians charged home, threatening to break yet another French battalion, but the French were able to pass their morale test, hold on and lock the Prussians in a vicious hand to hand combat that continued over the next couple of turns. Although eventually beaten back, the French had inflicted sufficient casualties on both of the Prussian battalions to shake them causing the brigade to fall back. The supporting Austrians were too late to help out and unable to exploit the weakening French right flank. Meanwhile, on the left, the Austrians tried to push through the French cavalry, only to be counter charged and were soundly beaten! The Austrian cavalry then managed, to not only fail their morale throw, but the supporting units also broke as well. The Allied advance was in tatters and the French were victorious!
The Prussians fail to break the French in combat and are periously close to losing the brigade.
We then moved onto the third scenario which was a skirmish game. Unfortunately, I did not take pictures and so will not include it in the report. In view of the superb French performance, it was clear that Pete had done Lecourbe and France proud and won the day! In real life, Lecourbes campaign was described as a “master class in defence” which Davout thought worthy of a Marshal’s baton. Sadly, worn out by his exertions, Lecourbe died in October 1815. His name is inscribed on the Arc de Triomphe – a well deserved recognition of his achievements.
The French Cavalry charge home and are victorious! Both Austrian Cavalry regiments break as well as the supporting Austrian Infantry!
The event itself was, as always, a very pleasant and enjoyable day. My only regret was that I was so engrossed in the games that I did not attend any of the Lectures or have a chance to browse the books on sale! We had a good number of people through to watch us and to join in with the games. Wargaming isn’t really a spectator activity but I hope that those that did get a chance to roll dice and make some of the command decisions enjoyed themselves. As always, it was great to meet up with friends and like minded hobbyists.
Bingham Napoleonic days Look out for the 2021 event!
We are very much looking forwards to next years event. If you are available in early March, put a note in your diary. Entry to the event is free and I know that the programme of speakers will be of the usual top quality.
THE COMMERCIAL BIT
To get full details of the Bingham Napoleonic days, including a list of speakers, click here:
Almost all of the paints, miniatures, bases, basing materials and anything that you are likely to need for your hobby are available POST FREE from my shop here:
Trent Miniatures make a lovely model of General Lecourbe ( as well as a few other revolutionary Generals!). I you would like a Le Courbe to lead your army you can get him here:
After my diversion with the wolf enclosure last week, it was back to the projects on my work bench. With storm Dennis causing mayhem across the country, it was a good weekend to spend safely indoors painting model soldiers. I had two items that I wanted to complete. The priority was painting a couple of models of Richard III emerging from his tomb under a Leicester car park! I’ve already posted a picture of one the completed models on our Face book page – I’ll detail how I went about painting and converting him in next weeks blog. Here’s a picture of the original version.
Richard Triumphant!
The other project that I wanted to complete was a batch of 6 Warlord games Prussian Jaegers, who would be bolstering my force at our demo game at the Bingham Napoleonic days in March. To be honest, I didn’t really need to paint them but I had a spare pack at work and it would give me an extra unit of Jaegers to use in the game, either as a small unit or as Skirmishers in front of a battalion attack column.
Bingham Napoleonic days
The Bingham Napoleonic days, now in their fourth year, take place on the 6/7 March at Longacre Studios in Bingham. As usual I will be with my gaming buddies, the NG13 gamers and we will be running a series of Demo games based loosely on General Lecourbes campaign against the Austrian army after the battle of Waterloo in 1815. There is a link to the Bicorne site in my Commercial section below giving more details but it’s worth pointing out that if you are at a loose end, entrance to the event, including the lectures, is free. It’s not the biggest show that you are likely to attend – possibly the smallest and definitely the least commercial, but if you fancy a drive out to the Nottinghamshire countryside and a pub meal, it’s a nice way to pass the day.
Prussiajn Jaegers – primed and ready for painting
Back to the jaegers – I should point out that the Prussians weren’t involved in the original campaign but we have included them to add some colour to the table and give me an excuse top dust off my Prussian contingent! I followed my usual painting method for churning out units for my Napoleonic army – Prime, block paint, Quick shade and base.
Block paint started – first colours on
I’m not going to detail the colours for the simple reason that I was a bit lazy when it came to researching them. I usually spend a bit of time finding the correct colours but on this occasion although I consulted both my Osprey books and the Mont St John web site, Pinterest and of course, the painting sheet that comes with the Perry Miniatures Prussians, the details seemed to be confused. I sort of lost patience in trying to work out the correct facing colours and exact uniform and just decided to copy the painted models on Warlords web site.
Prussian Jaegers – detail added prior to quick shade
This means that they wont technically fit in with my Silesian Prussian regiment but I quite liked the red facings for a change! So they will appear on the wargames table with the Silesians, regardless!
Jaegers based
Once they were painted with quick shade and matt varnished, I started the basing process. I spread Vallejo dark earth mud texture paste on to 20mm square MDF bases and ‘plonked’ the figures into the paste, using a sculpting tool ( a cocktail stick would have been fine!) to draw the paste around the figures bases and blend them in. There is no need to glue the figures to the bases, the paste will hold them securely. It was then just a question of tidying up the edges, painting the bases and adding some scatter and tufts and another six figures are ready for the wargames table.
All based up – just waiting for the tufts!
Not the most ‘loved’ of projects that I have done but sometimes it’s nice just to get another unit off the painting bench, even if that means dropping standards a bit!
THE COMMERCIAL BIT
To get full details of the Bingham Napoleonic days, including a list of speakers, click here:
If you want to join us for the wargame, we are there on Saturday only but you are welcome to find us out in the back room and have a chat, may be roll some dice and of course discuss why a batch of Jaeger are in the wrong facings!
Almost all of the paints, miniatures, bases, basing materials and anything that you are likely to need for your hobby are available POST FREE from my shop here:
Lets start with what’s off the work bench! I’ve finally finished the battalion of Black Watch Highlanders that I started back in September. It’s taken nearly two months to get these finished and based, although my usual painting routine has been interrupted by a holiday and other domestic events. I have had to do some decorating, although I’m sure that this qualifies as mental cruelty. Some how, gloss painting doors and emulsioning the walls and ceiling of the bathroom doesn’t have the same appeal as painting model soldiers! That said, I have been dragging my heels with this project, so it was good to get them based and in the cabinet ready for the next Napoleonic wargame. Of course I have been working on other projects – WOTR Crossbowmen and the new DeeZee cavemen, so I cant really blame the decorating for the slow turnaround of the Highlanders!
The Black watch completes my Highland contingent at Waterloo.
I will now get back to my growing WOTR army. I have just about enough figures to game using our current big skirmish/small battle rules set, ‘Nevermind the Bill Hooks’. However, I do intend to build the Army to give me a bit more flexibility and the possibility of having enough figures for two players. I have now defined exactly what I need to complete this project. My WOTR army will consist of:
One unit of 12 Archers.
4 units of 12 Archers of which two are finished.
One Unit of War of the Roses Billmen.
4 units of 12 Billmen of which only one is complete.
One Unit of FootKnights
3 Units of 12 Foot knights – all completed – actually it’s unlikely they will ever all be on the table with the army and for the time being, I’m using one of these units as Billmen.
One unit of Pikemen (Crossbow men in the background)
2 units of Pikemen to form a Pike block – one unit completed, the other underway.
Six Mounted men at arms -the rules set that we use has units of 8 cavalry.
1 Unit of 12 mounted men at arms – Completed
1 Unit of 12 Light cavalry – yet to be purchased
The above will be deployed in units of 8’s and as with the Foot knights, I probably will have too many cavalry but will have options!
Unit of Hand gunners
1 unit of 6 hand gunners – completed
Unit of Crossbowmen
2 units of 6 Crossbowmen – Completed
one unit of Skirmishing Archers
1 unit of 6 skirmishing archers – completed
2 Artillery pieces – yet to be purchased.
Once this list is complete, my WOTR project will be more or less complete, although I suspect I will add a few character figures along with some baggage pieces and of course, some scenery. So this gives me about 84 or so figures to paint, plus the artillery.
Pikemen on the painting board
The pikemen are already on the painting table and in order to complete the unit, I’ve had to put a few men at arms with spears and command figures in the block to make up the numbers. It will just about pass though and should look good enough on the table.
So the plan is to complete this army for the end of the year, so that I can start the New Year with a fresh project. Quite what that will be I have yet to decide. I have a Napoleonic Caribbean force to get finished and I have a few Indian wars/AWI models in the lead pile. Perhaps I might finally get on with painting a few tanks for WW2…..
THE COMMERCIAL BIT
We carry the full range of Perry’s Plastic sets and supply them post free to most worldwide locations at the time of writing. You can see the WOTR sets here:
This website uses cookies to improve your experience. We'll assume you're ok with this, but you can opt-out if you wish.AcceptRead More
Privacy & Cookies Policy
Privacy Overview
This website uses cookies to improve your experience while you navigate through the website. Out of these cookies, the cookies that are categorized as necessary are stored on your browser as they are as essential for the working of basic functionalities of the website. We also use third-party cookies that help us analyze and understand how you use this website. These cookies will be stored in your browser only with your consent. You also have the option to opt-out of these cookies. But opting out of some of these cookies may have an effect on your browsing experience.
Necessary cookies are absolutely essential for the website to function properly. This category only includes cookies that ensures basic functionalities and security features of the website. These cookies do not store any personal information.